Intercompany project invoicing in practice: Process
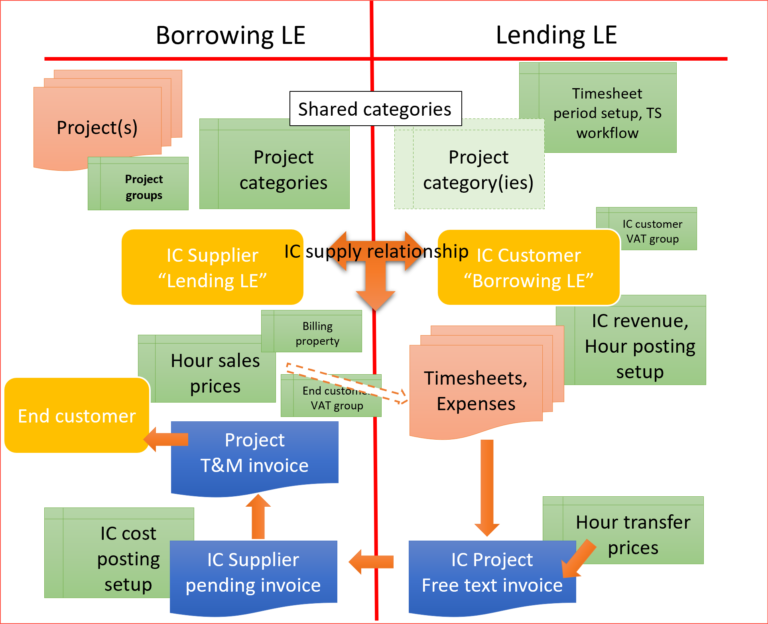
With the Intercompany project invoicing in practice: Setup in place, let’s proceed with the business process step by step.
Timesheet entry
Go to Project management and accounting > Timesheets > My timesheets and create a new one. People often experience issues here for the first time. These may be traced to 2 possible causes: a wrong/missing user-employee relation and/or missing timesheet periods or timesheet weeks records (every employee has a set of his/her own: refer to Part 1, Show/Update timesheet periods).
Pick the borrowing Legal entity, and the list of the eligible projects becomes available. All the constraints in the borrowing entity are respected: the project stage, a possible worker/project validation, billing Line properties etc. Unfortunately, this goes as far as to the extraction of the final sales price to the end customer and the ultimate customer-facing VAT group from the borrowing LE side. These parameters are ‘frozen’ once the timesheet is posted in the lending entity, but the game is not yet over: one can fix them after.
Perhaps the most critical flaw in the design of intercompany timesheets is the derivation of the financial dimensions: the project financial dimensions do not propagate the lending entity at all, despite the common chart of accounts and accounting structures. Instead, the employee dimensions are taken, and nothing else. This is going to hit us hard at the moment of the IC free text invoice booking, because the revenue account structures very often require a cost/profit centre, a line of business dimension and so forth.
The workaround may be to set the P&L dimensions in every employee card (which is awkward and may not always fit) or to extend the /Tables/TSTimesheetLine/Methods/initFromProjTable method.
The issue is aggravated by the fact, that an entity-backed Project ID dimension cannot span multiple legal entities, while the project itself obviously can! A common ‘solution’ is a custom or a manual Project ID financial dimension (business case: booking an asset depreciation against a project, booking service revenues against a CAPEX project and so on).
Either way, as soon as the first hours have been entered, they already appear in the Manage / Pending transactions view with the final sales price to the customer:
Submit the timesheet to the Workflow in due time, get it approved (learn the Reassign button in the Workflow history). The timesheets may either be configured for the automatic posting or they may be posted manually in the Project management and accounting > Timesheets > Unposted timesheets list. Beware that no Project transactions (ProjEmplTrans) get produced, the transactions are still “pending”.
Intercompany customer invoice
Run the Project management and accounting > Periodic > Project invoices > Create intercompany customer invoices function to collect desired types of transactions and bill them at once to the borrowing IC partner.
The result appears on the Project management and accounting > Project invoices > Intercompany customer invoice list: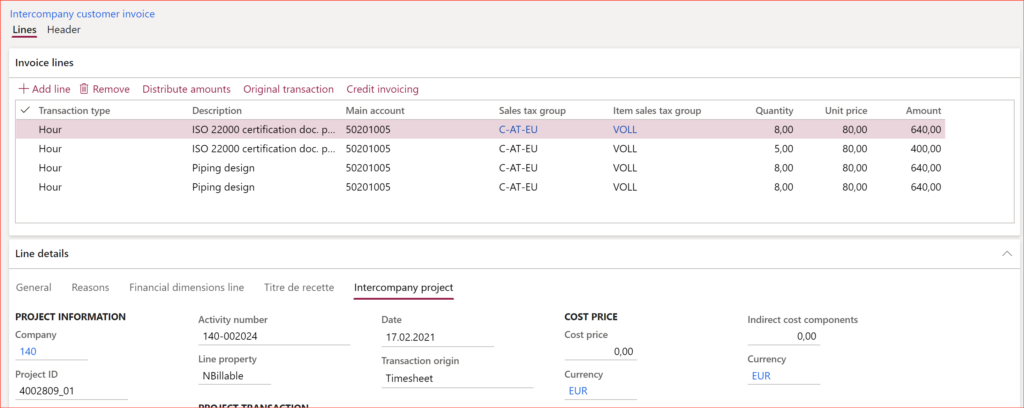
In essence, it is a usual free text invoice with a few project extras. Every timesheet day results in one IC customer invoice line (!) and the printout may be quite long. To preview the invoice, use the common Sales ledger (en-us: Accounts receivable) > Invoices > All free text invoices form. Once the invoice is created, the pending project transactions in the borrowing LE disappear for a short moment of time.
Should anything be wrong, the invoice may be simply deleted and re-created at will. You cannot correct the source dimensions in the timesheet anymore, but the dimensions or the accounting distribution in the free text invoice may be amended… line by line.
Post the invoice. This is the moment when the system makes a copy of it in the borrowing legal entity as a Supplier pending invoice; the transactions reappear on the pending project transactions list.
Pending supplier invoice
In the borrowing legal entity, locate the Purchase ledger (en-us: Accounts payable) > Invoices > Pending supplier invoices. The IC invoice must be there with the free text invoice number from the lending entity. The lending LE financial dimensions have been overwritten with the dimensions of the project in the borrowing LE.
This is the fist chance to fix timesheet errors by amending the Billable/Non-billable Line property, the final Sales price, etc. The quantities (hours) are better tended by adjusting the resulting project transactions, once the Supplier invoice is posted.
Namely, there is one key constraint to realise: there is no facility to cancel the original IC customer invoice in the lending entity, therefore no legal options to fix it in terms of the cost amount (i.e. the transfer price), quantities etc. in the borrowing entity either. Game over. The lending entity may only issue an all-manual free text invoice for the disputed difference.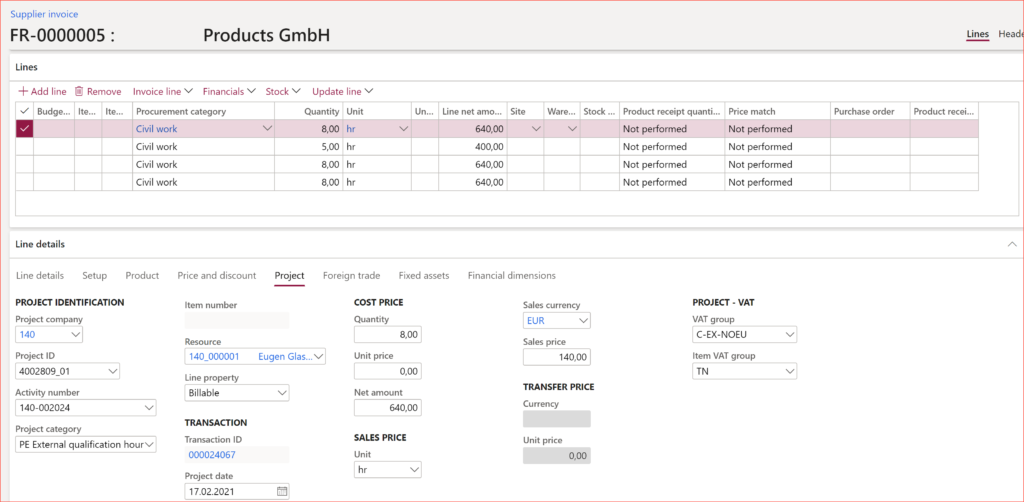
Post the invoice. The invoice lines finally appear as Posted project transactions in the project, where the sales price comes from the borrowing LE and the cost price = transfer price originates in the lending LE.
Note one weird thing about the transactions: the Origin is the Supplier invoice of the expense project transaction type, yet the categories are the hour categories. The project date is the original date on the timesheet (there used to be a bug around that, but it was fixed).
This concludes the specific intercompany part of the process. In the case of a Fixed fee project, it all ends with the cost, WIP and the revenue recognition at the end of the month. In the case of a Time and material project, the hours and/or expenses may be billed regularly:
Project proposal → [Invoice proposal workflow] → Project invoice, either detailed or condensed.
Project Management and Accounting blog series
Further reading:
Dynamics 365: Migrating fixed price projects and WIP balances
Advance payment invoices in Fixed fee projects in D365, D-A-CH style
What Item requirements can’t do
Revenue recognition with project budget shadow forecasts
Intercompany project invoicing in practice: Process
Intercompany project invoicing in practice: Setup

