Canvas sections in D365 Configurable Business Documents

Bill of exchange
Bill of exchange

Canvas sections in D365 Configurable Business Documents

Embedding static sections of a fixed width and length into configurable Business documents in Excel seems to be hard to impossible, but it is not. An example can be an American pre-printed Cheque or the notorious French Bill of exchange at the end of the invoice. The section may not span 2 pages, i.e. it should be kept together to be torn off or scanned by the bank OCR system. This cannot be achieved by merging cells but with floating graphical elements only. Follow the below advice how to make it:

  1. Better use Excel. The mapping of an Excel file to an Electronic Reporting format configuration is based on the named ranges (name manager), a mapping of a named Text box in a drawing is also possible. It is not necessary to attach an XML schema to the Excel file, the design of an Excel report is a simple WYSIWYG exercise.
  2. You cannot use the Configurable business documents UI, because the changes needed are intricate and can hardly be made in the online Office 365. You have to locate the exact format in Electronic reporting (here: Sales invoice (Excel) (FR)), open and save the attachment with the template on your computer, amend it, upload it as an attachment and reassign to the root node in the format Designer.
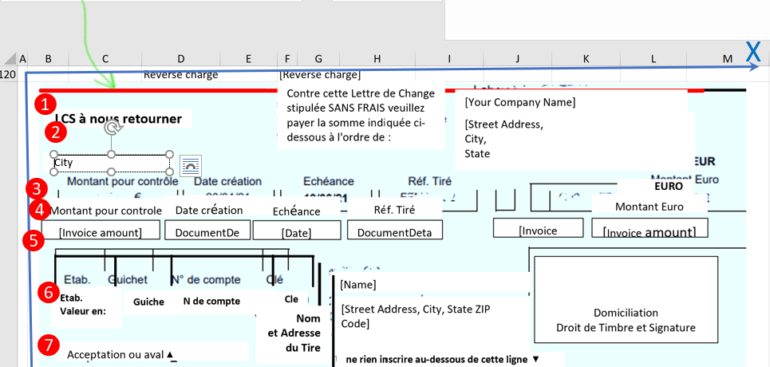
  3. Figure out the exact width of the paper by printing the document. Check at which column the page boundary begins (here: M-N).
  4. Capture a raster image of the section you have to embed and paste it as a template into your document to position the vector elements over it nicely. Send it to the background and resize carefully to match the full page width (here in the background, cyan stained).
  5. The drawing elements get anchored by Excel to the adjacent cell, and to maintain the relative positions they should be floating inside of a large merged cell of the size of the whole section (here: $B$121:$M$121). The outer boundaries of the elements shall not cross the boundaries of this mother sell. Make the row a named range which will be holding all the boxes and images (here: BoE for the bill of exchange).
  6.  The Electronic Reporting may only work properly with Text boxes and Images. Everything must be rendered with text boxes.
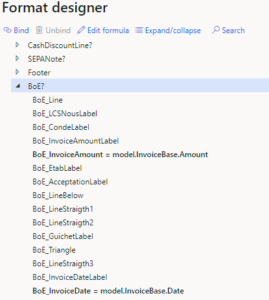
  7. To address and populate the elements in the Electronic Reporting format definition, they must be named ranges* in Excel (here for the red line: BoE_Line).
    * Not really a range but a named/renamed element of a drawing. The ER engine is going to multiply them – in theory – and a BoE_Line element becomes BoE_Line1 etc. in the final output.
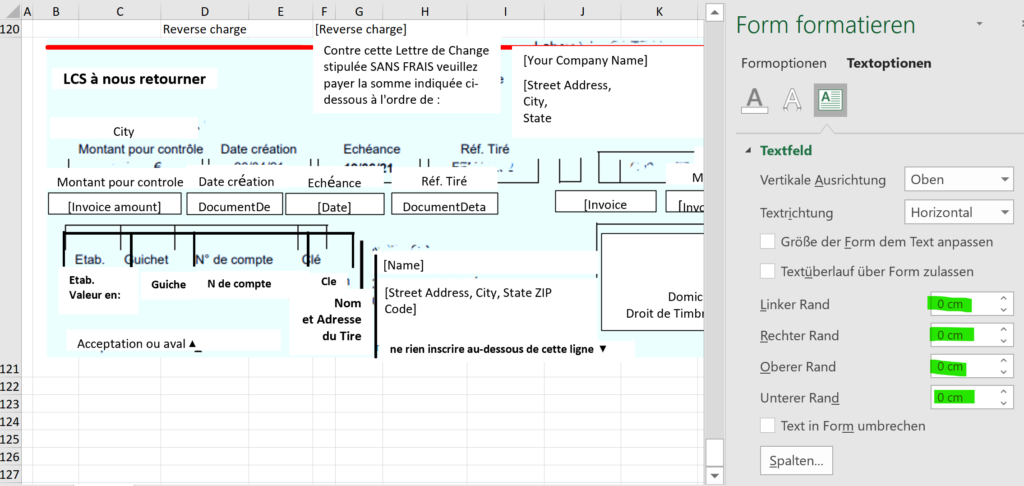
  8. The Electronic Reporting cannot currently place circles, lines or any other geometric form properly. The little triangles in this example have been drawn with Unicode symbols like “∇”. If you need to draw a line, it must be an empty Text box with a height of around 0,03 cm and an opaque line around of the given thickness divided by 2. The inner boundaries of the text must be all zero, otherwise the ER will corrupt the width, the position and the line type and make it disappear:
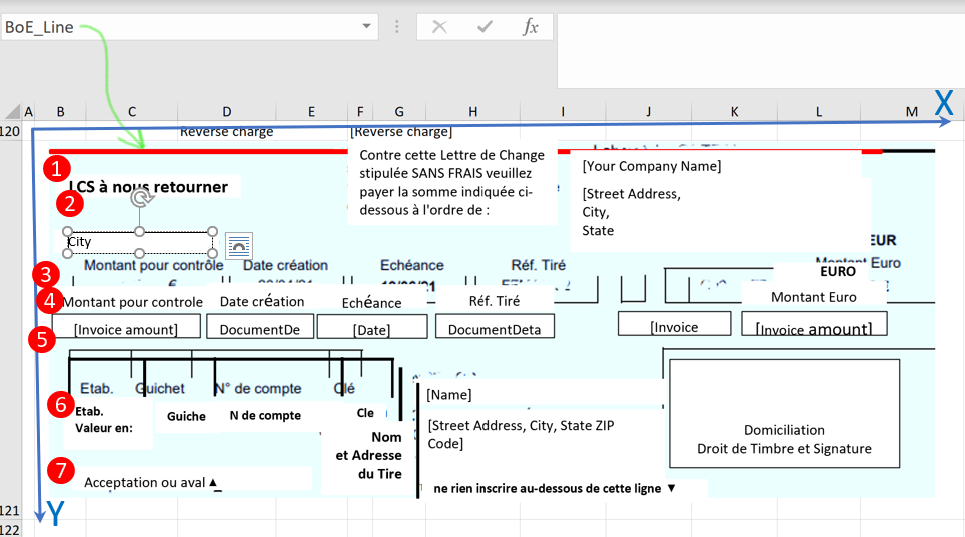
  9. Every element (including the “lines”!) must be explicitly listed (listed, not necessarily mapped!) in the format definition as a cell or range, otherwise the graphical object remains linked to the absolute number of the adjacent cell (e.g. B121) and starts floating all around, appearing in the middle of the invoice when you print it.
  10. The objects must be in the proper order, or the ER Designer is going to warn you that “The range BoE_Line must be preceded by the range XXX“. The sorting order is a bit special. If the cells are sorted by {ROW, COLUMN}, the drawing objects are apparently sorted by the cartesian coordinates {X;Y} of the upper left corner, from left to right, then from the up to the bottom (which is a theoretical aspect, since it is hard to place the elements at exactly the same X coordinate by drag and drop only). See the above enumeration 1-7, the upper line starting the leftmost.
  11. Test and print your report with a proforma document often. If you don’t know how to test an ER configuration in a Draft status, here is the sacred answer: Electronic Reporting (ER) Cookbook 2: new tips from the kitchen.
  12. The raster image shall be removed in the end, of course, it is too cheap a solution for the static texts and lines.

Conclusion

To avoid all this mess, you may try to convince the customer that negotiable instruments from the XVIII-XIX centuries may become obsolete in the XXI (you know: the wire payments, SEPA, blockchains and Co…) Good luck with that.

Find and merge a DimensionAttributeValue

Find and merge a DimensionAttributeValue

Recently I was given an opportunity by an American partner to develop something around dimensions in Dynamics 365 for Finance. A few years ago, my blog Get a cost center in D365FO resonated quite a bit, this time it goes deeper.
The task is generally to enrich a source document with a dimension [segment] according to the custom business logic, and it is one of the most common customizations in D365FO.

In this particular case, I had to put the Intercompany dimension into the GL transaction every time the respective company was involved in an IC exchange. Naturally, the IC dimension should be an entity-backed one, it should be! A few times I had a debate why didn’t we make a custom [free text] dimension for the intercompany: some legal entities were not in the D365 implementation scope [yet]. “At the headquarters D365 will only be rolled out in 2028!” The argument is flawed, since it only takes 3-5 minutes to create a new legal entity in D365 with the given ID and name.

The task can be decomposed into the following steps:

  • Identify the dimension attribute in question.
  • For the given legal entity ID (DataAreaID), find the corresponding attribute value.
  • Find a DimensionAttributeValueSet record for the given value, where the IC is the only segment populated.
  • Merge it with the existing dimensions of a transaction or a source document.

Identify the dimension attribute

The below dimension is backed by the Legal entity table CompanyInfo, in the demo company USMF it bears the name LegalEntity:

We won’t look it up by the name though, but the constant BackingEntityType, which is the number of the table. The developers did not use the TableID of the CompanyInfo directly, they abstracted the backend table with a view DimAttribute* as they did for every other ‘back-able’ entity in D365FO (Customers, Suppliers, Assets etc.) to only return the Key=RecId and Value=the symbolic 4 letters code of every legal entity, here in pseudocode *):

CREATE VIEW DimAttributeCompanyInfo
AS SELECT RecId AS KEY, DataArea AS VALUE, …
FROM CompanyInfo

*) I call it pseudocode, since a CompanyInfo does not physically exist in the database. It’s rather a DirPartyTable record. This is probably the reason why the views were put on top: the DirPartyTable does not only hold legal entities but also cost centres, departments, other organisations.

The below snippet will return the RecId of the dimension LegalEntity in D365 demo database, its performance is reinforced with the global cache:

public class DimensionICHelper
{
private const GlobalObjectCacheScope sgocScope = classStr(DimensionICHelper);
private const int sgocKey = 1;
public static DimensionAttributeRecId getICAttributeRecId()
{
SysGlobalObjectCache sgoc = classFactory.globalObjectCache();
DimensionAttributeRecId ret;
[ret] = sgoc.find(sgocScope, [sgocKey]);
if (! ret)
{
ret = (select firstonly RecId from DimensionAttribute
where DimensionAttribute.BackingEntityType == tableNum(DimAttributeCompanyInfo)
&& DimensionAttribute.DimensionKeyColumnName /*active*/).RecId
;
sgoc.insert(sgocScope, [sgocKey], [ret]);
}
return ret;
}
}

See also Get a cost center in D365FO.

Find the corresponding attribute value

The financial dimensions do not relate to the original records in the backing table (aka EntityInstance; here: CompanyInfo) but the global DimensionAttributeValue records. These only store references to the “Entity Instances”. The below code returns a DimensionAttributeValue for the given DataAreaID legal entity symbol:


public static DimensionAttributeValue getICAttributeValueByDataAreaId(DataAreaId _value)
{
DimAttributeCompanyInfo dimAttributeCompanyInfo;
DimensionAttributeValue icAttributeValue;
select firstonly icAttributeValue
where icAttributeValue.DimensionAttribute == DimensionICHelper::getICAttributeRecId()

exists join dimAttributeCompanyInfo
where dimAttributeCompanyInfo.Key == icAttributeValue.EntityInstance
&& dimAttributeCompanyInfo.Value == _value;

if (! icAttributeValue)
{
icAttributeValue = DimensionAttributeValue::findByDimensionAttributeAndValue(
DimensionAttribute::find(DimensionICHelper::getICAttributeRecId()),
_value,
false,
true); // Create if needed

}
return icAttributeValue;
}

The DimensionAttributeValue::findByDimensionAttributeAndValue() call is for an improbable situation where the backing record exists but its DimensionAttributeValue replica has not been created yet. They only do it as the legal entity (in general, an Entity Instance) is used as a dimension for the first time somewhere.

Try it for yourselves: in the demo AxDB, only USMF, USRT, USSI and DEMF are present in the DimensionAttributeValue table, while the General ledger > Chart of accounts > Dimensions > Financial dimensions, Dimension values form shows all 25+ potential ‘candidates’. Weird.

Find or create a DimensionAttributeValueSet

Next, let’s convert the dimension value found into a dimension “set” of only one entry, e.g. {USMF}. This corresponds to a DefaultDimension (the one without the MainAccount segment inside) of this kind:

Again, this Set may not exist. For example, imagine a holding with 100 companies, but only 4 are in intercompany relations with each other. Then the number of the DefaultDimensions will be in the range 0..4. What, zero?! It depends if any historical business case between the companies X and Y has ever been recorded in this D365 instance.

This is why the code is what it is:

public static DimensionDefault getDefaultDimensionForCompany(DataAreaId _value)
{
DimensionAttributeValueSetStorage valueSetStorage = new DimensionAttributeValueSetStorage();
valueSetStorage.addItem(DimensionICHelper::getICAttributeValueByDataAreaId(_value));
return valueSetStorage.save();
}

Merge the value with the existing dimensions

Finally, at some extension point we will be using the above DimensionAttributeValueSet according to some custom business logic. There may be 3 options:

  • We use the ‘naked’ default dimension as is (very seldom)
  • We merge it with another Default dimension in a master data record or in a source document (example: a new customer representing the IC company immediately becomes this segment populated)
  • We merge it with a LedgerDimension i.e. with a dimension set where the Main Account segment is populated (example: a GL transaction or a GL journal line of the Ledger AC type)

The 3rd case is the hardest since we have to convert the DefaultDimension into a LedgerDimension first, then merge:

DimensionDefault icDimensionDefault = DimensionICHelper::getDefaultDimensionForCompany(curExt());
LedgerDimensionBase icLedgerDimension = LedgerDimensionFacade::serviceCreateLedgerDimForDefaultDim(icDimensionDefault, ledgerJournalTrans.LedgerDimension);
ledgerJournalTrans.LedgerDimension = LedgerDimensionFacade::serviceMergeLedgerDimensions(icLedgerDimension, ledgerJournalTrans.LedgerDimension);

Bye-bye work report, welcome wave labels!

Bye-bye work report, welcome wave labels!

One of the common customizations of the Dynamics 365 Warehouse management module was the automatic printing of the work report [for the sales order picking work]. If the number of shipments exceeds a hundred per day, the electronic work list (Menu item type = Display open work list) on the Warehouse mobile device becomes unmanageable, and the distribution of the daily picking work amongst the warehouse workers requires printing and sorting of some carbon documents. This used to be the Work report in the Warehouse management > Work > All work list. However, it is better printed interactively out of the browser UI i.e., the supervisor requires a PC with a mouse, and the printing can hardly be automated / integrated with the other wave processing steps.

The latest Wave label printing – Supply Chain Management | Dynamics 365 | Microsoft Docs feature is the remedy;
In the Containerization scenario, the Wave label type is assigned to the respective level in the Unit sequence group:

Yet the Wave label printing can not only produce box labels after the system-driven containerization, but also simply print the picking work i.e., it will take the Work headers and Lines as a data source and send them to the label printer(s)!

Wave label printing setup

Activate the wave label printing feature on the Feature management screen. Add a new Warehouse management > Setup > Document routing > Wave label type.

The Wave label layout is by far more complex than the classic put-away routing layout. It consists of a Header and a Footer static ZPL code, and a dynamic Body ZPL part. With 0..N bodies per label, the Wave label feature may render complex business documents of a variable height, such as a Bill of lading.

The below sample layout prints just one label = header + body + footer for every Pick work line (see Wave label row settings, Rows per page = 1). Create a Wave label row settings / Row ID = XXX first, then use the proprietary <Row name =”XXX”>… </Row> closed tag in the Body section:

Header
^XA
^SZ2^JMA
^MCY^PMN
^PW810
~JSN
^JZY
^LH0,0^LRN

Body
<Row name="WorkLine">
^FT21,37
^CI0
^A0N,28,38^FDPicking label ¸ Eugen Glasow^FS
^FO17,54
^BY3^BCN,102,N,N^FD>:$WHSWorkLine.WorkId$^FS
^FT135,182
^A0N,28,38^FD$WHSWorkLine.WorkId$^FS
^FT21,276
^A0N,28,38^FDSales order:^FS
^FT214,276
^A0N,28,38^FD$WHSWorkLine.OrderNum$^FS
^FT52,236
^A0N,28,38^FDShipment:^FS
^FT214,236
^A0N,28,38^FD$WHSWorkTable.ShipmentId$^FS
^FT541,50
^A0N,34,46^FDPacking^FS
^FT541,85
^A0N,34,46^FDLocation:^FS
^FT589,133
^A0N,34,46^FD$WHSWorkLine.WMSLocationId$^FS
^FO640,235
^BQN,2,6^FN1^FS
^FT571,390
^A0N,28,31^FN2^FS
^FT651,216
^A0N,28,38^FDPart no:^FS
^FT146,316
^A0N,28,38^FDQty:^FS
^FT214,316
^A0N,28,38^FD$WHSWorkLine.QtyWork$^FS
^FT110,356
^A0N,28,38^FDBatch:^FS
^FO214,331
^GB266,30,30^FS
^FT214,357
^A0N,28,53^FR^FD$WHSWorkLine.FEFOBatchId$^FS
^XZ
^XA
^XFR:SSFMT000.ZPL^FS
^FN1^FDLA,$WHSWorkLine.ItemId$^FS
^FN2^FD$WHSWorkLine.ItemId$^FS
</Row>

Footer
^PQ1,0,1,Y
^XZ

In the Wave label template, the labels may be sent to different label printers depending on the picking Zone, for instance. Moreover, a separator – a zone Break label – may be inserted into the endless stream of picking labels for the tearing at the right place. This requires a sorting (see Edit query) by the Zone field and a Group by + Print break label option under Wave label template group. From my experience, more than one sorting / grouping level does not work.

Work label printing: test run

The above layout may be used not only for managing the picking work, but also for labelling the picked items for the end customer with the sales order / shipment / transport package ID:

To test the labels, create a wave step code “Label Printing”, and add the waveLabelPrinting method to the Wave template right after the work creation step. Release some test sales orders to the warehouse, then Process the outbound wave.
A warning “There is no unit for the … wave label type on the … unit sequence group. Wave labels are not created for the … item” may be shown, but it may be ignored. A stream of labels should come out of the printer, one per picking work line for every work header created.