

The below instruction was inspired by the blog How to access AX 7 from other machine. However, I work not on a single notebook, but connect to a prosumer 6-core Windows Server 2016 machine with 32 GB RAM, 1 TB M2. SSD. The resulting performance is comparable – if not higher – to a D365 production instance.
Onebox in the LAN
- The first [time consuming] step is to download the latest Dynamics 365 for Finance and Operations, Enterprise edition 7.3 with Platform update 12. Once downloaded, unpack the 10x3GB RAR archives to a fast disc, preferably SSD. The Connect site some of us have been using semi-officially to download the latest releases and betas has been retired,
but the latest VHD is available here: https://aka.ms/finandops73pu12, God knows for how long.Update 27.03.2018: the above SharePoint link has expired too. Use LCS to download the image. - Install the Hyper-V role to the Windows Server, should it has not been done before.
- In the Virtual Switch manager of the Hyper-V manager, create a new Virtual Switch of the External network type, and Allow management operating system to share this network adapter:
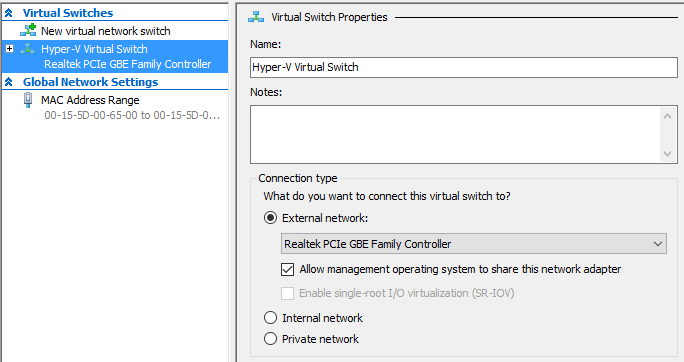
Contrary to this advice, there is no need for another Internal network, because the virtual machine is going to be an equal peer in the LAN, visible under a local IP address. Should your physical server be assigned a fixed IP and running its own DHCP service, note the IP address down before applying the changes, because the Hyper-V switch is going to take place of the original Ethernet connection and become the primary ‘gate’. - Next, create a new Virtual Machine in the Hyper-V manager. Generation = 1, attach the VHD you have unpacked at step 1. Give it dynamic memory; a Dynamics 365 Onebox running under full steam consumes between 8 and 12 GB of memory. Hence, for a comfortable experience your physical server should possess no less than 24 GB RAM. Give the machine the Network Adaptor from step 3. An Automatic Start Action (delayed) makes sense for an always on, accessible anytime virtual machine.
- Start the VM. It should be able to boot and join the local area network. Connect to the machine using the default credentials: Username = CONTOSO/Administrator, Password = pass@word1 (you will be asked to change the password ASAP). Be aware the EN-US keyboard is active by default.
FYI: for the SQL server Authentication in SQL Server Management Studio, the user name and password are going to be AOSUSER, AOSWebSite@123. - Once connected, make yourself comfortable in the virtual machine: assign your native keyboard layout, localization options and the time zone. Dynamics is not going to let you in, though, for the admin provisioning tool has not been executed yet. Let the Windows Server 2016 running in the virtual machine download and install the latest updates. It is going to take a while.
- Create a snapshot of the VM to rollback any changes to this virgin state, if needed.
- Run the AdminUserProvisioning tool from the VM desktop to associate your personal Office 365 tenant account with the Admin user in Dynamics 365.
FYI: the basic Office 365 Business Essentials subscription is as cheap as ~4 Euro a month. - Try the Internet Information Server and the Dynamics 365 application by typing in https://usnconeboxax1aos.cloud.onebox.dynamics.com in the browser on the VM. The External network connection is mandatory, because the application is going to authenticate you against the Azure Active Directory.
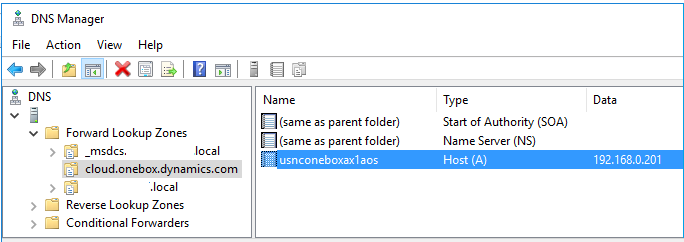
- In the meantime, open your DHCP management console and assign a fixed local IP address to the virtual machine by the Hyper-V virtual MAC address. The VM must have gotten a lease already under the name ‘MININT-F36S5EH’. This lease can be Added to reservation to make the lease persistent, e.g. 192.168.0.201
- What the C:\Windows\System32\drivers\etc\hosts file does to the local machine, so is the DNS server for the local network. In the DNS console, create a new Forward Lookup Zone cloud.onebox.dynamics.com, and add a New Host (A) usnconeboxax1aos with the IP address from step 10 into this zone. The FQDN of the virtual machine in the local network becomes usnconeboxax1aos.cloud.onebox.dynamics.com:
- To test the connection, you may temporarily turn the firewall in the VM off for the internal network, and try to ping the VM by the name usnconeboxax1aos.cloud.onebox.dynamics.com from a different host in the LAN, then navigate to https://usnconeboxax1aos.cloud.onebox.dynamics.com in the browser. The browser is going to show an SSL certificate error.
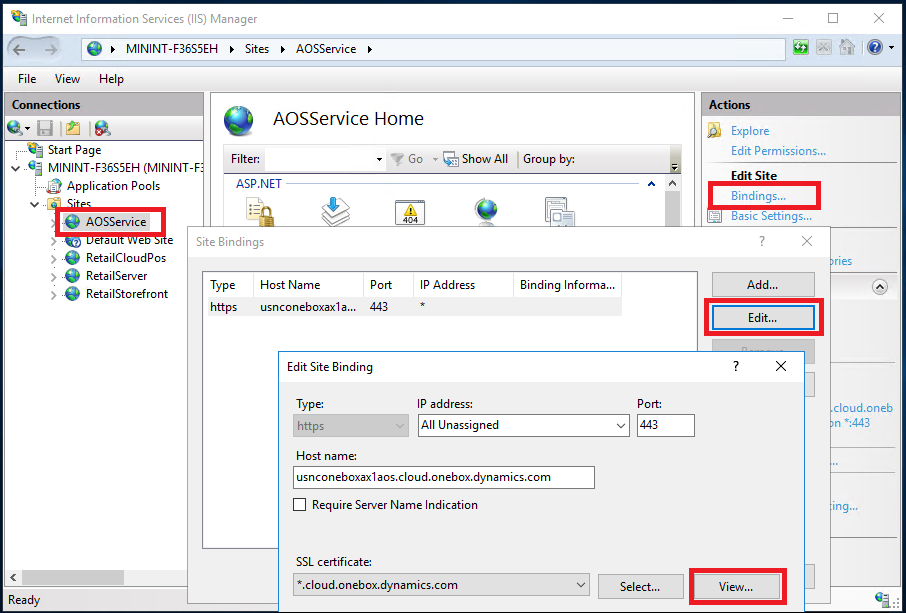
- To circumvent the warning, export the SSL certificate from the IIS in the VM by opening Bindings… of the AOSService site, then Edit… > View… > Details > Copy to File, then save the file in a local network share, since your VM is able to browse the local network.
- Install the certificate on your notebook into the Trusted Root Certification Authorities repository of your Current User by double-clicking the .PFX certificate file from step 13 (you may review or delete them if needed in the Manage user certificate console).
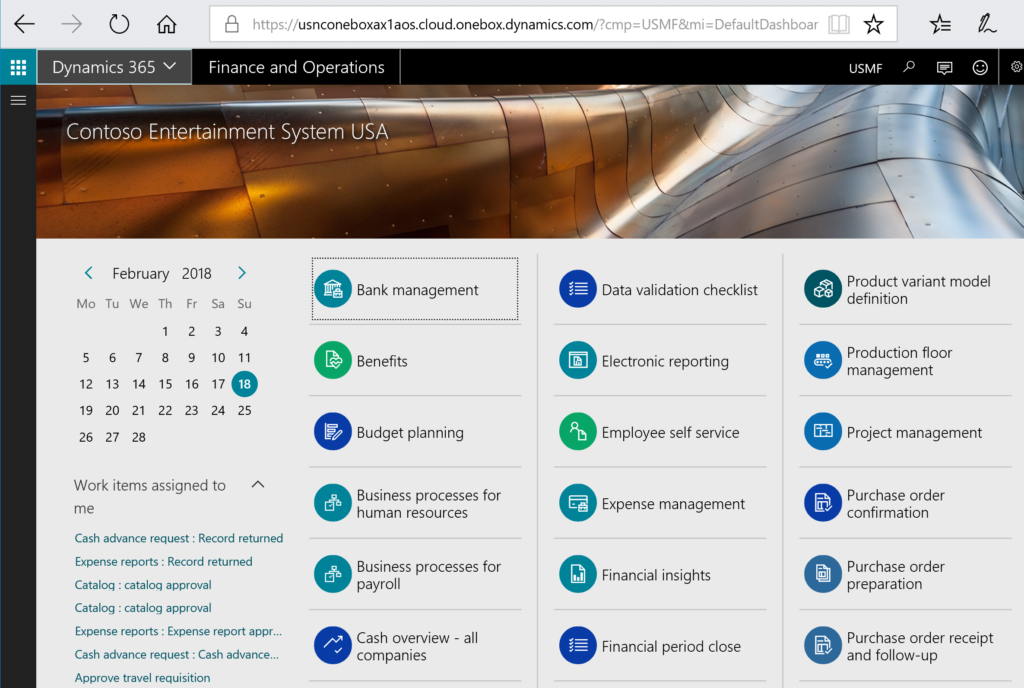
- Try https://usnconeboxax1aos.cloud.onebox.dynamics.com again, voila!
- Update 27.03.2018: In order to download Office files from the machine or to use the Data management module you need to re-configure the Azure Storage Emulator in the OneBox, otherwise an error appears on the attempt to connect to the address http://127.0.0.1:10000.
- Open the configuration file C:\Program Files (x86)\Microsoft SDKs\Azure\Storage Emulator\AzureStorageEmulator.exe.CONFIG and replace 127.0.0.1 with usnconeboxax1aos.cloud.onebox.dynamics.com at 3 places.
- Open the configuration file C:\AOSService\webroot\web.CONFIG and replace the encoded connection string with
UseDevelopmentStorage=true;DevelopmentStorageProxyUri=http://usconeboxax1aos.cloud.onebox.dynamics.com - In the Windows firewall, add a new Inbound rule and open the ports 10000, 10001, 10002 to the Private network.
Update 02.09.2019: The Azure Storage Emulator fails to release the 1000x ports on every VM restart e.g. due to mandatory Windows updates. Change the ports to 40000, 40001, 40002 in C:\Program Files (x86)\Microsoft SDKs\Azure\Storage Emulator\AzureStorageEmulator.exe.CONFIG, start the emulator, than restart the VM once more, set the ports back to 10000, 10001, 10002 and restart the emulator again. - Restart the IIS application and the Azure Storage Emulator.
Onebox in the WAN
Exposing the same machine to the WAN is difficult. Obviously, you do not own the domain dynamics.com, and for the global Domain Name System to redirect an HTTPS call to the external IP address of your router, you have to rename the URL of the Dynamics 365 application first. The old instructions here and here do not work anymore, since authentication attempts from a fake URL such as dax.erconsult.eu fail with the errorAADSTS50011: The reply address 'https://dax.erconsult.eu/' does not match the reply addresses configured for the application: '00000015-0000-0000-c000-000000000000’
Update 02.09.2019: This conundrum was solved by M.J. from the Netherlands: https://cloudtotal.blog/2019/08/tutorial-expose-a-dynamics-365-for-finance-and-operations-onebox-on-a-custom-public-domain/
Below is a copy of his work:
Connect the Warehouse Management App
- Follow the advice Install the Warehouse Management mobile app – Supply Chain Management | Dynamics 365 | Microsoft Learn up to the selection of the authentication method.
- Opt for the User-based authentication. Follow the guidance User-based authentication – Supply Chain Management | Dynamics 365 | Microsoft Learn. It is essential to have these 2 API permissions granted to your Application:

CustomService.FullAccess

https://erp.dynamics.com/CustomService.FullAccess

Resource APP ID: 00000015-0000-0000-c000-000000000000
https://graph.microsoft.com/User.Read
Resource APP ID: 00000003-0000-0000-c000-000000000000 - With regards to the user setup, you may find this blog highly useful: (6) User-based authentication (Device code flow) for the D365 Warehouse management app | LinkedIn
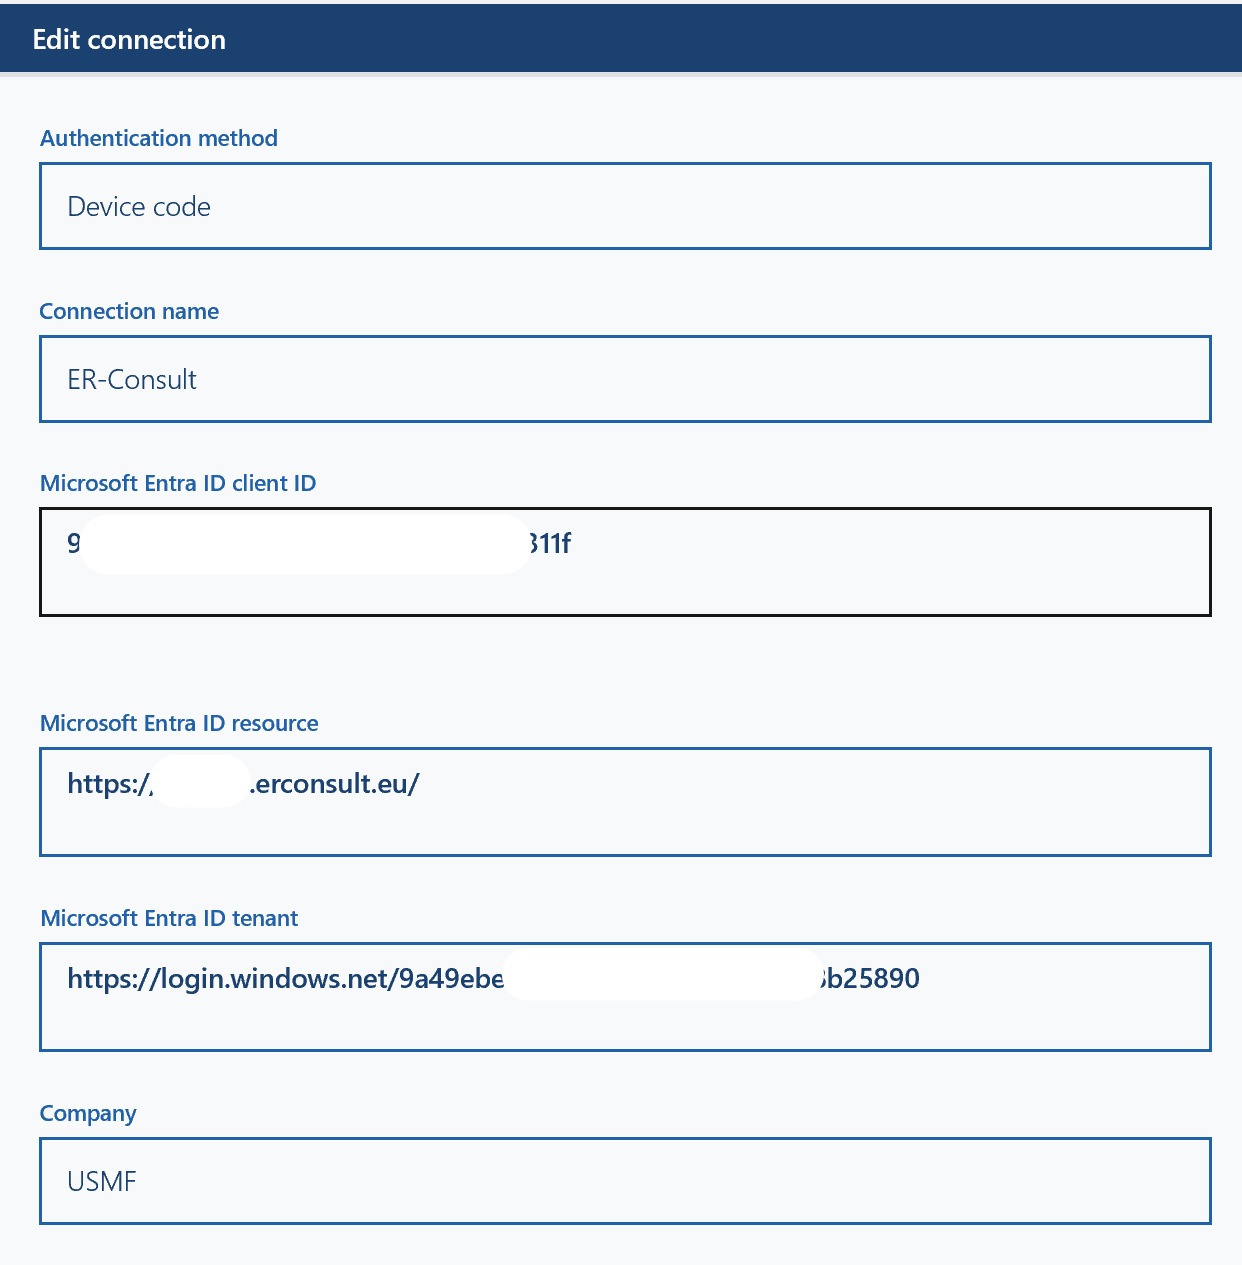
The connection settings will look like this: where the client ID is the Application ID, and the Entra ID resource is the URL of the Dynamics 365 for Finance and SCM application.
Dynamics 365 tips and tricks
Further reading:
SysFlushAOD: Refresh SysExtension cache in D365FO
Batch jobs in D365: a Russian roulette
Cross-company data sharing vs. Duplication in Dynamics
Refresh master data cache in D365FO
Number of records in D365
Overwrite a read-only configuration in D365FO
Copy-paste automation in D365 FO with a keyboard emulator
Make yourself an Admin in Dynamics 365 Fin/SCM
Exposing Dynamics 365 Onebox to the LAN