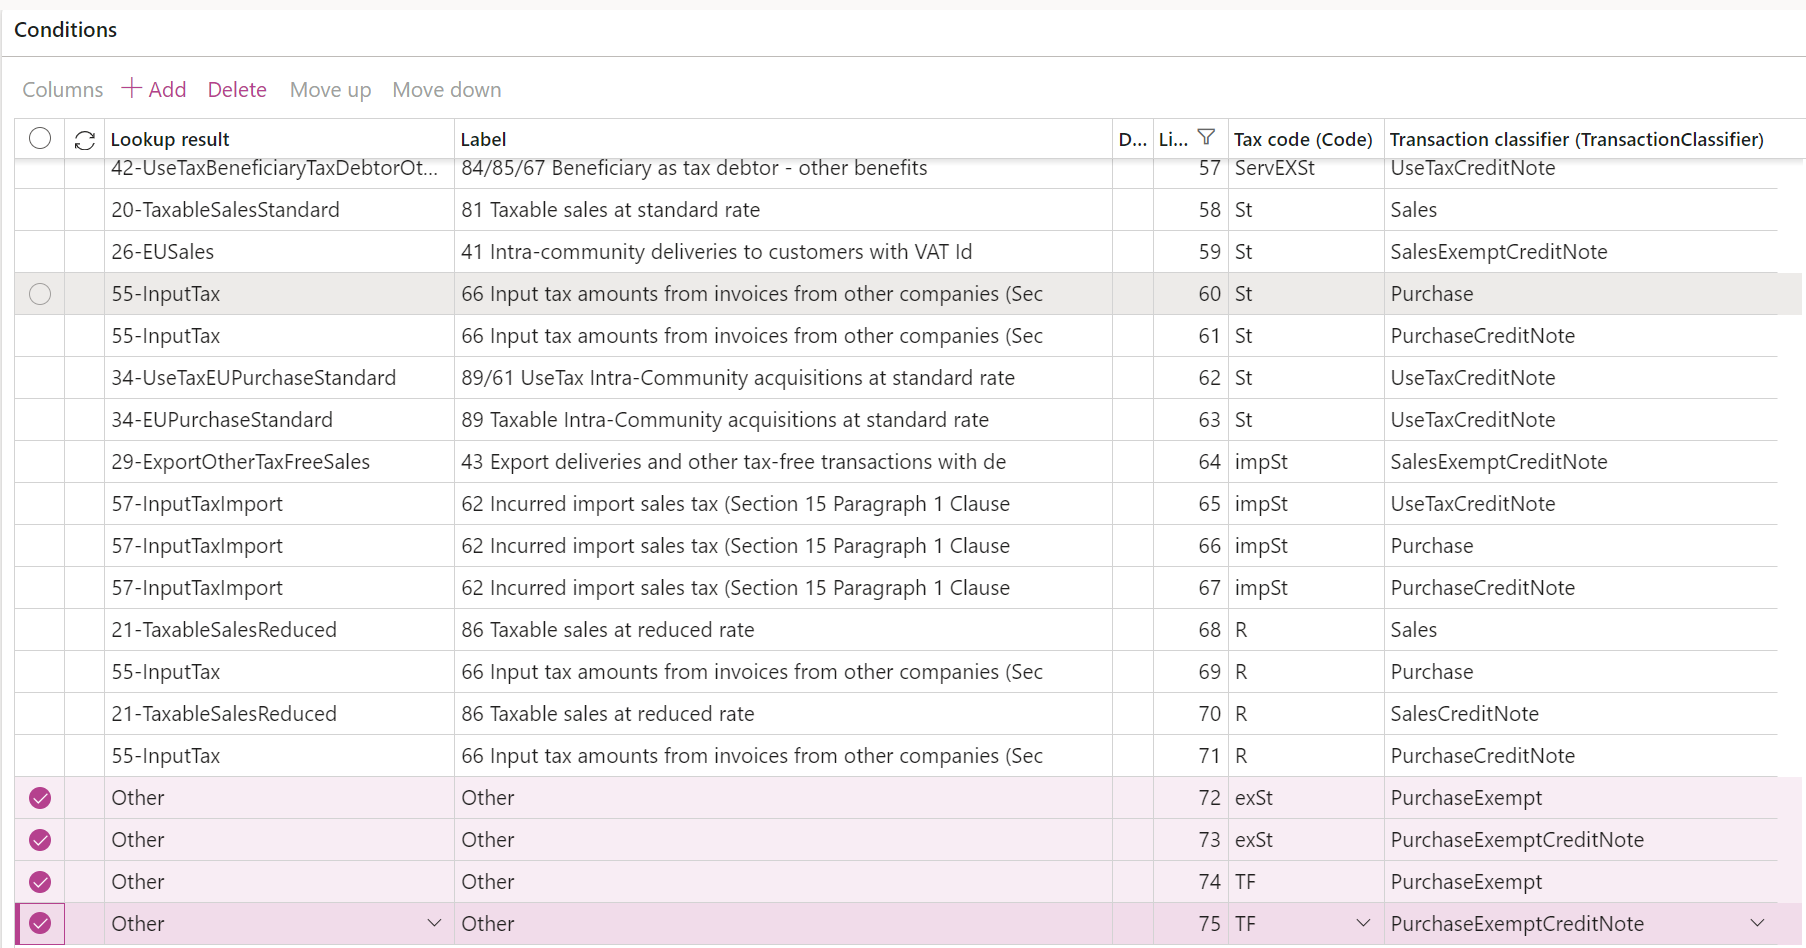
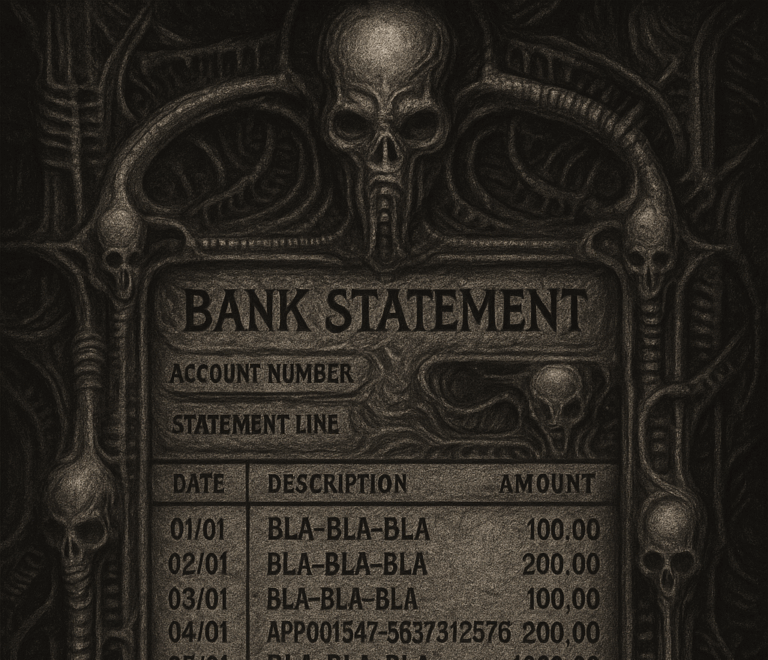
Here, the general ledger voucher APP001547 forms part of the <EndToEndId>. In the Microsoft ABR Camt.053 format, this element is written into the Description field of the imported bank statement line. The reconciliation matching rule (Cash and bank management > Setup > Advanced bank reconciliation setup > Reconciliation matching rules) can then compare the voucher number against the Description.
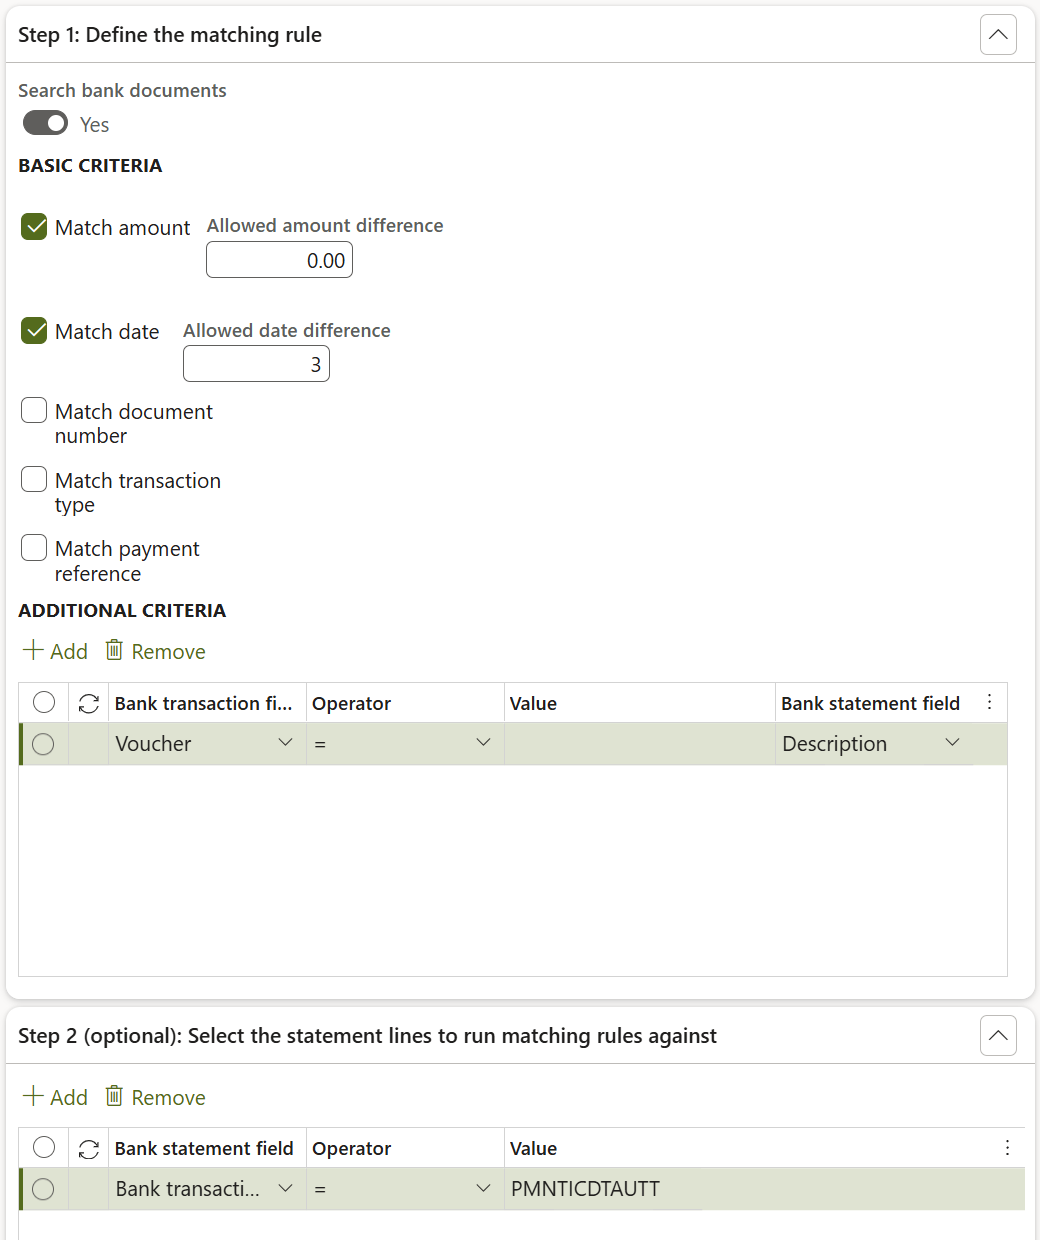
However, the Contains operator will not help, because the Description is longer than the voucher: the voucher does not contain, it is contained. The In operator (Voucher is contained in the Description) is not available here, and the less “<” operator if not going to help, either.
To carve out the voucher number only and let the exact match “=” operator to work, you may modify either the ABR Camt.053 format (where the XML file is interpreted) or the ABR Bank statement mapping to destination (where the parsed data is written to the bank statement entity).
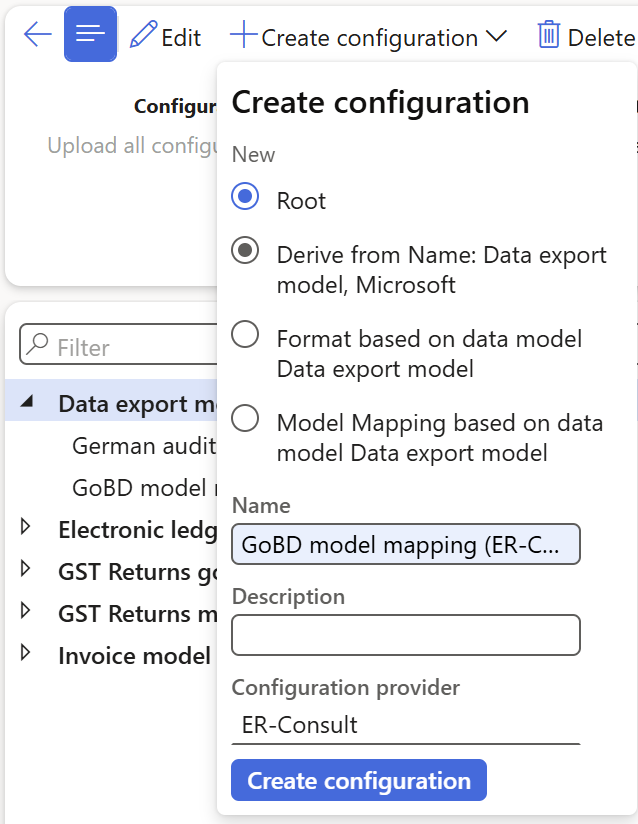
To adjust the format, open Organization administration > Electronic reporting > Configurations, find ABR Camt.053 format under Advanced bank reconciliation statement model, press +Create configuration to derive a new from the ABR Camt.053 format. In the Designer, open Map format to model and launch its Designer.
The DATA SOURCES to the left follow the XML structure:
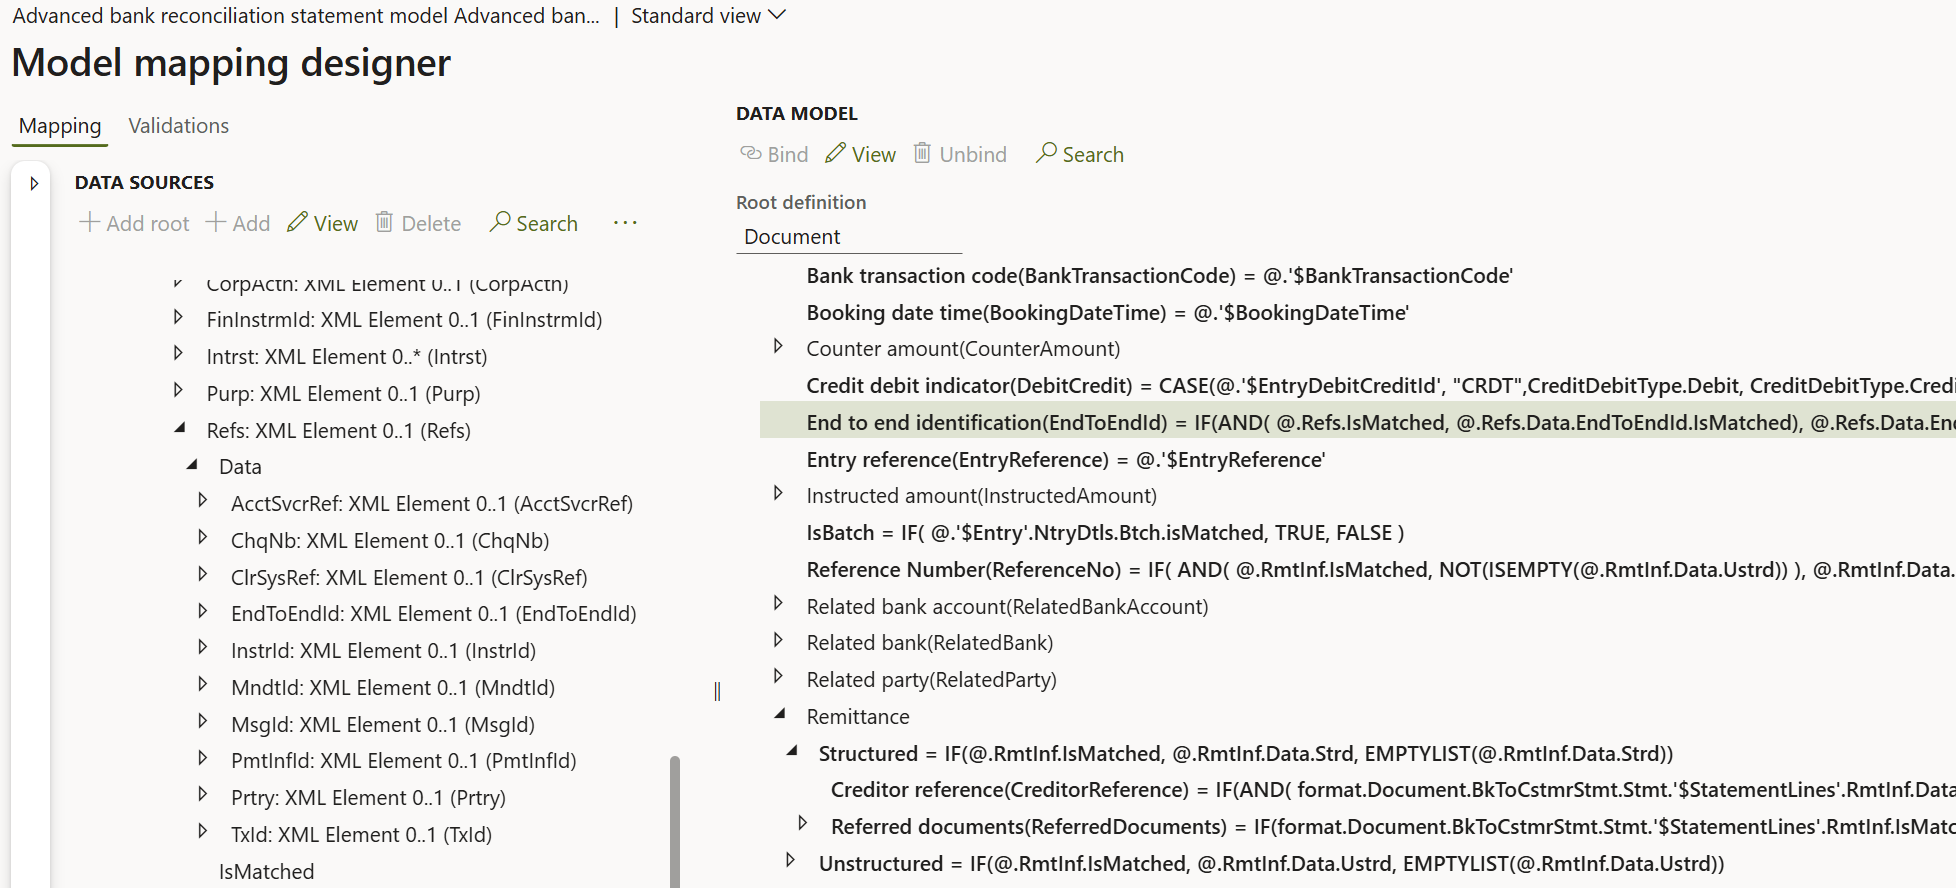
On the right side, …NtryDtls/TxDtls/Refs/EndToEndId maps to Statement/StatementLine/EndToEndId.
By default, the mapping expression is:
IF(AND(@.Refs.IsMatched, @.Refs.Data.EndToEndId.IsMatched), @.Refs.Data.EndToEndId.Data.Str, "")
If your voucher numbers are fixed at nine characters, replace it with:
IF(AND(@.Refs.IsMatched, @.Refs.Data.EndToEndId.IsMatched), LEFT(@.Refs.Data.EndToEndId.Data.Str, 9), "")
Save and close, mark the version as Completed, and assign this format under Cash and bank management > Setup > Advanced bank reconciliation setup > Bank statement format. From that point, the <EndToEndId> will travel through the following path:
Vendor payment journal line Voucher → ISO20022 Credit Transfer → Bank → [ISO20022 pain.002 confirmation] → ABR Camt.053 format → ABR Bank statement mapping to destination → Bank statement line Description → Bank reconciliation worksheet.
Direct debits
For direct debits, where funds are collected from customer accounts via SEPA mandates, the flow differs. There is a <Ref> element which represents the Structured Creditor Reference, and it may be preferable over <EndToEndId>. In Dynamics 365, the Creditor reference corresponds to the Payment ID on the invoice.
Customer payment journal line Payment Id → ISO20022 Direct debit → Bank → ISO20022 Camt.054 or ABR Camt.053 format → Mapping to destination → Bank statement line Creditor reference information → Bank reconciliation worksheet.
The structure in the pain.008 file appears as:
According to EPC142-08 (https://www.europeanpaymentscouncil.eu/sites/default/files/KB/files/EPC142-08-EPC-Guidance-on-Creditor-Reference-ISO-Std.pdf) the bank must return this structured reference. Unfortunately, Dynamics 365 cannot currently produce a proper Payment ID compliant with the Mod 97 checksum required for structured creditor references, since the so-called “Norwegian” Payment ID is not flexible enough.
You can vote for an improvement here: Dynamics Idea Portal – Structured Creditor Reference.
As a workaround, assuming invoice numbers contain only digits, you can form a pseudo-structured reference by prefixing the invoice number with RF00 with the feature NO-00002 Customer payment based on payment ID – Finance | Dynamics 365 | Microsoft Learn. This synthetic reference can then be used by the reconciliation rule to match incoming customer payments in the bank statement:

Bank, payments and reconciliation blog series
Further reading:
 Proposal for a shorter EndToEndId in pain.001, or a 3-letter hash for RecId
Matching own payments in Modern bank reconciliation
D365 Petty cash review
Z4-Meldung an Bundesbank
Electronic Reporting (ER) Cookbook