France is effectively Europe’s pilot project for ViDA. What French companies are implementing today is a good indication of what many of us will face during the 2030s. The objective goes far beyond exchanging structured invoices: it is about giving the tax authorities near real-time visibility into commercial transactions.
As Dr. Dynamics recently pointed out (France’s E-Invoicing Mandate, Flow by Flow | LinkedIn), producing a technically perfect XML invoice is only the beginning of the journey. Once invoices start flowing through the network, they have to be tracked throughout their life cycle.
What has not yet received much attention is everything around the invoice itself: regular validation of Endpoint IDs of establishments (effectively the SIRET in France + possibly more granular CODE ROUTAGE within = the unique code ligne d’adressage or “CLA”, see Dossier de specifications externes de la facturation electronique v2.1) and the so-called E-REPORTING:
Besides exchanging electronic invoices, companies must periodically report all business that is not covered by the e-invoicing network, namely 3 times a month for the past 10 days: on the 11th, on the 21st and on the 1st for the last 11-9 days of the previous month. This includes B2C sales, because consumers do not receive e-invoices, as well as international B2B sales and international B2B purchases; in short, all transactions where the trade partner does not have a SIREN.
These reports are submitted as 4 separate XML data flows (“Flux”) in 2 XML formats: Payments and Transactions. The implementation deadline for these reporting flows is later than the first e-invoicing milestone in September 2026, so we still have a little time before they become mandatory in 2027.
The Payments format reports B2C aggregated inbound payments (Flux 10.4, paiements reçus sur des ventes B2C, compressed by date) and the B2B international inbound payments (Flux 10.2, paiements reçus sur des factures internationales).
The Transactions format covers B2C sales (Flux 10.3, ventes aux particuliers agrégées, compressed by date and invoice category, see below) together with international B2B sales and B2B purchase invoices (Flux 10.1, factures émises/reçues avec des entreprises étrangères).
From the ERP perspective, this introduces some technical challenges. Dynamics 365 Finance does not expose VAT amounts on payments (unless the VAT is “conditional” a.k.a. VAT on payment), yet this information is required for the Payments flow. You take the invoice VAT base (separated by rate) in proportion of the particular payment to the total invoice amount w/o VAT.
The Transactions flow, on the other hand, requires every transaction to be classified with a CategoryCode as goods TLB1, services TPS1 or international sales TNT1, plus the exotic tax margin sales TMA1 (antiques and collector’s items, travel agencies). This is another piece of information that is not readily available in every ERP implementation, see Biens ou Services ou Mixte? for more insight.
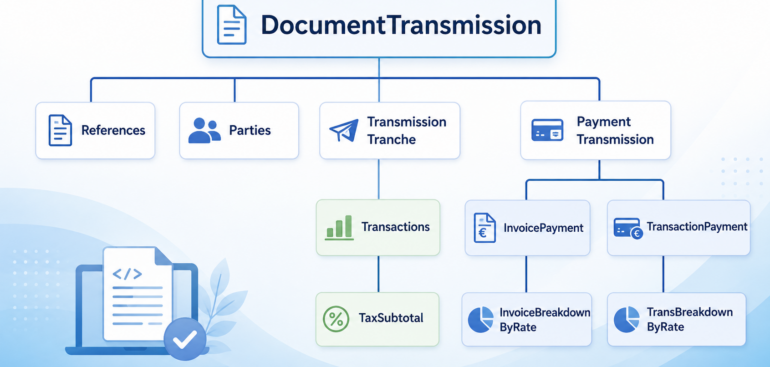
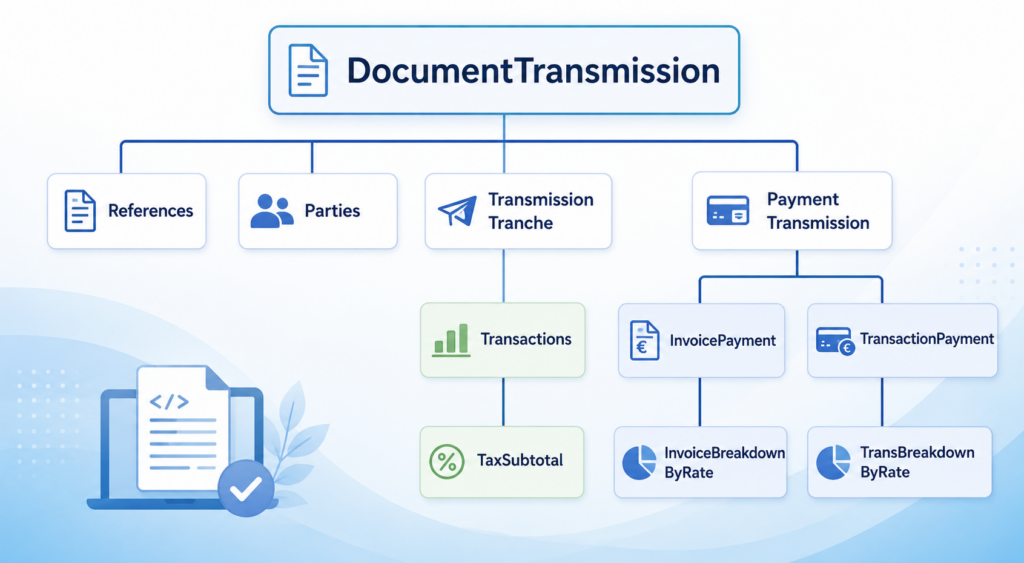
Below are examples of the Payments and Transactions XML files generated for the French e-reporting process:
					<?xml version="1.0" encoding="utf-8"?>
<DocumentTransmission>
  <DocId>PAYMENT-0035</DocId>
  <DocName>Payments_20260201_20260210</DocName>
  <DateTime>20260710124422</DateTime>
  <TransmissionType>IN</TransmissionType>
  <Project>PAYMENTS</Project>
  <Parties>
    <Qualifier>II</Qualifier>
    <Additional_ID_type>0002</Additional_ID_type>
    <Additional_ID_value>censored</Additional_ID_value>
    <CompanyName>censored</CompanyName>
    <Role>SE</Role>
  </Parties>
  <PaymentTransmission>
    <PeriodStartDate>20260201</PeriodStartDate>
    <PeriodEndDate>20260210</PeriodEndDate>
    <InvoicePayment>
      <InvoiceNumber>invoiceA</InvoiceNumber>
      <InvoiceDate>20250623</InvoiceDate>
      <PaymentDate>20260202</PaymentDate>
      <InvoiceBreakdownByRate>
        <TaxPercent>20</TaxPercent>
        <PaymentCurrency>EUR</PaymentCurrency>
        <Amount>460.76</Amount>
      </InvoiceBreakdownByRate>
    </InvoicePayment>
    <InvoicePayment>
      <InvoiceNumber>invoiceB</InvoiceNumber>
      <InvoiceDate>20260202</InvoiceDate>
      <PaymentDate>20260202</PaymentDate>
      <InvoiceBreakdownByRate>
        <TaxPercent>20</TaxPercent>
        <PaymentCurrency>EUR</PaymentCurrency>
        <Amount>39.64</Amount>
      </InvoiceBreakdownByRate>
    </InvoicePayment>
    <TransactionPayment>
      <PaymentDate>20260202</PaymentDate>
      <TransBreakdownByRate>
        <TaxPercent>20</TaxPercent>
        <PaymentCurrency>EUR</PaymentCurrency>
        <Amount>500.40</Amount>
      </TransBreakdownByRate>
    </TransactionPayment>
  </PaymentTransmission>
</DocumentTransmission>
					<?xml version="1.0" encoding="utf-8"?>
<DocumentTransmission>
  <DocId>Trans_000000018</DocId>
  <DocName>Transactions_20260201_20260210</DocName>
  <DateTime>20260710125547</DateTime>
  <TransmissionType>IN</TransmissionType>
  <Project>TRANSACTIONS</Project>
  <Parties>
    <Qualifier>II</Qualifier>
    <Additional_ID_type>0002</Additional_ID_type>
    <Additional_ID_value>censored</Additional_ID_value>
    <CompanyName>censored</CompanyName>
    <Role>SE</Role>
  </Parties>
  <TransmissionTransaction>
    <Period_start_date>20260201</Period_start_date>
    <Period_end_date>20260210</Period_end_date>
    <Transactions>
      <Date>20260202</Date>
      <TransactionCurrency>EUR</TransactionCurrency>
      <TaxDateCode>3</TaxDateCode>
      <CategoryCode>TLB1</CategoryCode>
      <NetTotal>12345.67</NetTotal>
      <VATAmount>0.0</VATAmount>
      <TransactionCount>25</TransactionCount>
      <TaxSubtotal>
        <TaxRate>0</TaxRate>
        <TaxableAmount>12345.67</TaxableAmount>
        <TotalTax>0.0</TotalTax>
      </TaxSubtotal>
    </Transactions>
    <Transactions>
      <Date>20260203</Date>
      <TransactionCurrency>EUR</TransactionCurrency>
      <TaxDateCode>3</TaxDateCode>
      <CategoryCode>TLB1</CategoryCode>
      <NetTotal>402.0</NetTotal>
      <VATAmount>0.0</VATAmount>
      <TransactionCount>1</TransactionCount>
      <TaxSubtotal>
        <TaxRate>0</TaxRate>
        <TaxableAmount>402.0</TaxableAmount>
        <TotalTax>0.0</TotalTax>
      </TaxSubtotal>
    </Transactions>
  </TransmissionTransaction>
</DocumentTransmission>
At ER-Consult, we now know how to build these reporting flows for Dynamics 365 Finance. If you are preparing for the French e-invoicing reform or the upcoming ViDA requirements, feel free to contact us.
E-invoice and configurable business documents blog series

Further reading:
ZUGFeRD 2.4 export/ Factur-X 1.08 for Dynamics 365 FO
ZUGFeRD 2.2-2.4 import for Dynamics 365 for Finance
Filling PDF Forms with Electronic Reporting in Dynamics 365 for Finance
Aktueller Stand der eRechnung in D365 for Finance (Deutschland)
Austrian Peppol-UBL e-invoice
How NOT to send an order confirmation per e-mail
Enumerate lines in Configurable Business Documents
Canvas sections in D365 Configurable Business Documents
Italian eInvoicing FatturaPA, CIG and CUP numbers, RIBA
Italian eInvoicing FatturaPA: Part 2