D365 Electronic Reporting: JOIN records in pairs

Test for odd number
Test for odd number

D365 Electronic Reporting: JOIN records in pairs

Recently, I came across a really challenging requirement in Electronic Reporting / Configurable Business Documents in Dynamics: in an additional section in the Delivery note, print a flat table where every pair of consecutive records becomes one line:

No Not like this But like this No
1 Left lace Left lace – Right lace 1
2 Right lace Left shoe – Right shoe 2
3 Left shoe
4 Right shoe

This required a set of sophisticated techniques I am thrilled to share. The idea is to split into odd and even records and build something like

SELECT *, ROW_NUMBER as Rn1 FROM Records JOIN *, ROW_NUMBER as Rn2 from Records ON Rn2= Rn1+1

  1. Enumerate: make a so called Calculated field at the ER configuration’s root level with a record list and a row Number inside:
    ENUMERATE(ALLITEMS(MyRecords))
  2. Add another Calculated field at the row level to check if the current record has an odd or an even row number: LEN(REPLACE("13579",RIGHT(NUMBERFORMAT(@.Number,"#"),1),"",false))<5 I’ll leave the formula uncommented, but I wonder if somebody manages to write a shorter function. I can also imagine using TRANSLATE() or the VALUEIN(SPLIT(“1,3,5,7,9″…) functions. The problem is the missing MOD operator in Electronic Reporting: https://experience.dynamics.com/ideas/idea/?ideaid=09590ad4-70a4-e711-80c0-00155d7cd0b4. They promised, but failed to deliver. Anyway, now we’ve got this:
  3. Next, let’s add another root Calculated field, filter the list by $Odd = true and make a list with only the odd records:
    WHERE('$AllRecordsEnumerated', '$AllRecordsEnumerated'.'$Odd')
  4. Finally, attach an ‘even’ record to every ‘odd’ one by placing another Calculated field with a lookup inside of the $OddRecord: FIRSTORNULL(WHERE('$AllRecordsEnumerated', '$AllRecordsEnumerated'.Number=@.Number+1)). Here is the result, a JOIN to itself:

Bingo!

Canvas sections in D365 Configurable Business Documents

Bill of exchange
Bill of exchange

Canvas sections in D365 Configurable Business Documents

Embedding static sections of a fixed width and length into configurable Business documents in Excel seems to be hard to impossible, but it is not. An example can be an American pre-printed Cheque or the notorious French Bill of exchange at the end of the invoice. The section may not span 2 pages, i.e. it should be kept together to be torn off or scanned by the bank OCR system. This cannot be achieved by merging cells but with floating graphical elements only. Follow the below advice how to make it:

  1. Better use Excel. The mapping of an Excel file to an Electronic Reporting format configuration is based on the named ranges (name manager), a mapping of a named Text box in a drawing is also possible. It is not necessary to attach an XML schema to the Excel file, the design of an Excel report is a simple WYSIWYG exercise.
  2. You cannot use the Configurable business documents UI, because the changes needed are intricate and can hardly be made in the online Office 365. You have to locate the exact format in Electronic reporting (here: Sales invoice (Excel) (FR)), open and save the attachment with the template on your computer, amend it, upload it as an attachment and reassign to the root node in the format Designer.
  3. Figure out the exact width of the paper by printing the document. Check at which column the page boundary begins (here: M-N).
  4. Capture a raster image of the section you have to embed and paste it as a template into your document to position the vector elements over it nicely. Send it to the background and resize carefully to match the full page width (here in the background, cyan stained).
  5. The drawing elements get anchored by Excel to the adjacent cell, and to maintain the relative positions they should be floating inside of a large merged cell of the size of the whole section (here: $B$121:$M$121). The outer boundaries of the elements shall not cross the boundaries of this mother sell. Make the row a named range which will be holding all the boxes and images (here: BoE for the bill of exchange).
  6.  The Electronic Reporting may only work properly with Text boxes and Images. Everything must be rendered with text boxes.
  7. To address and populate the elements in the Electronic Reporting format definition, they must be named ranges* in Excel (here for the red line: BoE_Line).
    * Not really a range but a named/renamed element of a drawing. The ER engine is going to multiply them – in theory – and a BoE_Line element becomes BoE_Line1 etc. in the final output.
  8. The Electronic Reporting cannot currently place circles, lines or any other geometric form properly. The little triangles in this example have been drawn with Unicode symbols like “∇”. If you need to draw a line, it must be an empty Text box with a height of around 0,03 cm and an opaque line around of the given thickness divided by 2. The inner boundaries of the text must be all zero, otherwise the ER will corrupt the width, the position and the line type and make it disappear:
  9. Every element (including the “lines”!) must be explicitly listed (listed, not necessarily mapped!) in the format definition as a cell or range, otherwise the graphical object remains linked to the absolute number of the adjacent cell (e.g. B121) and starts floating all around, appearing in the middle of the invoice when you print it.
  10. The objects must be in the proper order, or the ER Designer is going to warn you that “The range BoE_Line must be preceded by the range XXX“. The sorting order is a bit special. If the cells are sorted by {ROW, COLUMN}, the drawing objects are apparently sorted by the cartesian coordinates {X;Y} of the upper left corner, from left to right, then from the up to the bottom (which is a theoretical aspect, since it is hard to place the elements at exactly the same X coordinate by drag and drop only). See the above enumeration 1-7, the upper line starting the leftmost.
  11. Test and print your report with a proforma document often. If you don’t know how to test an ER configuration in a Draft status, here is the sacred answer: Electronic Reporting (ER) Cookbook 2: new tips from the kitchen.
  12. The raster image shall be removed in the end, of course, it is too cheap a solution for the static texts and lines.

Conclusion

To avoid all this mess, you may try to convince the customer that negotiable instruments from the XVIII-XIX centuries may become obsolete in the XXI (you know: the wire payments, SEPA, blockchains and Co…) Good luck with that.

Electronic Reporting (ER) Cookbook 4: References in a model

Electronic Reporting (ER) Cookbook 4: References in a model

The “Item reference” in Dynamics 365 Electronic Reporting models has been an elusive concept for me for quite a long time. A reference creates a kind of a cross-link between the ER model parts, but what for? Now I think I have figured out some important use cases:

  • Re-use structures and record list definitions within the model, especially for UNIONs
  • Map the same model in different ways and export similarly structured files from different sources

References to facilitate LISTJOINs

The LISTJOIN ER function is an analogue to the SQL UNION. It combines heterogenous record lists into one list of a common type. For example, a LISTJOIN(model.PurchaseLines, model.SalesLines) creates a typed single record list with their common fields: Product no, Quantity, Delivery date, Warehouse etc. However, for the LISTJOIN to recognize the common fields, the fields must be aligned, i.e. follow in exactly the same order, bear exactly the same names.

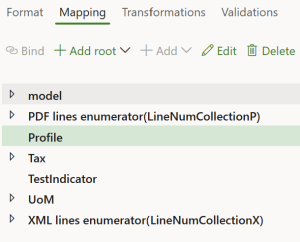
Here is where the references come into play. One can organize a “Dictionary” root entry in the model, define the most elementary composite entries there, then click the Switch item reference button elsewhere and include this small “brick” into a larger record. From the small bricks one may build larger bricks and so on. Such cross references are indicated by the asterisk (*):

In the above example, an Order record includes the CategoryComposite, Coverage order, Item order nested 1:1 records, and uses fields of the Category type and Line status enumerations. The resulting common Order record type is further assigned to the Sales and Purchase record lists, and this makes their structure in the model identical. The LISTJOIN() then produces a list of records with the following fields:

@.Amount
@.’Qty avail’
@.Category.Group
@.Category.’Category ID’

and so on.
By the way, the root node Item dictionary here is a Container. A Container is used simply to put together diverse artefacts, a way to make the model definition more readable.

References to apply different mappings to the same model

Imagine you need to export sales order lines and purchase order lines into 2 different files, similar in structure. You need a model to abstractly describe a generic Order line list, then a Sales line format export definition, a Purch line format definition both preferrably derived from a common Order line format, and 2 mappings: Sales line to model and Purch line to model to populate the Order line list model from 2 different data sources in Dynamics 365.

Try to run the Sales line format file. It is going to start complaining about 2 models present: “More than one model mapping exists. Set one of the configurations as default.” You set the Sales line to model as Default for model mapping = Yes and the export starts working.
No try to run the Purch line format. It is going to export sales order lines in the purchase order line format, because a link between the format and the outbound mapping is through the model node they use:

Format → Model [node] → [default] Model mapping

To fix this, the 2 formats should be mapped to different nodes in the model!

I’ve got a similar issue when I was trying to use the same model both for the export and for the import of data. There was a Counting journal model and 2 formats: Export to Kardex and Import from Kardex. There was a Counting model mapping for the export and a Counting model to destination mapping for the import.

Tried to run the export Export to Kardex and it asked to “Set one of the configurations as default“, which I did.
Then I tried to run the Counting model to destination mapping but it was not prompting any files for the upload, because a link between the inbound mapping to the import format was established through the model and it was pointing to the export format:

Model mapping to destination → Model [node] → Format

The trick is to use different nodes! The import format should write the data from the inbound file into one Record list in the model, while the export format should read data from another Record list in the model. The mappings then bind the same table to the one node and another, respectively. To reuse the data types and the structure, one node references the other (Switch item reference).