Integrate APS with Dynamics 365 for SCM
APS means “Advanced Planning and Scheduling”. APS systems are used to optimize production processes by planning and scheduling manufacturing orders, taking into account factors like resource availability, machine capacity, and production deadlines. As a “better, smarter MRP”, APS helps companies improve efficiency, reduce lead times, and respond quickly to changes in sales or production orders.
In the German market, the 2 widely used programs are FELIOS from Inform-Software and HYDRA by MPDV. To be precise, their APS system is called FEDRA, with the HYDRA being a sister Manufacturing Execution System (MES). I had an occasion to integrate both with Dynamics 365 for SCM. By the way, a MES integration is something else and it already exists in Dynamics 365: Integrate with third-party manufacturing execution systems – Supply Chain Management | Dynamics 365 | Microsoft Learn.
High-level concept of the APS interface
An integrated APS uses data from the operations system, such as Dynamics 365 for SCM, including open sales, purchase, and production orders, current stock levels, and master data (BOMs, routes, resources, products and materials). All the data may be extracted from D365 with the standard or slightly modified entities.
The APS then generates an optimized production plan, often suggesting new raw material purchases and production orders, acting as a full-scale master planning system. However, we may neglect the planned order proposals and only import the updated production routes to align the ERP system with the APS. The process reduces to 5 steps:
- After the nightly D365 MRP run, the above data is exported as .TXT files, representing the day’s snapshot.
- APS loads these files, refreshes its database, and performs a planning run.
- Operators may adjust the plan in APS the day after.
- The final plan, with updated order and route dates, is exported as a set of inbound .TXT files.
- The production route file is used to update production route operations in D365 via a custom entity, since the standard one may only write to Created production orders.
The production route entity at step “5” is teased in another blog: “Import a D365 FO entity with a virtual KEY field“. The entity should skip rescheduling if the operation dates in the file match those in Dynamics 365 and only touch route operation/jobs in the following statuses: Scheduled, Released, Started.
Key step: adopt the APS route schedule
- Unlock the production order if it’s locked.
- Re-schedule jobs associated with the route operation, using the dates and times imprinted upon the ProdRoute record. This will update capacity reservations according to the new dates. As a positive side effect, this will adjust the start and end dates of the production order if the operation is the first or last in the route. It will also update raw material demand dates and times on related BOM lines in the production order.
- Lock the production order, protecting the scheduled route operation from further changes.
public void reschedule2jobs()
{
ProdTable prodTable = prodRoute.prodTable();
ProdRouteJob prodRouteJob;
// 1. Unlock the order if locked
if (prodTable.ProdLocked)
{
Args args = new Args(this);
args.record(prodTable);
ProdMultiLockForReschedule::construct(args).run();
}
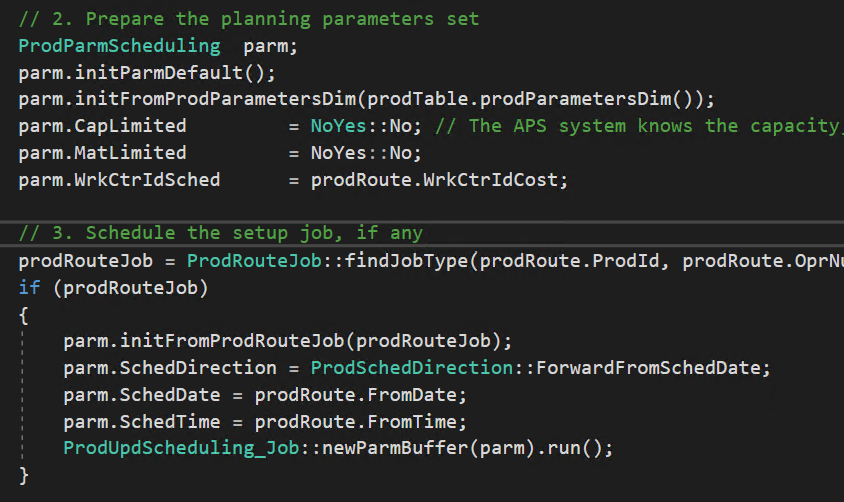
// 2. Prepare a planning parameters set
ProdParmScheduling parm;
parm.initParmDefault();
parm.initFromProdParametersDim(prodTable.prodParametersDim());
parm.CapLimited = NoYes::No; // The APS system knows the capacity, resource, mat. availability better
parm.MatLimited = NoYes::No;
parm.WrkCtrIdSched = prodRoute.WrkCtrIdCost;
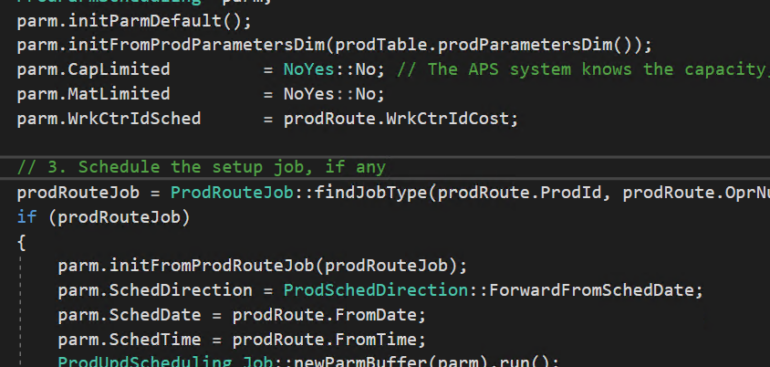
// 3. Schedule the setup job, if any
prodRouteJob = ProdRouteJob::findJobType(prodRoute.ProdId, prodRoute.OprNum, prodRoute.OprPriority, RouteJobType::Setup);
if (prodRouteJob)
{
parm.initFromProdRouteJob(prodRouteJob);
parm.SchedDirection = ProdSchedDirection::ForwardFromSchedDate;
parm.SchedDate = prodRoute.FromDate;
parm.SchedTime = prodRoute.FromTime;
ProdUpdScheduling_Job::newParmBuffer(parm).run();
}
// 4. Schedule the process job
prodRouteJob = ProdRouteJob::findJobType(prodRoute.ProdId, prodRoute.OprNum, prodRoute.OprPriority, RouteJobType::Process);
if (prodRouteJob)
{
parm.initFromProdRouteJob(prodRouteJob);
parm.SchedDirection = ProdSchedDirection::BackwardFromSchedDate;
parm.SchedDate = prodRoute.ToDate;
parm.SchedTime = prodRoute.ToTime;
ProdUpdScheduling_Job::newParmBuffer(parm).run();
}
// 5. Lock the production order against any manual re-scheduling
prodTable.reread();
Args args = new Args(this);
args.record(prodTable);
ProdMultiLockForReschedule::construct(args).run();
}
Remark: the highlighted line is used to change the work centre in the route operation. The APS system sends a new resource number, it is written directly into the route operation into the cost resource column. From there, the programme relays the changed resource number to the D365 planning core to reserve the capacity of the new work centre and de-reserve the capacity of the old.
Production and Manufacturing blog series
Further reading:
Assistance and Secondary operations in D365 for SCM
Integrate APS with Dynamics 365 for SCM
D365 Mass de-reservation utility
Picking list journal: Inventory dimension Location must be specified
Consumable “Kanban” parts in D365 Warehouse management
Subcontracting with Warehouse management Part 2
Subcontracting with Warehouse management Part 1
Semi-finished goods in an advanced warehouse
The case of a missing flushing principle