Dynamics 365 SCM: Do not reserve in Inbound

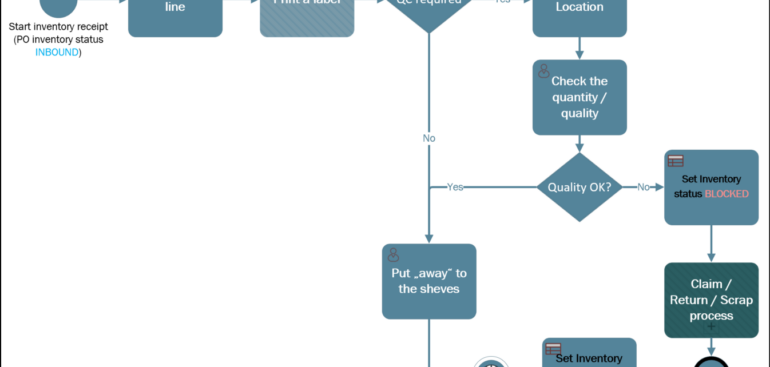
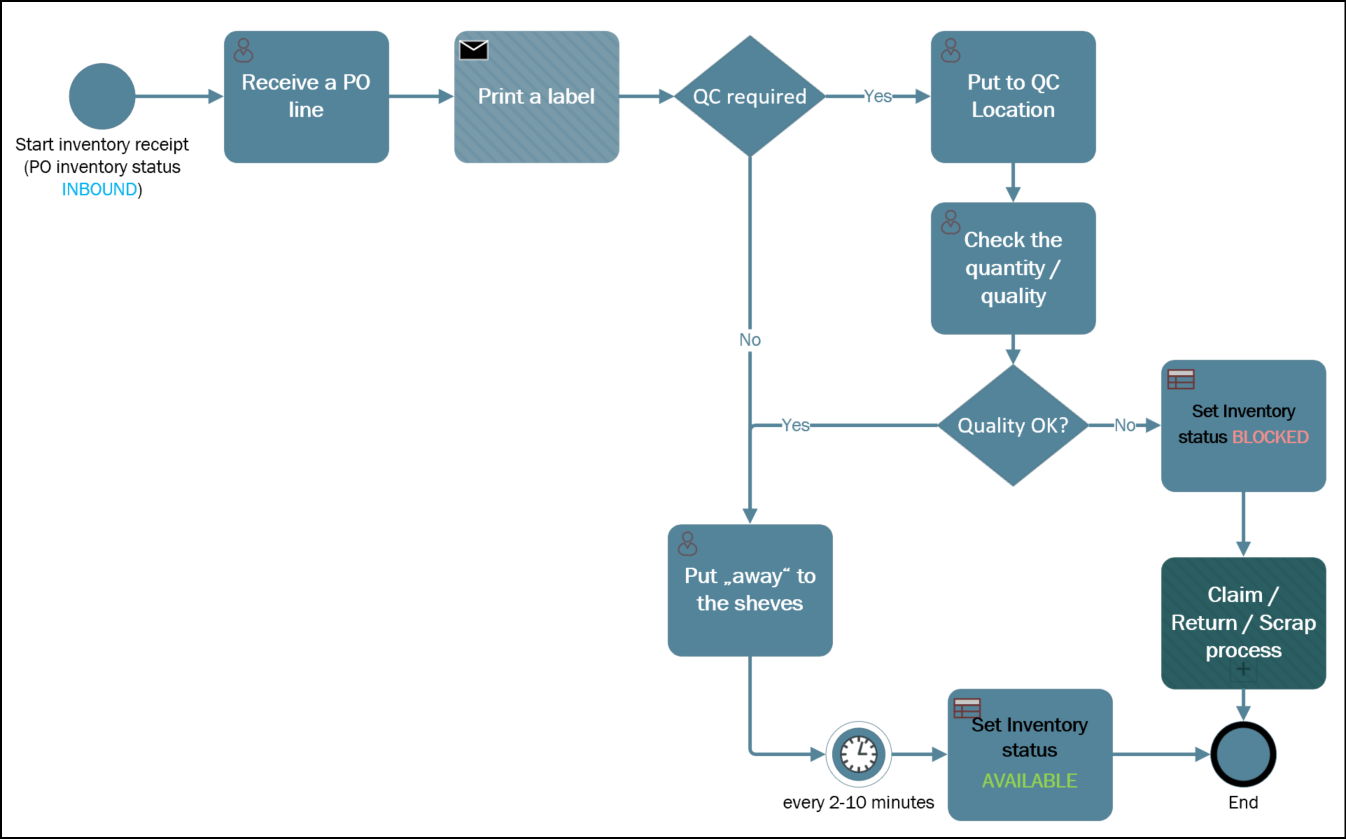
Dynamics 365 Inbound status process

Dynamics 365 SCM: Do not reserve in Inbound

You are going to have this error in Dynamics 365 Warehouse management, guaranteed. The error manifests itself at the production order picking or at sales order picking: the picking location is empty. Depending on the Location directive failures setup under the Warehouse management parameters this is going to either create a broken warehouse work or throw an error, but the outcome will be bad in any case.  This issue can occur when materials or merchandise have arrived but have not yet been put away in their expected location. They are not on the shelves but still somewhere in a staging area, possibly waiting for sorting or expecting a quality control. If your location directives are correct, you may need to adjust your inventory status settings to prevent this issue from happening.

The below recipe was invented either by Carsten or Thomas, maybe Nicolas, all kudos to them, I have just picked up the torch, refined the recipe and shared it with my colleagues and customers at 2 other implementation projects.

In a nutshell, create a new Inventory status called INBOUND and assign it to every purchase order. Make sure every sales or transfer order becomes the regular inventory status AVAILABLE. When a production order covers the demand, it will inherit the “Available” status and pass it to the BOM lines. Only “Available” raw materials will be reserved, not “Inbound”. If you attempt to release the production order, it will fail, because the reservation will misfire (but only if you install my fix Production order should not get Released on material shortage). This is a desired behaviour, because the materials have not been inspected or deconsolidated yet. The “Inbound” inventory status remains transparent to master planning and won’t be replenished unless the quality inspection fails and the goods become BLOCKED.

To implement this scenario, you’ll need to adjust some very specific parameters throughout the system. Below are the notes to myself:
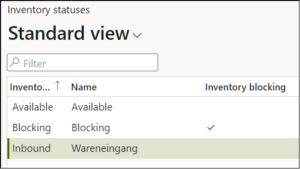
  1. Inventory status InboundIn Warehouse management > Setup > Inventory > Inventory statuses, add a new inventory status called “Inbound“. Do not mark it as inventory blocking; it only needs to differ from the “Available“.
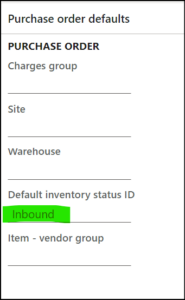
  2. In Warehouse management > Setup > Warehouse > Warehouses, do not set the default inventory status ID at your advanced warehouse, as it will overrule other settings.Default inventory status ID
  3. In Warehouse management parameters, set the default inventory status ID to “Available” and mark Use default status for sales orders and transfer orders to force most material demand to look for Available items only.Default inventory status for sales orders
  4. Default purchase inventory status IDEnsure that every purchase order line becomes a different status by assigning the default inventory status ID “Inbound” to every supplier, new or existing (Accounts payable > Vendors > All vendors).
  5. Turn OFF the Reserve ordered items inventory parameter in Inventory management > Setup > Inventory and warehouse management parameters. To be honest, I have not seen any customer yet who benefited from the reservations in purchase orders not yet received, it just messes things up. If you do let the system reserve in open purchase orders, it is going to reserve the Inbound status, which is clearly not our intent, and the picking location will be empty again.
  6. Now it becomes tricky. If you use master planning, do not firm planned orders in the Standard or– God forbid – Extended Update marking mode. This marking will again be later converted into a fixed reservation of the materials / merchandise in the Inbound status. Instead, carefully set the default Update marking mode in Master planning > Setup > Master planning parameters. In a retail/distribution scenario, choose “None”. In a MTO (manufacture-to-order) or a ETO (engineer-to-order) scenario, choose Single level standard. The latter is quite a new addition to Dynamics 365 SCM: D365 New Feature – Make to order supply automation – Logan Consulting. This will establish a link between the Sales order and the production order, but not their lines or lower-level production orders to purchase orders. If there is a strong need for a chain of assembly / sub-assembly’s production orders, you may still use the Pegged supply BOM line type. This will make the upstream production order a derived requirement and it will establish a firm marking between the top-level and bottom-level production orders.
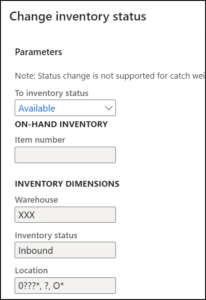
  7. Change inventory status InboundConfigure a recurring batch job in Warehouse management > Periodic tasks > Change inventory status to quickly update the status of “Inbound” items to “Available” once they are put away in their regular storage locations. Find a good set of criteria to capture all regular locations for storage and picking:

By following these steps, you can avoid the empty picking location error and ensure that your inventory status settings are correctly configured.

Bye-bye work report, welcome wave labels!

Bye-bye work report, welcome wave labels!

One of the common customizations of the Dynamics 365 Warehouse management module was the automatic printing of the work report [for the sales order picking work]. If the number of shipments exceeds a hundred per day, the electronic work list (Menu item type = Display open work list) on the Warehouse mobile device becomes unmanageable, and the distribution of the daily picking work amongst the warehouse workers requires printing and sorting of some carbon documents. This used to be the Work report in the Warehouse management > Work > All work list. However, it is better printed interactively out of the browser UI i.e., the supervisor requires a PC with a mouse, and the printing can hardly be automated / integrated with the other wave processing steps.

The latest Wave label printing – Supply Chain Management | Dynamics 365 | Microsoft Docs feature is the remedy;
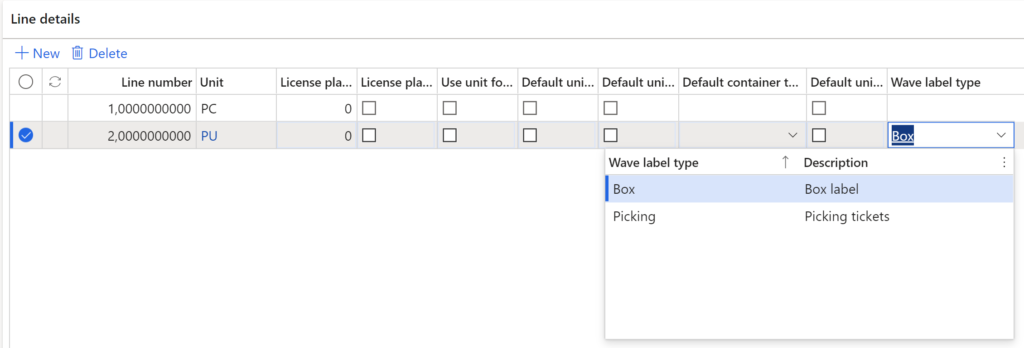
In the Containerization scenario, the Wave label type is assigned to the respective level in the Unit sequence group:

Yet the Wave label printing can not only produce box labels after the system-driven containerization, but also simply print the picking work i.e., it will take the Work headers and Lines as a data source and send them to the label printer(s)!

Wave label printing setup

Activate the wave label printing feature on the Feature management screen. Add a new Warehouse management > Setup > Document routing > Wave label type.

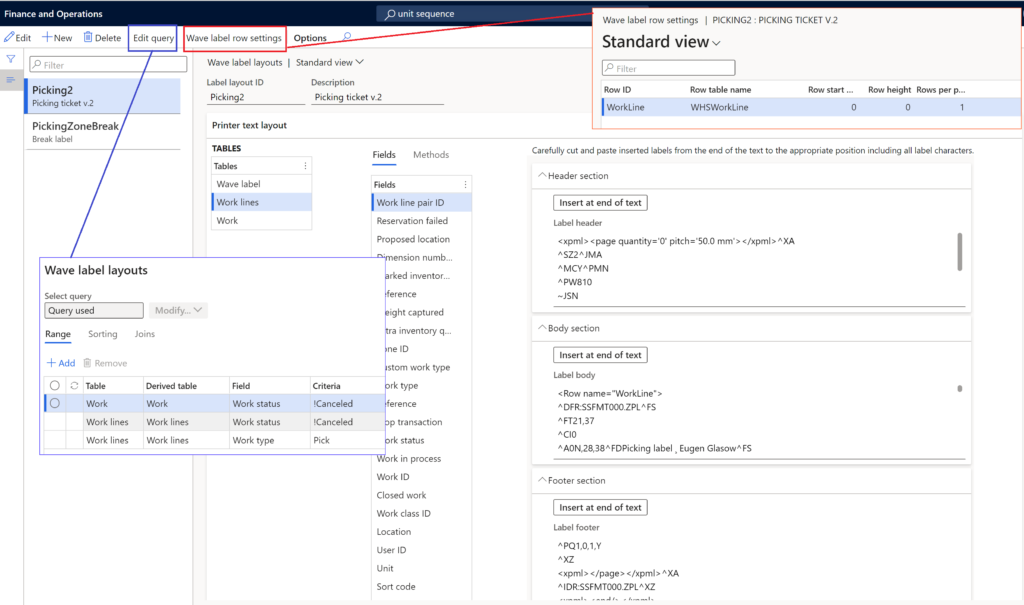
The Wave label layout is by far more complex than the classic put-away routing layout. It consists of a Header and a Footer static ZPL code, and a dynamic Body ZPL part. With 0..N bodies per label, the Wave label feature may render complex business documents of a variable height, such as a Bill of lading.

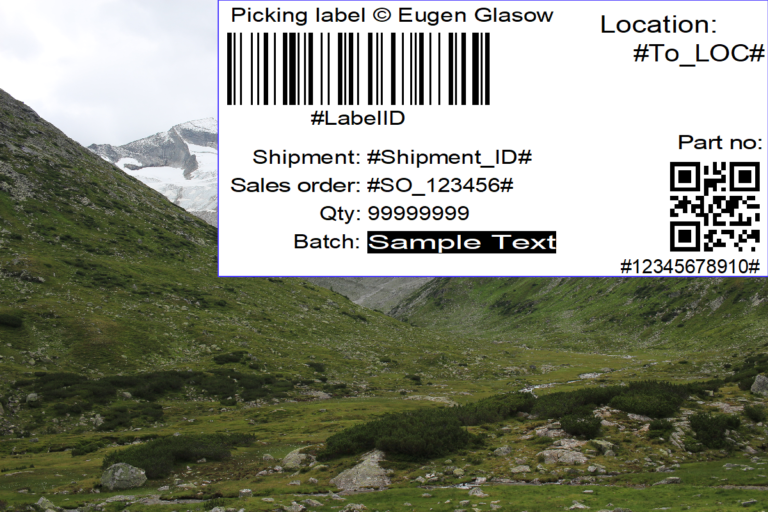
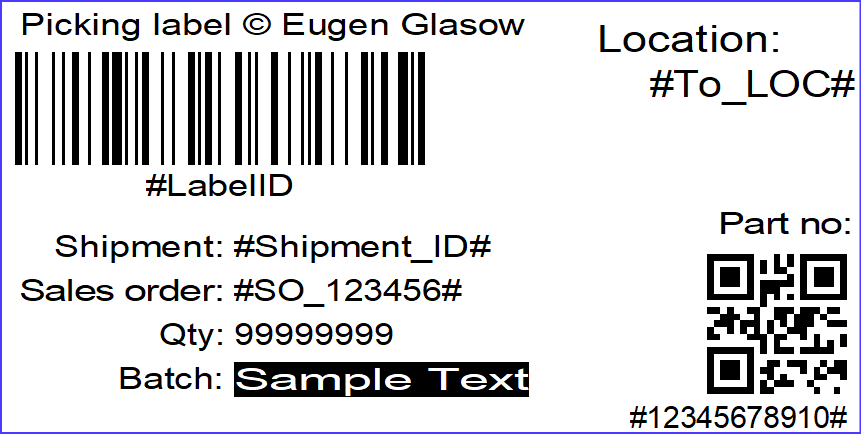
The below sample layout prints just one label = header + body + footer for every Pick work line (see Wave label row settings, Rows per page = 1). Create a Wave label row settings / Row ID = XXX first, then use the proprietary <Row name =”XXX”>… </Row> closed tag in the Body section:

Header
^XA
^SZ2^JMA
^MCY^PMN
^PW810
~JSN
^JZY
^LH0,0^LRN

Body
<Row name="WorkLine">
^FT21,37
^CI0
^A0N,28,38^FDPicking label ¸ Eugen Glasow^FS
^FO17,54
^BY3^BCN,102,N,N^FD>:$WHSWorkLine.WorkId$^FS
^FT135,182
^A0N,28,38^FD$WHSWorkLine.WorkId$^FS
^FT21,276
^A0N,28,38^FDSales order:^FS
^FT214,276
^A0N,28,38^FD$WHSWorkLine.OrderNum$^FS
^FT52,236
^A0N,28,38^FDShipment:^FS
^FT214,236
^A0N,28,38^FD$WHSWorkTable.ShipmentId$^FS
^FT541,50
^A0N,34,46^FDPacking^FS
^FT541,85
^A0N,34,46^FDLocation:^FS
^FT589,133
^A0N,34,46^FD$WHSWorkLine.WMSLocationId$^FS
^FO640,235
^BQN,2,6^FN1^FS
^FT571,390
^A0N,28,31^FN2^FS
^FT651,216
^A0N,28,38^FDPart no:^FS
^FT146,316
^A0N,28,38^FDQty:^FS
^FT214,316
^A0N,28,38^FD$WHSWorkLine.QtyWork$^FS
^FT110,356
^A0N,28,38^FDBatch:^FS
^FO214,331
^GB266,30,30^FS
^FT214,357
^A0N,28,53^FR^FD$WHSWorkLine.FEFOBatchId$^FS
^XZ
^XA
^XFR:SSFMT000.ZPL^FS
^FN1^FDLA,$WHSWorkLine.ItemId$^FS
^FN2^FD$WHSWorkLine.ItemId$^FS
</Row>

Footer
^PQ1,0,1,Y
^XZ

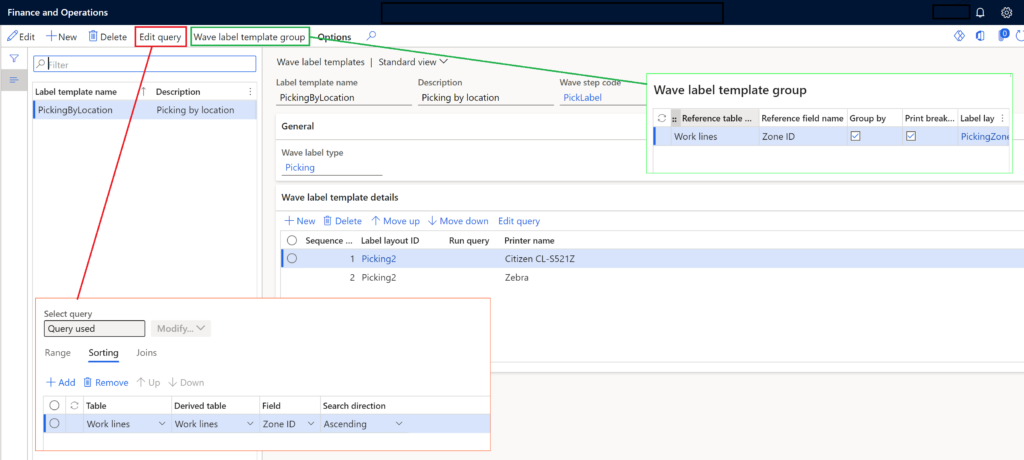
In the Wave label template, the labels may be sent to different label printers depending on the picking Zone, for instance. Moreover, a separator – a zone Break label – may be inserted into the endless stream of picking labels for the tearing at the right place. This requires a sorting (see Edit query) by the Zone field and a Group by + Print break label option under Wave label template group. From my experience, more than one sorting / grouping level does not work.

Work label printing: test run

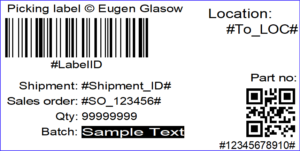
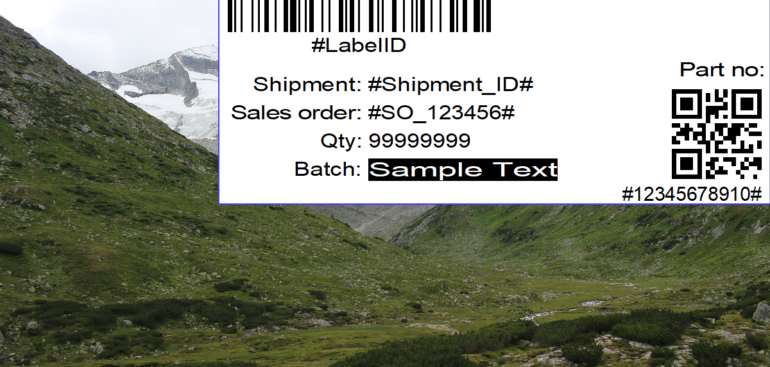
The above layout may be used not only for managing the picking work, but also for labelling the picked items for the end customer with the sales order / shipment / transport package ID:

To test the labels, create a wave step code “Label Printing”, and add the waveLabelPrinting method to the Wave template right after the work creation step. Release some test sales orders to the warehouse, then Process the outbound wave.
A warning “There is no unit for the … wave label type on the … unit sequence group. Wave labels are not created for the … item” may be shown, but it may be ignored. A stream of labels should come out of the printer, one per picking work line for every work header created.

WHS Label copies, Custom work, display methods on labels

WHS Label copies, Custom work, display methods on labels

Todays exercise is seemingly simple: print a voluntary number of warehouse label copies where the standard Dynamics 365 SCM only prints one. The ingredients are quite exquisite and variegated:

^PQ

Let’s start with a proof of concept: print as many labels as there are items. Assuming there are 3 items on the license plate (pallet), let’s print the same label 3 times. This sounds simple, yet you need the latest and the coolest feature Enhanced license plate label layouts. With that feature you can finally carve a substring from Dynamics data, but also format numbers and dates. This is exactly what we need.

In Warehouse management > Setup > Document routing > Document routing layouts, every Zebra label template ends with something like
^PQ1,0,1,Y
which is the instruction to the label printer how many copies to print. Now replace this line with
^PQ$Qty:0$,0,1,Y
The quantity as a real number is truncated to an integer on the label, and the ZPL printer makes as many copies as there were pieces on the pallet.

Display method

A real game changer is now the ability to parse a display method on the WHSLicensePlateLabel table. Let Dynamics calculate the number of copies on the fly, leveraging the PackingQty factor which is the number of pieces in the topmost unit of the Unit sequence group. Assuming the unit sequence group is PCS-BOX i.e. pieces in boxes and if the nominal quantity per box is 20, for a license plate with 100 items on it I would like to have 5 copies of the label.

Extend the WHSLicensePlateLabel as follows:

				
					[ExtensionOf(tableStr(WHSLicensePlateLabel))]
final class WHSLicensePlateLabel_Extension
{
    display Num noOfCopiesSimple()
    {
        return int2Str(this.PackingQty > 1 ? any2Int(roundUp(this.Qty / this.PackingQty,1)) : 1);
    }
}


and embed it into the ZPL code like this:
^PQ$noOfCopiesSimple()$,0,1,Y

Now the number of copies is dynamic, configurable and obeys the master data settings.

Custom work

The high-end solution is to let the user override and decide how many copies to print. In order to do that, before the Print line in the Work template we need an extra screen of the Custom work type:
Custom work type


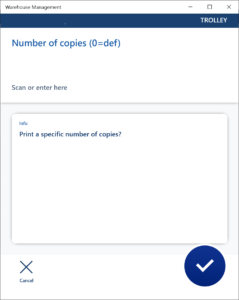
This brings the following prompt on the mobile device:

You may also want to explore possibilities of simple validations and post-processing of the data captured on the Custom work screen: Custom method tutorial.

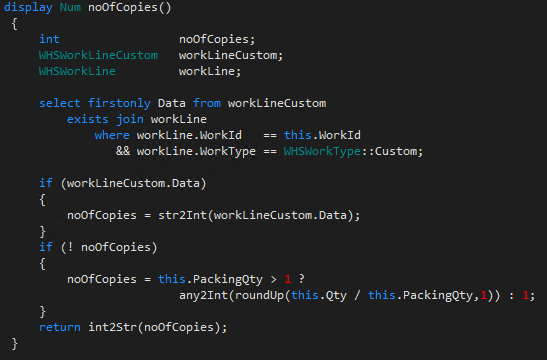
The so captured number of copies entered by the user is then interpreted by a more sophisticated display method:

				
					display Num noOfCopies()
{
    int noOfCopies;
    WHSWorkLineCustom workLineCustom;
    WHSWorkLine workLine;
    
    select firstonly Data from workLineCustom
        exists join workLine
        where workLine.WorkId == this.WorkId
            && workLine.WorkType == WHSWorkType::Custom
            && workLineCustom.WorkId == workLine.WorkId
            && workLineCustom.LineNum == workLine.LineNum;
    
    if (workLineCustom.Data)
    {
        noOfCopies = str2Int(workLineCustom.Data);
    }
    if (! noOfCopies)
    {
        noOfCopies = this.PackingQty > 1 ? any2Int(roundUp(this.Qty / this.PackingQty,1)) : 1;
    }
    return int2Str(noOfCopies);
}