Configuring Austrian and Norwegian per diems in Dynamics 365

Configuring Austrian and Norwegian per diems in Dynamics 365

Building upon my insight into travel expenses and per diem calculation in Germany, let us consider Austrian and Norwegian per diems side by side. In both countries scaled rates per hour apply, and in both counties rules for the domestic travel and for traveling abroad differ. Both countries can be implemented in Dynamics 365 for Finance and Operations with literally no customizations at all!

In Austria, the first 3 hours of domestic travel are not reimbursed, but once the duration of the trip reaches 3 hours, the employee becomes 4/12 of the full rate of 26,40 euros. These 8,80 euros apply to a trip with a length between 3 and 4 hours, from the 4th full hour the rate increases to 5/12 and so on. From the 11th hour the full rate 26,40 applies. A multi-day trip from the 01.05.2018 10:00 to 03.05.2018 13:10 is divided into 24-hour periods + the number of remaining begun hours: 2 days + 4 hours = 2 + 4/12 of the daily rate = 2,3333 * 26,40 = 61,60 euros.
In Norway, a domestic trip starts monetizing after the first 6 hours, the employee becomes 289 NOK. Contrary to Austria, in Norway there are just 2 steps: one for 6-12 hours of 289 NOK and the full 537 NOK for anything between 12-24 hours. 24-hour periods are counted, but the last day of a multi-day trip counts as a full one as soon as the remainder exceeds 6 hours. I.e. a trip from 01.05.2018 10:00 to 03.05.2018 18:10 gives 2 days + ~8 hours = 3 daily rates = 3 * 537 = 1611 kroner. A Norwegian speciality is a higher overnight stay rate of 733 NOK, while no overnight is 537 NOK.

Should the employer or customer provide free meals, the daily rates begin to decrease. In Austria, a domestic lunch leads to 50% reduction and the dinner reduces the daily rate to zero: 50% – 50%. The percentages refer to the full rate of 26,40 EUR, and a single lunch reduces a short 3 hours trip to zero: 4/12 – 1/2 = 1/3 – 1/2; the per diem amount may not become negative, though.
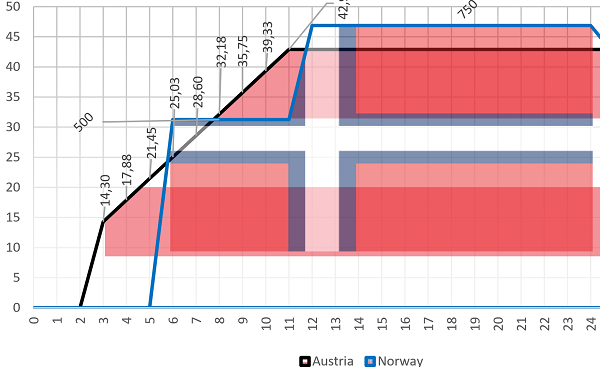
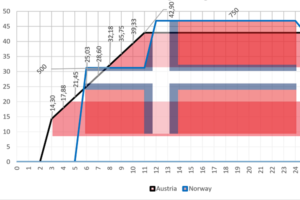
In Norway, a breakfast gives 20% of reduction, a lunch counts 30% and a dinner is 50%: 20% – 30% – 50%. I assume the percentages apply to the respective rate of 289, 537 or 733. Let us put the numbers on a diagram (a non-overnight Norwegian stay is represented):

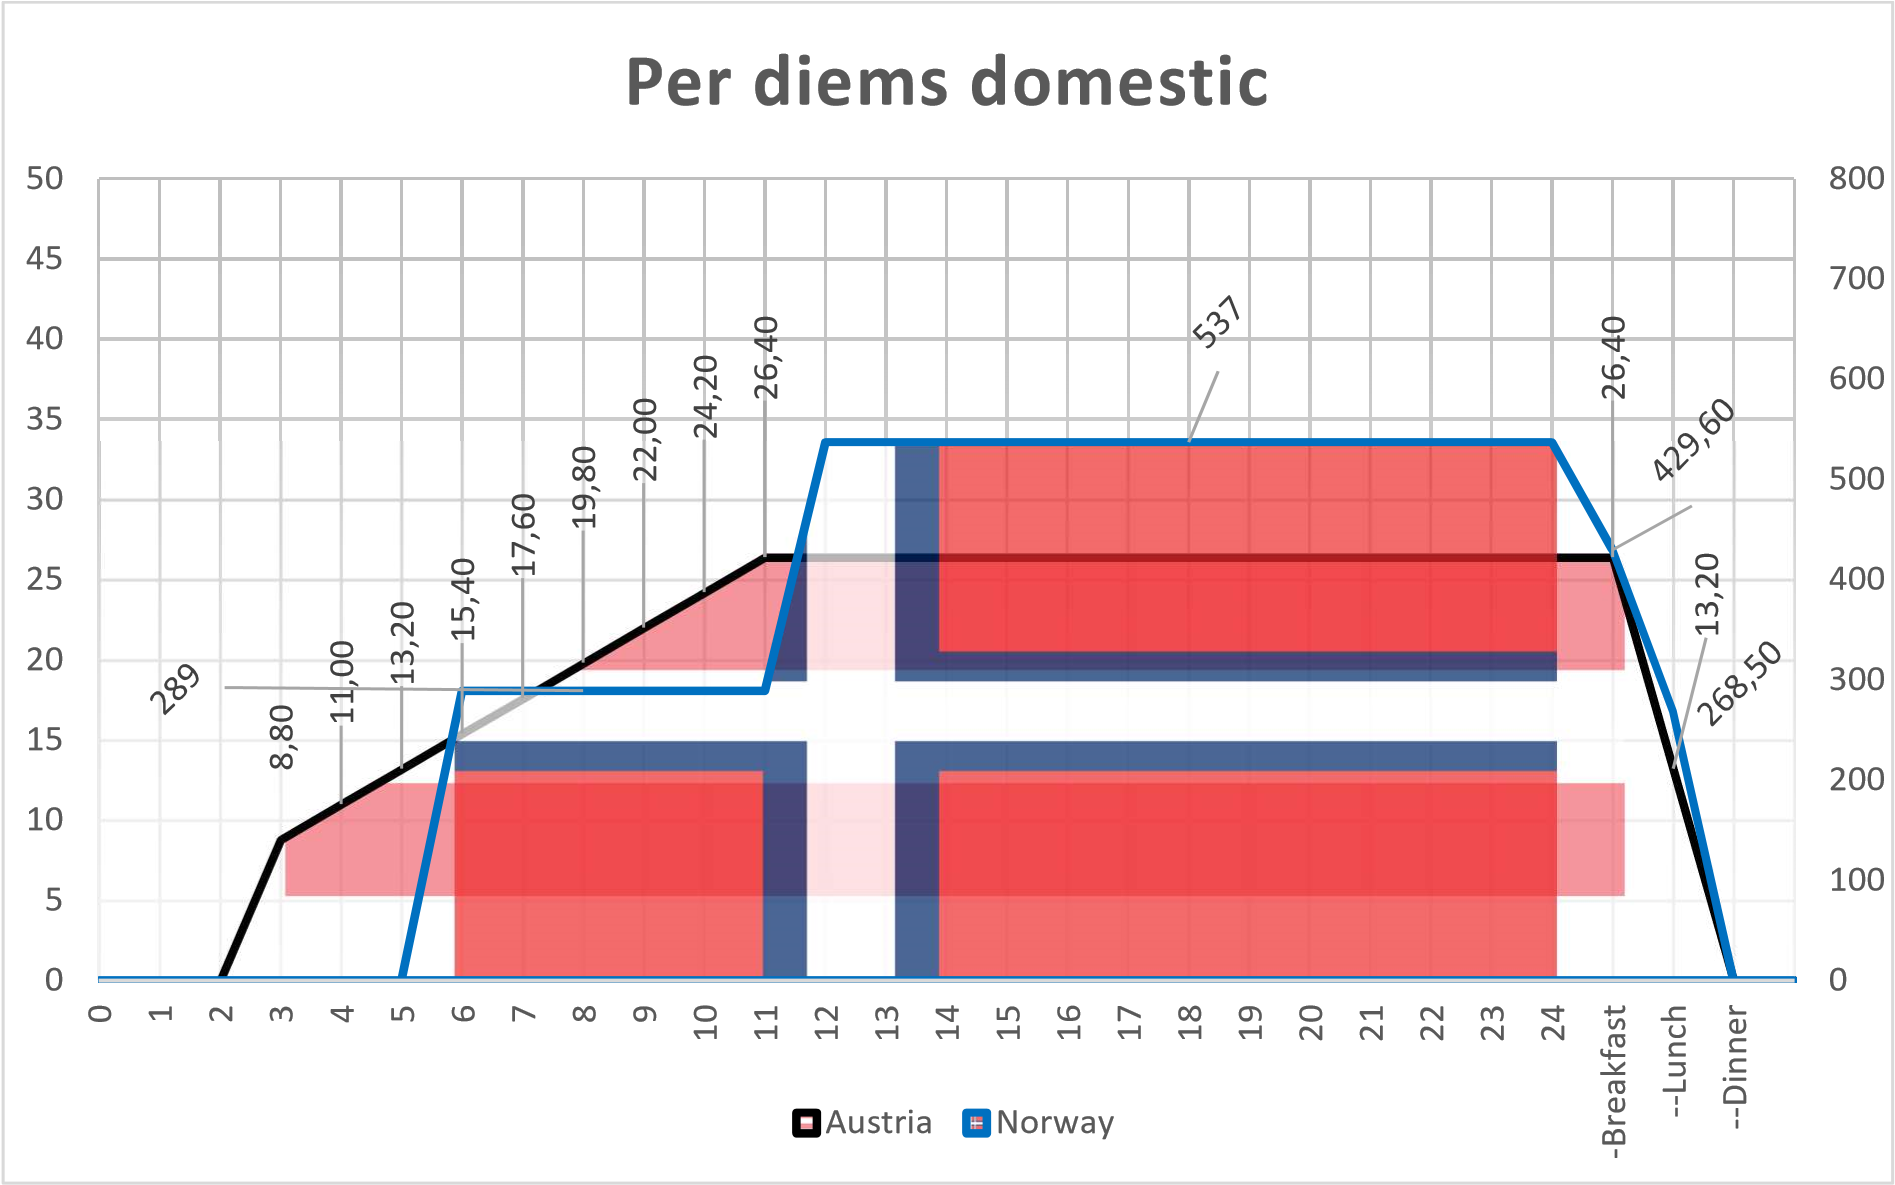
Foreign travel is peculiar: for Austria one meal abroad leads to no reduction, while 2 meals (lunch and dinner) reduce the foreign daily rate to 1/3 i.e. the reduction is never more than 66,67% per day. For Norway, even a hearthy breakfast abroad weighs less than a hyggelig breakfast at home: 10% – 40% – 50% 😉

Both countries maintain tables of detailed per diem rates for numerous destinations abroad, and account for some expensive capital cities.
In Austria the same X/12 rule applies to every destination abroad.
In Norway, the first 6-12 hours give 2/3 of the total foreign rate, and more than 12 hours give the full rate. This time, no exception is made for an overnight stay.
These rules can be visualized as follows:

Austrian configuration

The Minimum hours for per diem parameter is 3 hours (Expense management > Setup > General > Expense management parameters), Meal percent = 100, and Base per diem calculation on = 24 hour period.
The deduction for the breakfast used to be a grey zone in Austria: in the past there was an own percentage of reduction for breakfasts. This regulation was eased, and now only lunches and dinners count. In case of a travel abroad, one lunch or one dinner do nothing; only 2 meals lead to a reduction of 66,67%. I suggest using the mode Calculate meal reduction by = Number of meals per day, while preventing the breakfast entry by the Expense management > Setup > General > Expense report fields setup. The user should not be entering more than 2 meals per day.

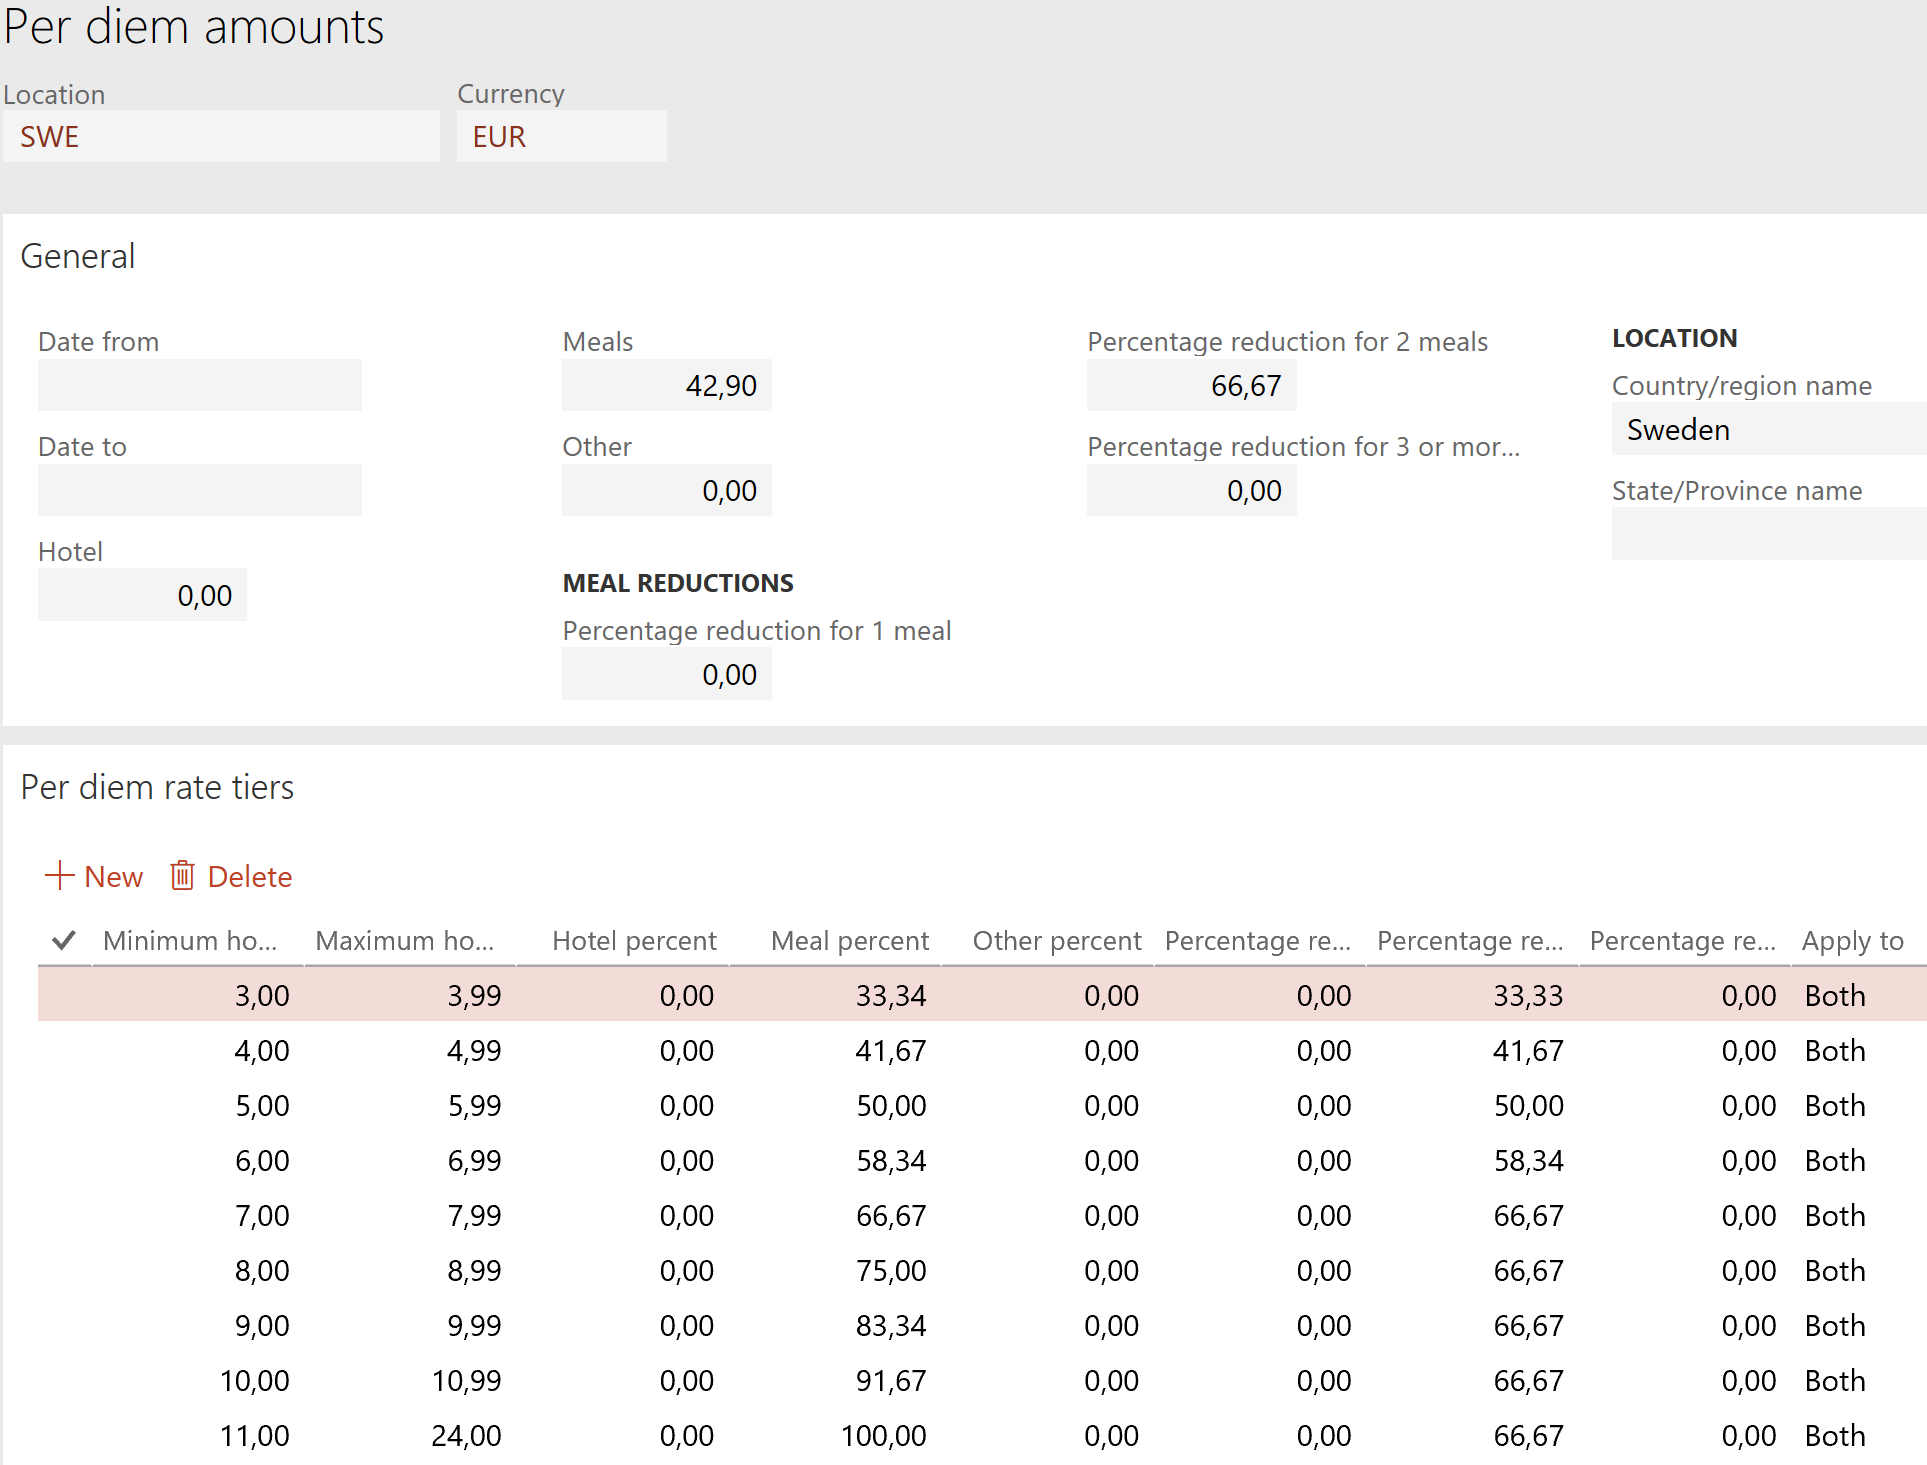
There can be as many Per diem locations as there are distinct rates per country and city. The location “AUT” for the domestic travel features the following rates and tiers (Expense management > Setup > Calculations and codes > Per diems):

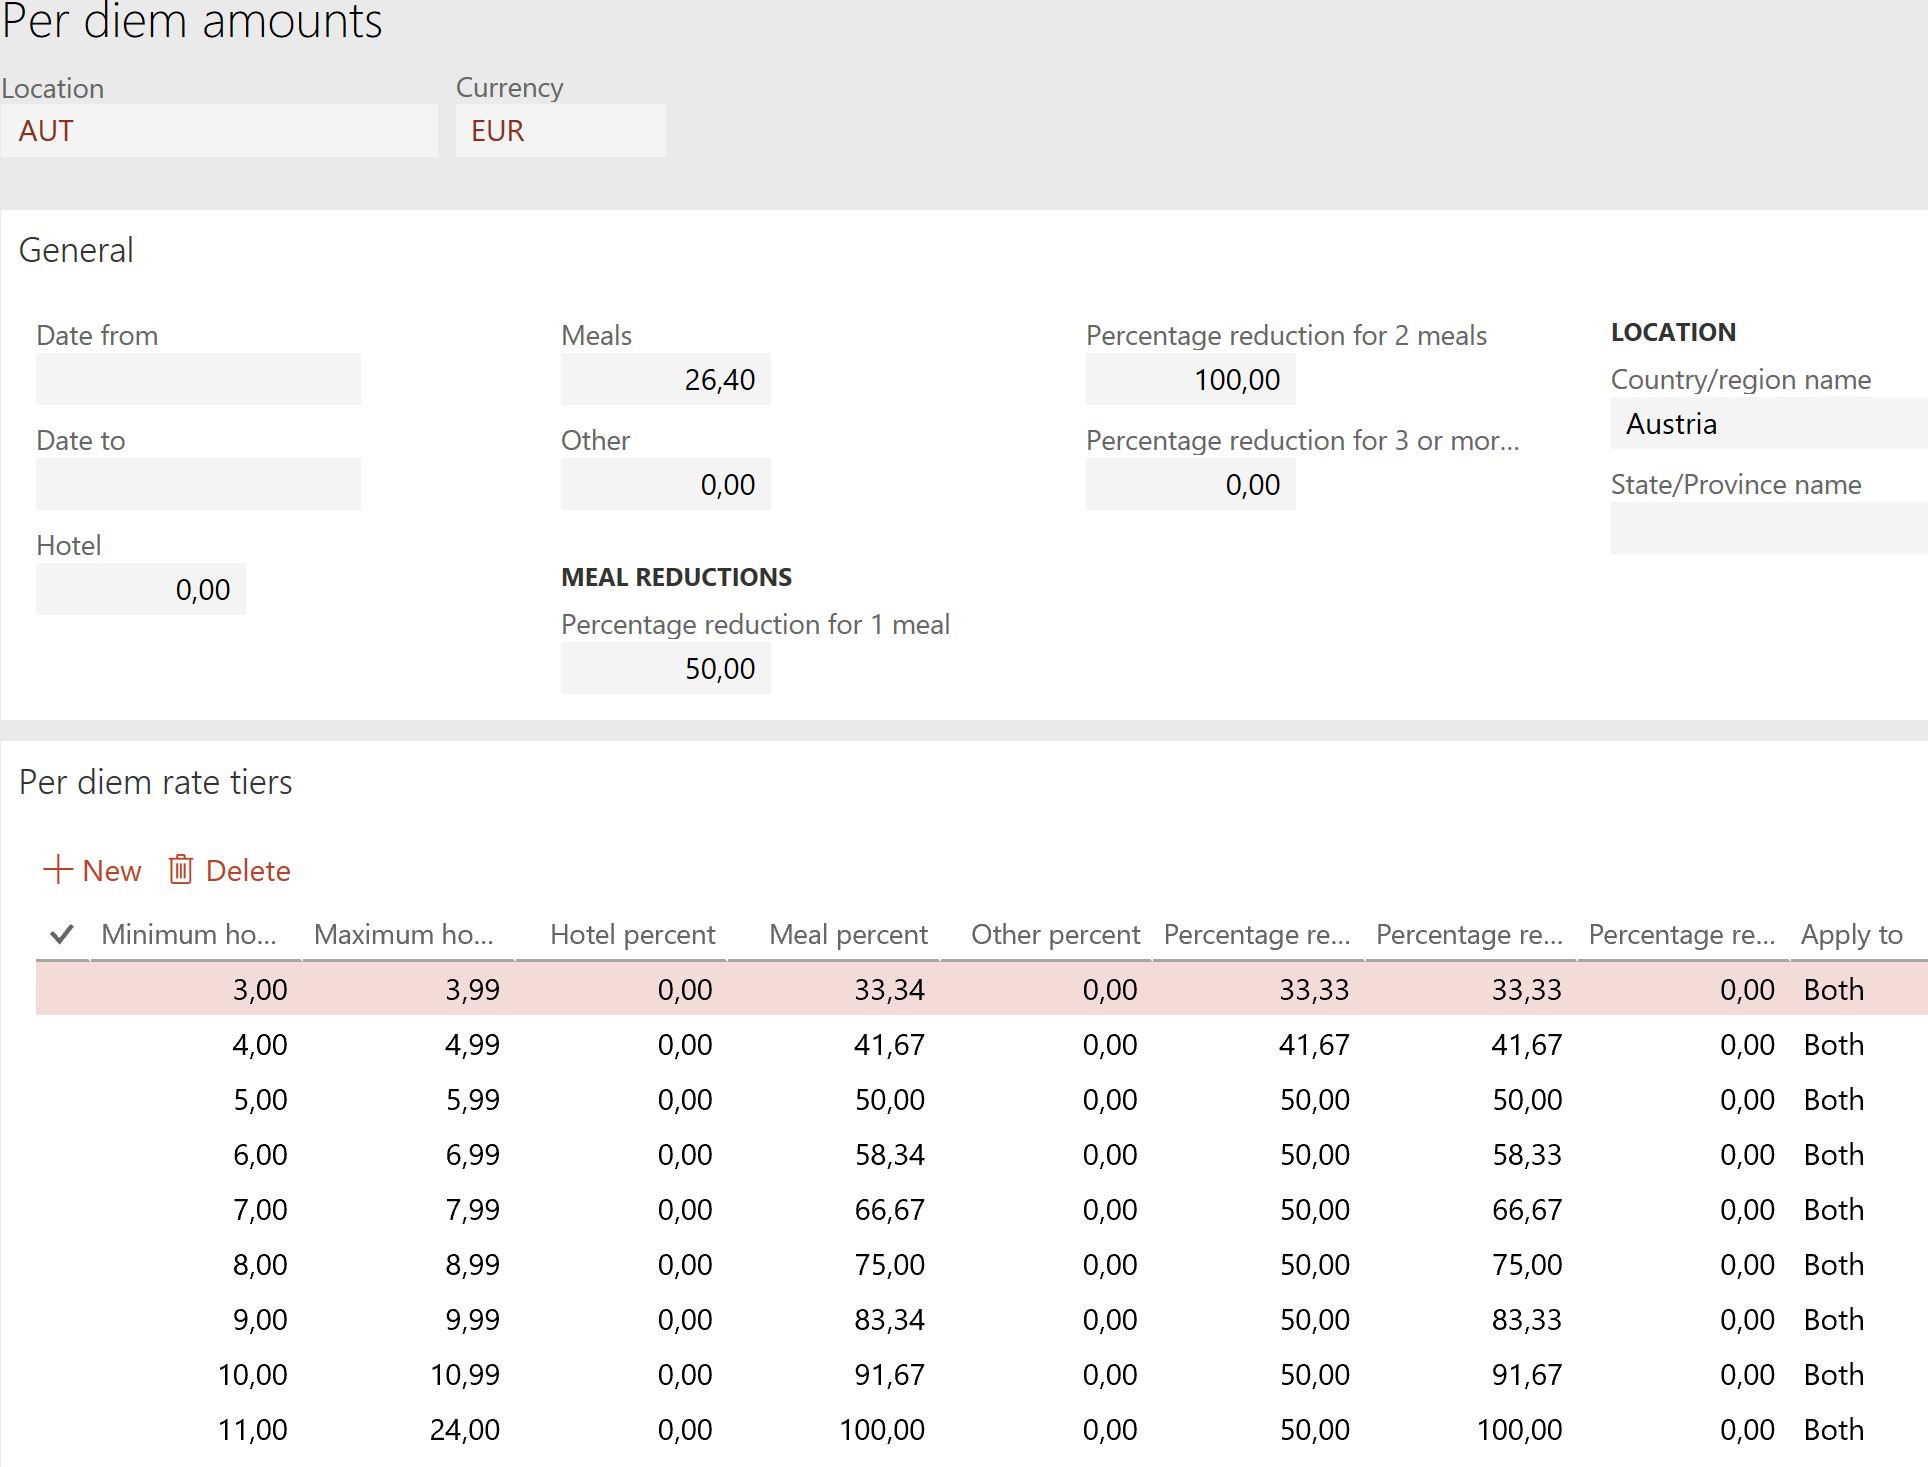
The Meal percent per number of hours refers to the portion of the full Meals rate of 26,40. The Per diem rate tiers apply to Both, i.e. to both the first day between 3 and 24 hours, and the last remainder of 3-24 hours. For any day (24 hour period, to be precise) in the middle, the General settings apply. The Percentage reduction for 1 meal and Percentage reduction for 2 meals should be tailored carefully, because the reduction amount may not exceed the given meal allowance amount and Dynamics gives an error message on the expense report screen: “Total meal reduction cannot exceed total per diem.”

Here is the result. A domestic business travel from 01.05.2018 10:00 to 03.05.2018 18:10 of 72,60 euros = 26,40 + 26,40 + 8,80 is reduced by 50% on the 1st day, by 100% on the 2nd day and by 8,80 euros on the 3rd day because there is nothing more to reduce there:

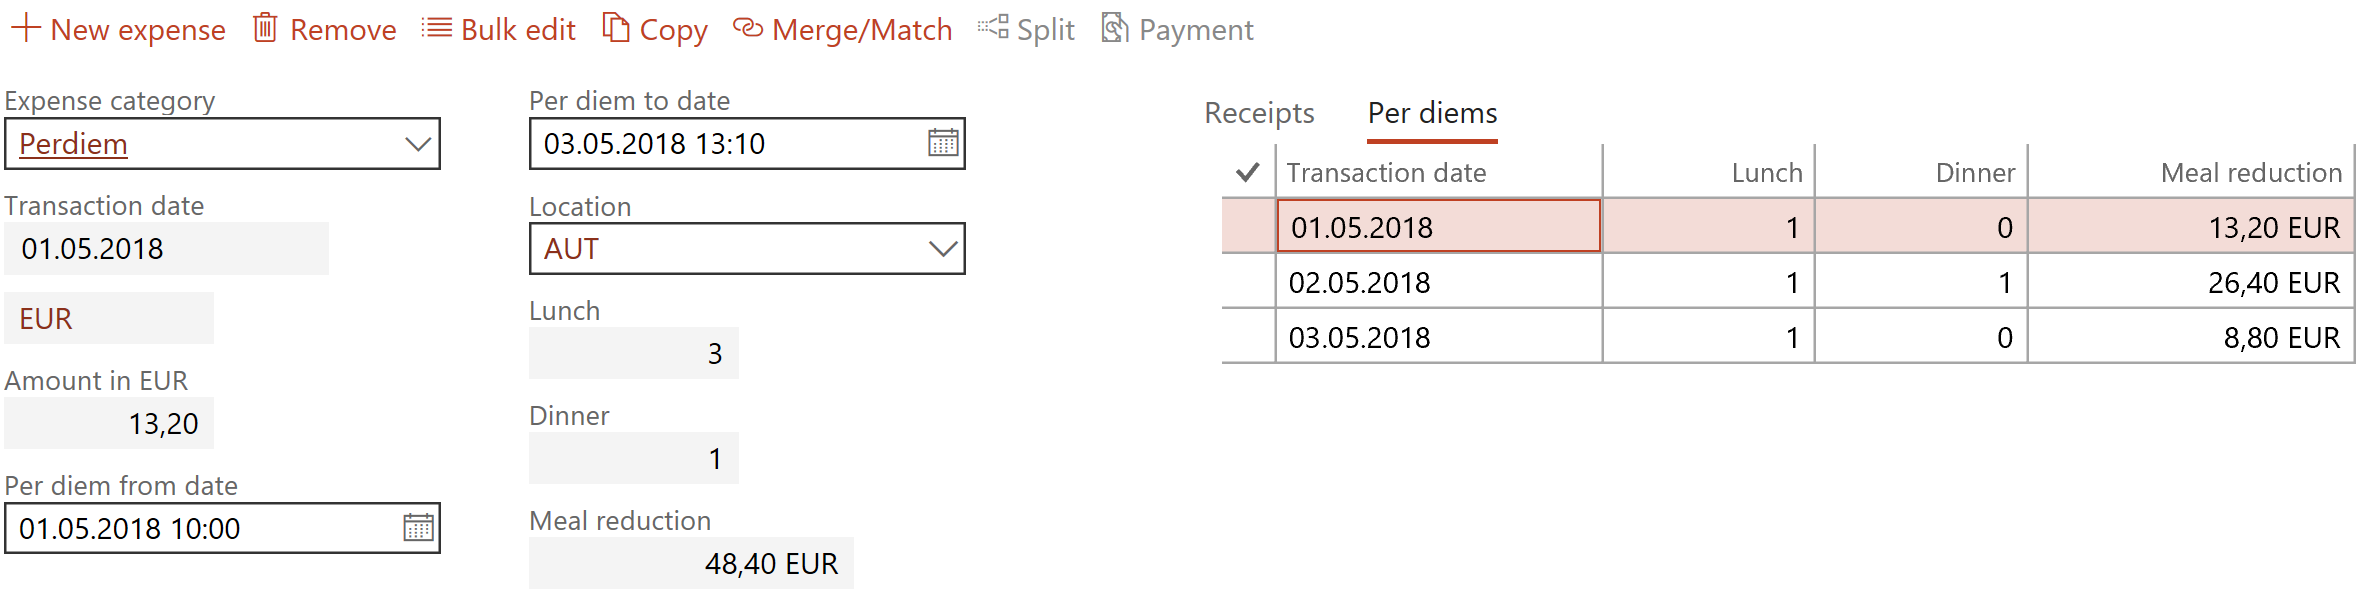
This amounts to 13,20 EUR.

The same trip to Sweden brings significantly more: 42,90 + 42,90 + 14,30 is reduced by 0% on the 1st day (one lunch alone does not count), 66,67% on the 2nd day and 0% on the 3rd day = 71,50 EUR:

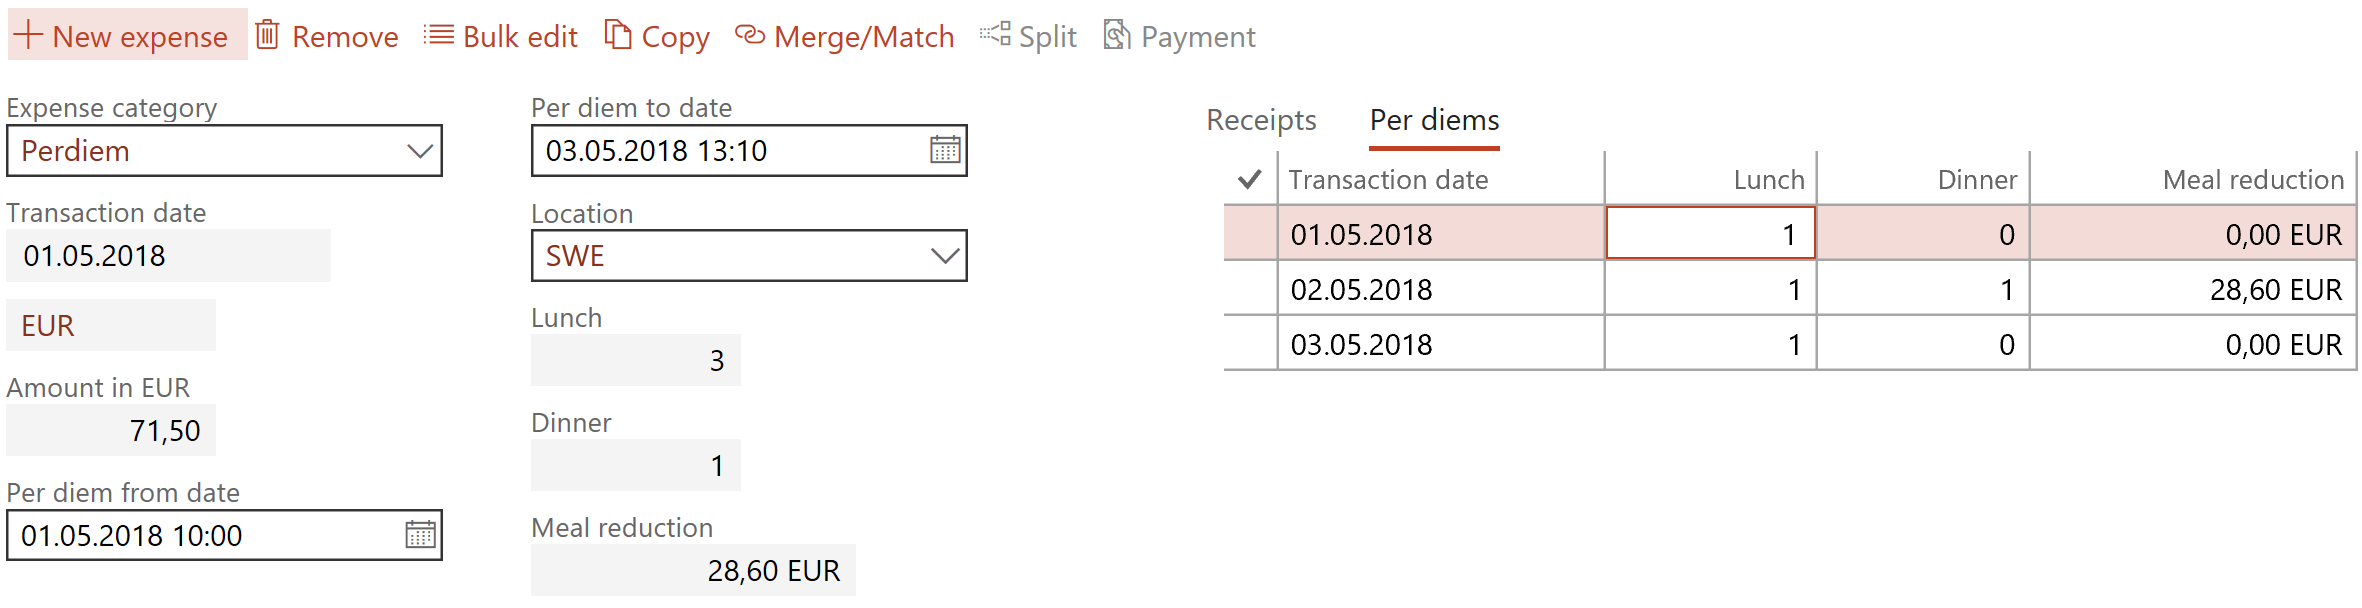
Norwegian configuration

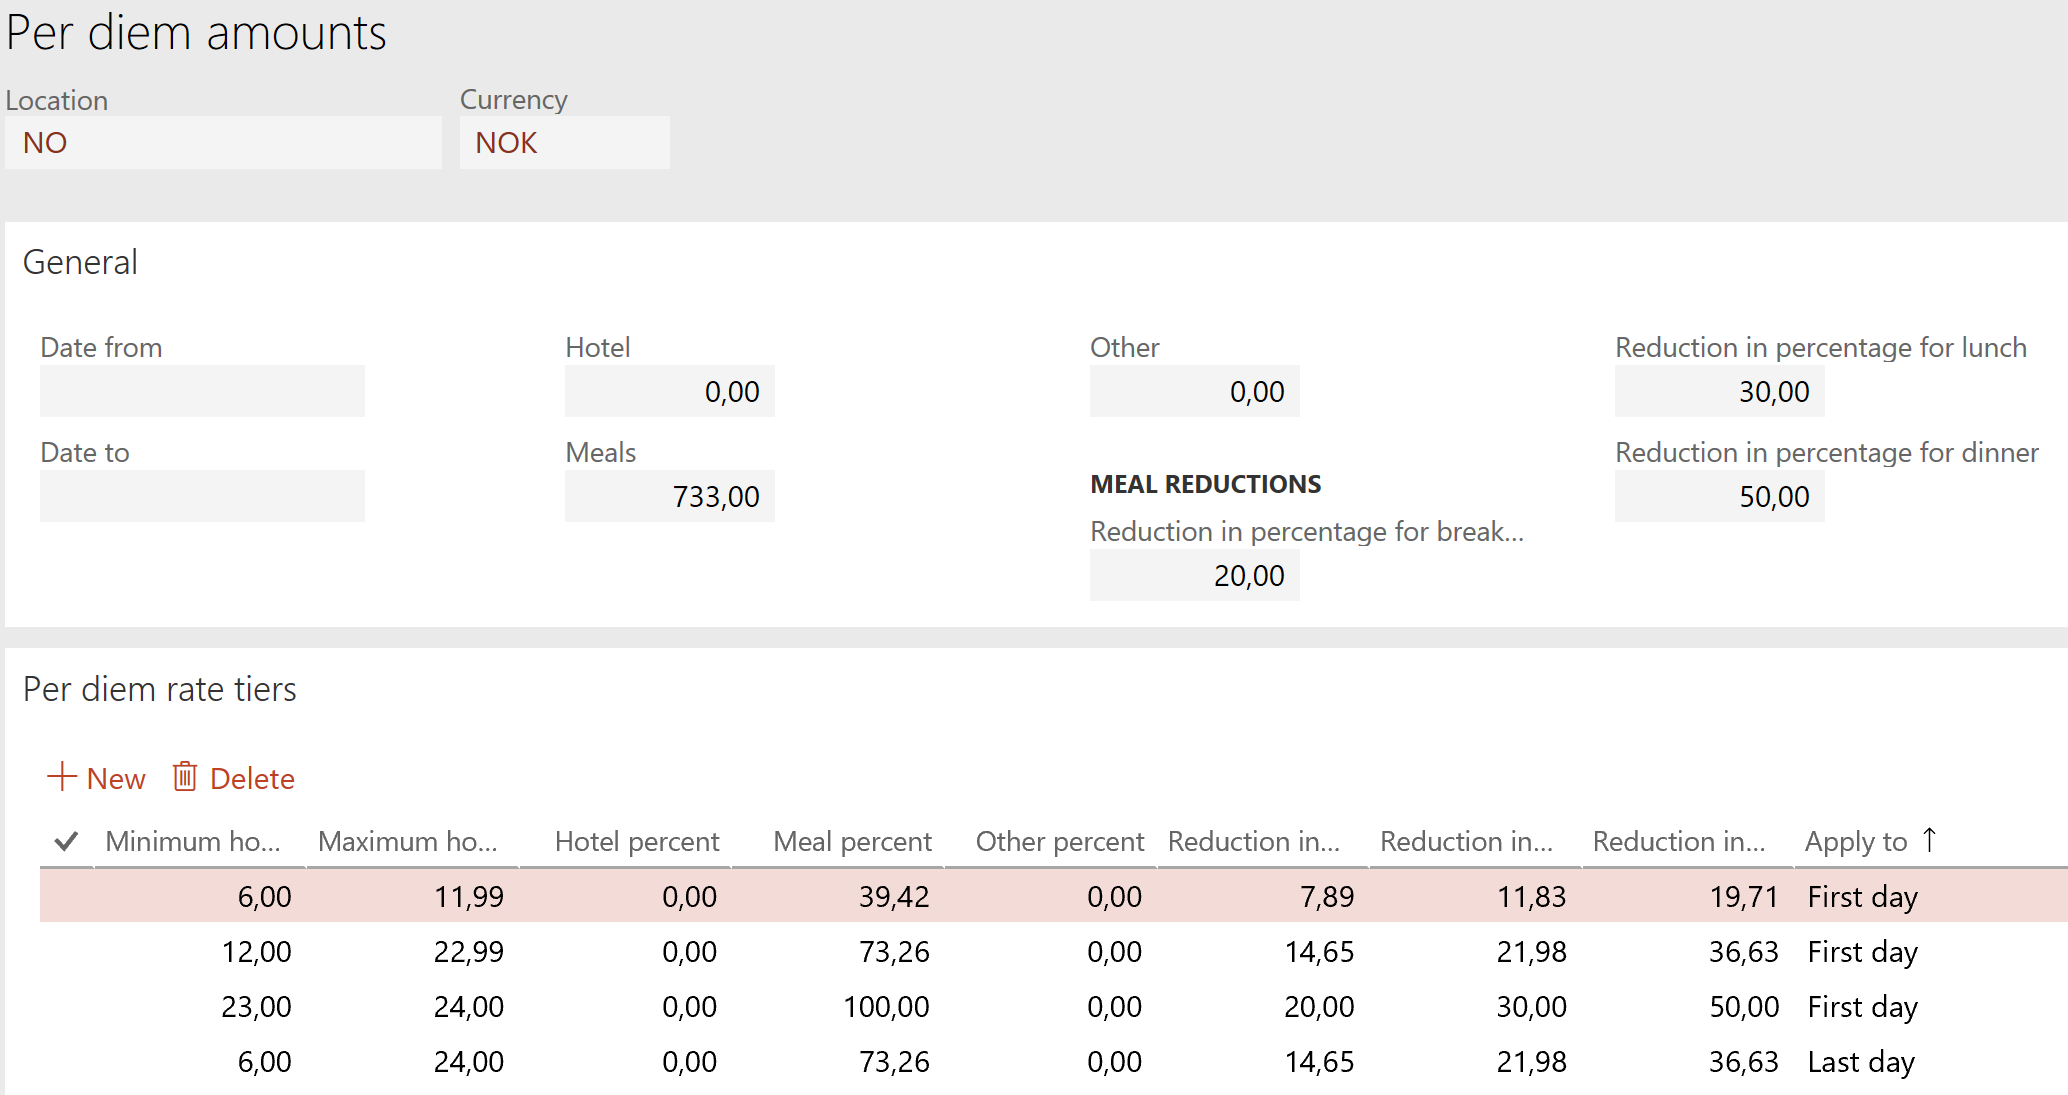
For Norway, the Minimum hours for per diem parameter would be 6 hours, while Calculate meal reduction by = Meal type per day, because the breakfast, lunch, dinner all lead to a reduction by a specific percentage (20% or 10%, 30% or 40% and 50%, respectively). Breakfasts should be enabled for entry. The Norwegian krone is a relatively light currency, the 0,01% precision of Dynamics’ configuration starts making a difference, and Per diem rounding needs to be set to Always round up, thanks to all the rates aligned to whole kroner.

In the Per diems configuration for the domestic location “NO“ I assume an overnight stay for every period longer than 23 hours, while the day of the departure is not overnight, i.e. the number of overnight stays is the number of whole 24 periods on site, and any last day longer than 6 hours gives 537 NOK:

With this setup a domestic business trip 01.05.2018 10:00 to 03.05.2018 18:10 which involves 2 overnight stays at the hotel and 2 breakfasts, 2 sponsored lunches and 1 sponsored dinner gives 733 + 733 + 537 reduced by 30%*733 on the 1st day, by 100%*733 on the 2nd day and by 50%*537 on the 3rd day = 781 NOK:

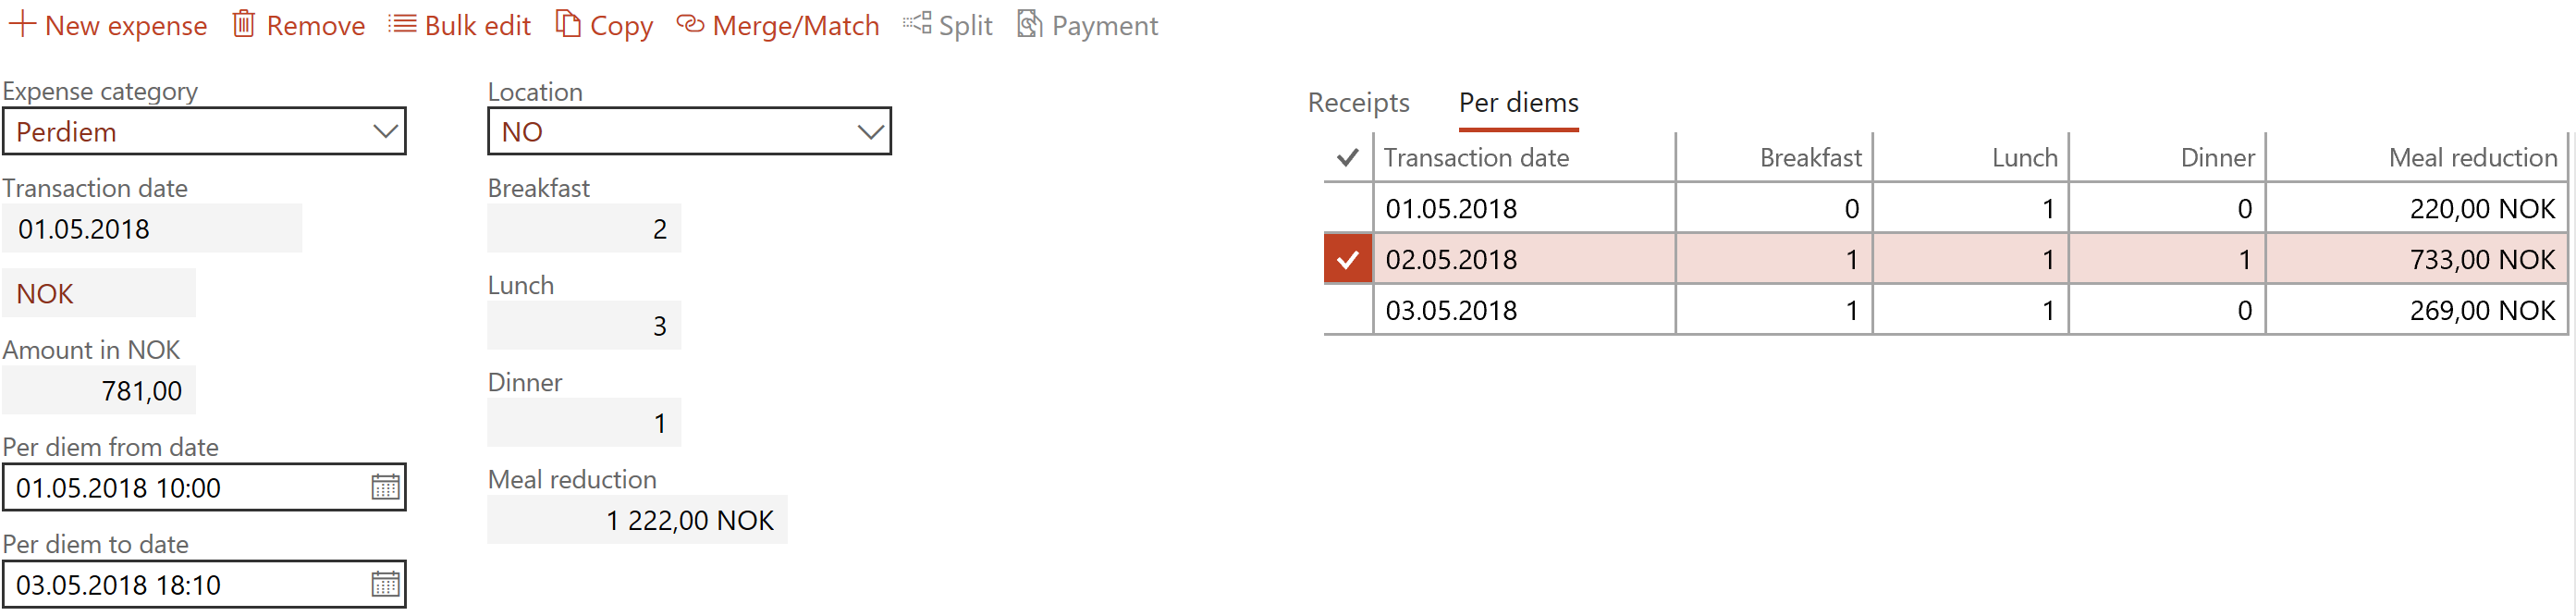
The above assumption with regards to the overnight stay may not always be correct, and this may require an additional virtual per diem location for Norway. When travelling abroad, there is no ambivalence, and the configuration reduces to the following (note the different reduction percentages 10-40-50):

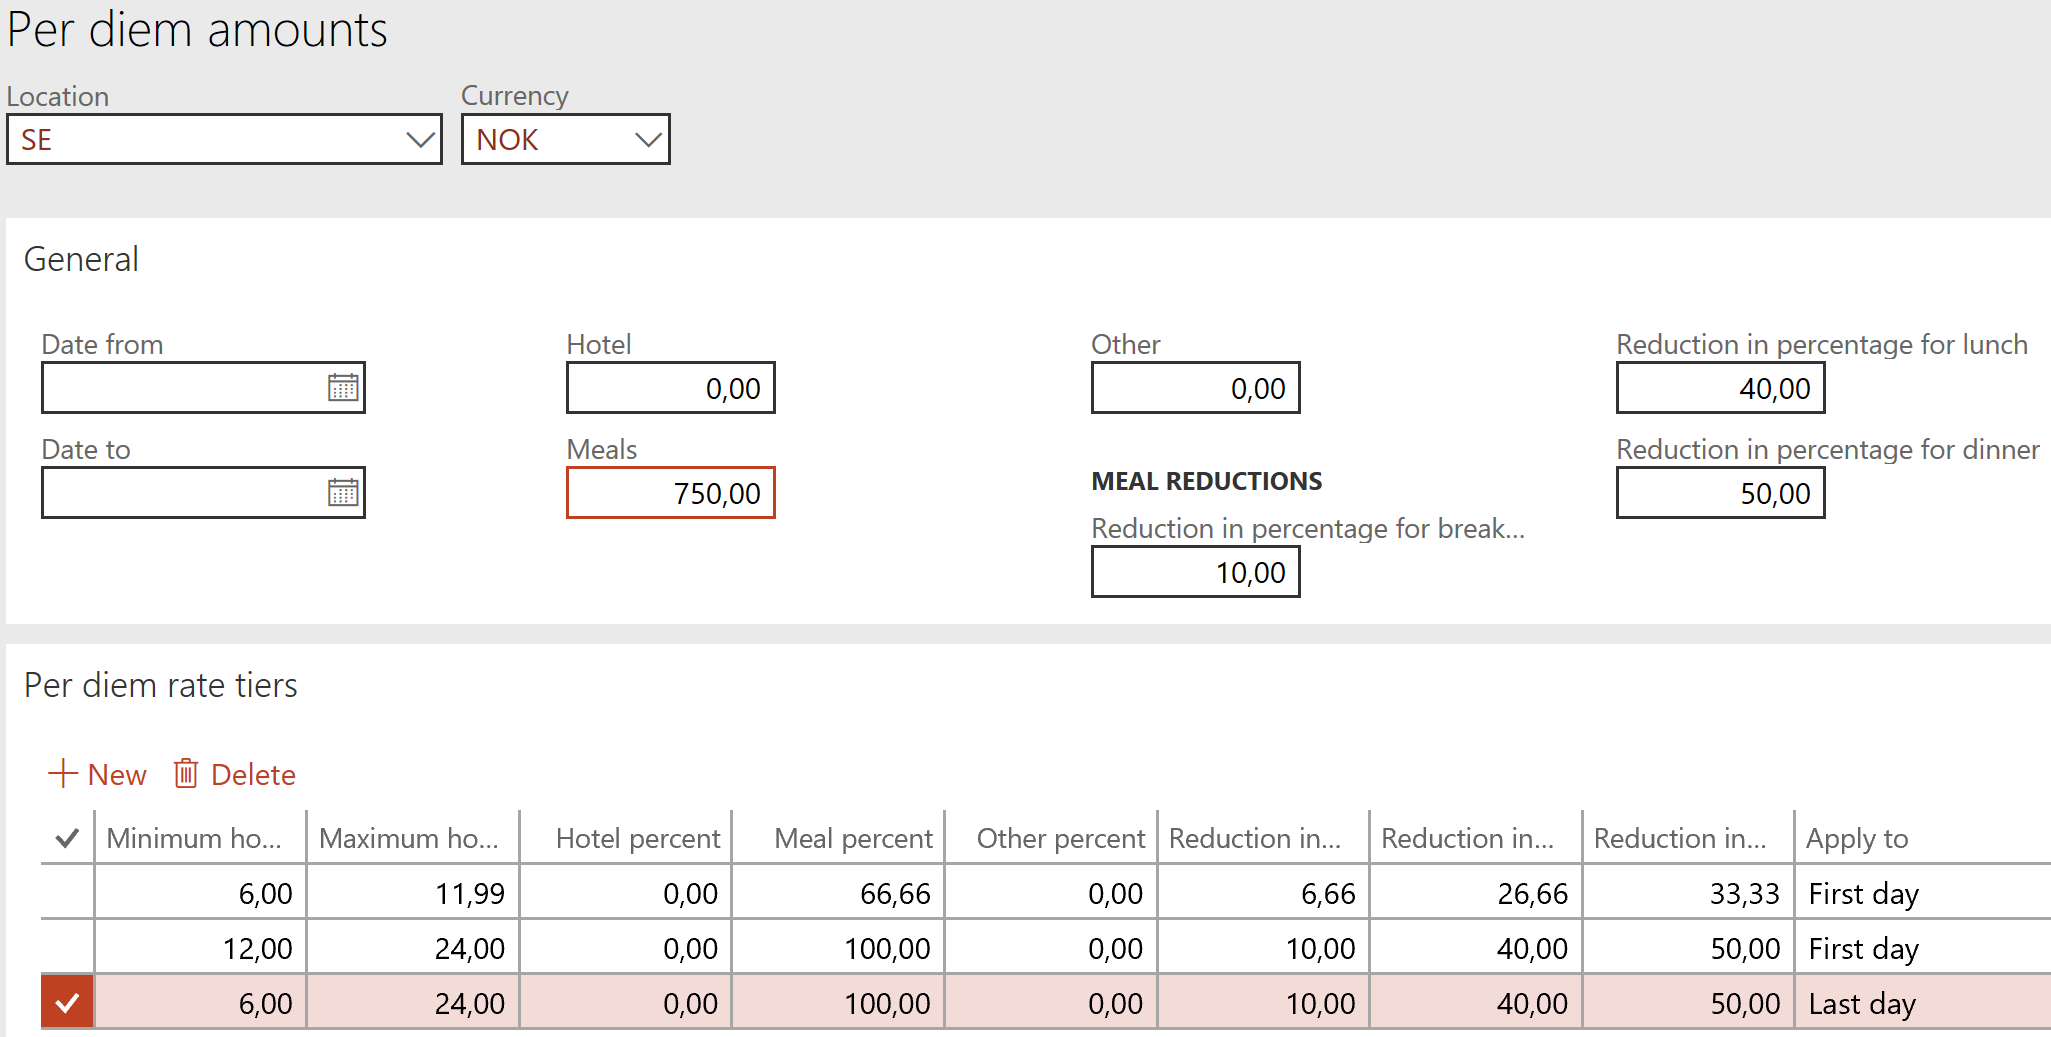
On a domestic business trip from Norway to Sweden from 01.05.2018 10:00 to 03.05.2018 18:10 this evaluates to 750 + 750 + 750 reduced by 40% on the 1st day, by 100% on the 2nd day and by 50% on the 3rd day = 825 NOK:
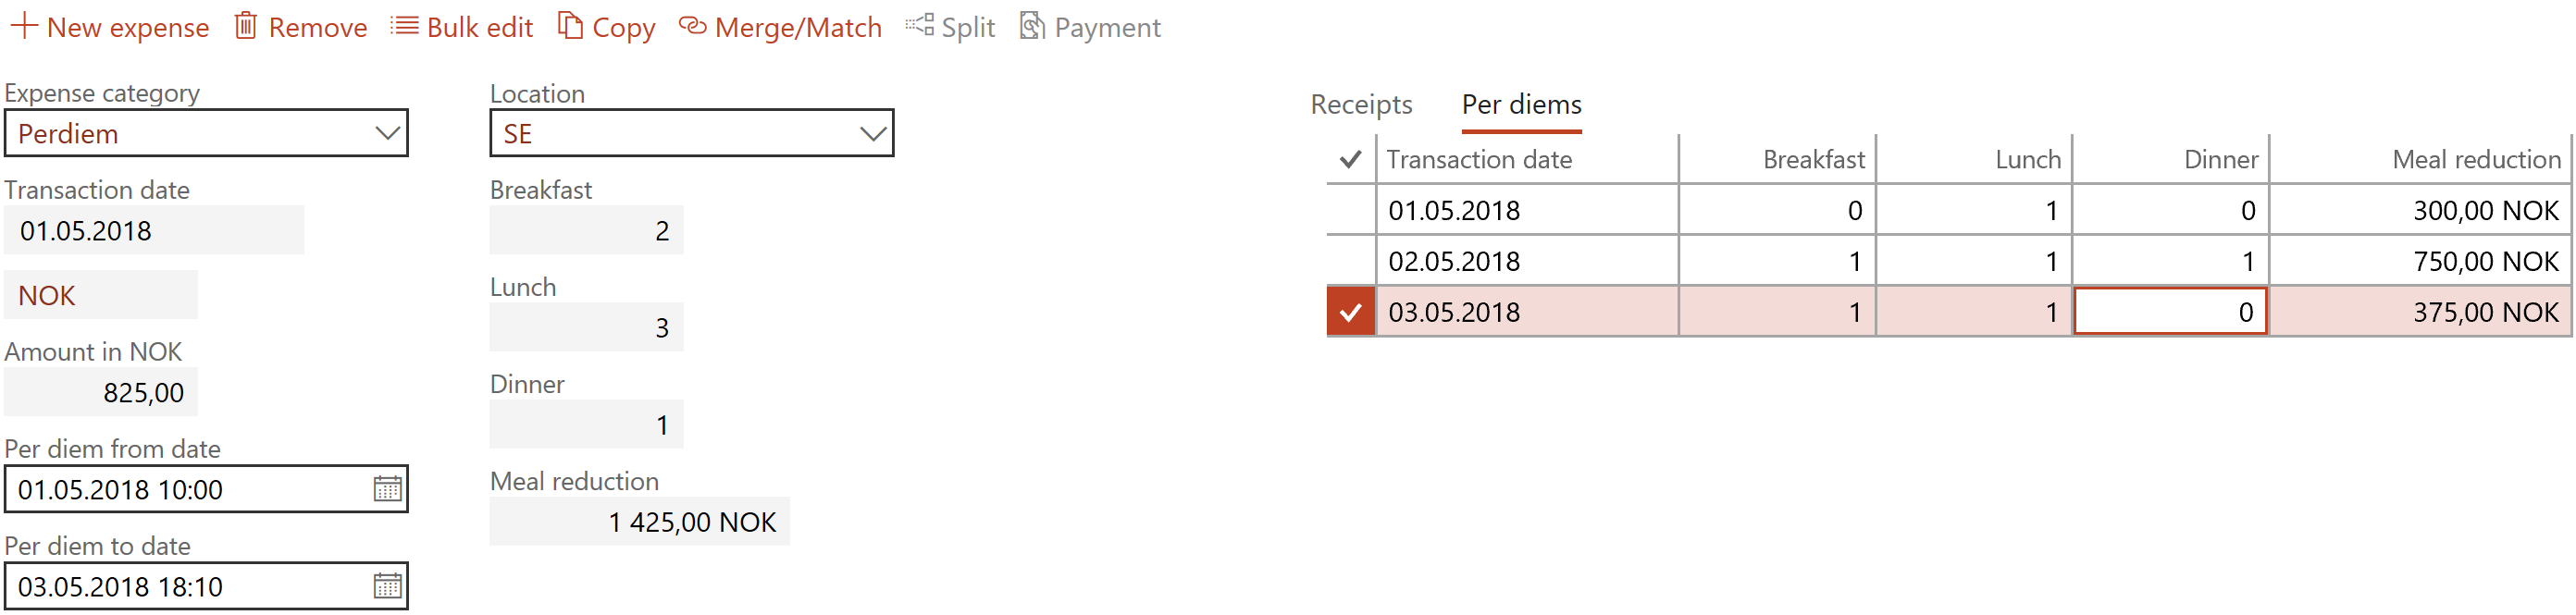
Exposing Dynamics 365 Onebox to the LAN

Exposing Dynamics 365 Onebox to the LAN

The below instruction was inspired by the blog How to access AX 7 from other machine. However, I work not on a single notebook, but connect to a prosumer 6-core Windows Server 2016 machine with 32 GB RAM, 1 TB M2. SSD. The resulting performance is comparable – if not higher – to a D365 production instance.

Onebox in the LAN

  1. The first [time consuming] step is to download the latest Dynamics 365 for Finance and Operations, Enterprise edition 7.3 with Platform update 12. Once downloaded, unpack the 10x3GB RAR archives to a fast disc, preferably SSD. The Connect site some of us have been using semi-officially to download the latest releases and betas has been retired, but the latest VHD is available here: https://aka.ms/finandops73pu12, God knows for how long.Update 27.03.2018: the above SharePoint link has expired too. Use LCS to download the image.
  2. Install the Hyper-V role to the Windows Server, should it has not been done before.
  3. In the Virtual Switch manager of the Hyper-V manager, create a new Virtual Switch of the External network type, and Allow management operating system to share this network adapter: Contrary to this advice, there is no need for another Internal network, because the virtual machine is going to be an equal peer in the LAN, visible under a local IP address. Should your physical server be assigned a fixed IP and running its own DHCP service, note the IP address down before applying the changes, because the Hyper-V switch is going to take place of the original Ethernet connection and become the primary ‘gate’.
  4. Next, create a new Virtual Machine in the Hyper-V manager. Generation = 1, attach the VHD you have unpacked at step 1. Give it dynamic memory; a Dynamics 365 Onebox running under full steam consumes between 8 and 12 GB of memory. Hence, for a comfortable experience your physical server should possess no less than 24 GB RAM. Give the machine the Network Adaptor from step 3. An Automatic Start Action (delayed) makes sense for an always on, accessible anytime virtual machine.
  5. Start the VM. It should be able to boot and join the local area network. Connect to the machine using the default credentials: Username = CONTOSO/Administrator, Password = pass@word1 (you will be asked to change the password ASAP). Be aware the EN-US keyboard is active by default. FYI: for the SQL server Authentication in SQL Server Management Studio, the user name and password are going to be AOSUSER, AOSWebSite@123.
  6. Once connected, make yourself comfortable in the virtual machine: assign your native keyboard layout, localization options and the time zone. Dynamics is not going to let you in, though, for the admin provisioning tool has not been executed yet. Let the Windows Server 2016 running in the virtual machine download and install the latest updates. It is going to take a while.
  7. Create a snapshot of the VM to rollback any changes to this virgin state, if needed.
  8. Run the AdminUserProvisioning tool from the VM desktop to associate your personal Office 365 tenant account with the Admin user in Dynamics 365. FYI: the basic Office 365 Business Essentials subscription is as cheap as ~4 Euro a month.
  9. Try the Internet Information Server and the Dynamics 365 application by typing in https://usnconeboxax1aos.cloud.onebox.dynamics.com in the browser on the VM. The External network connection is mandatory, because the application is going to authenticate you against the Azure Active Directory.
  10. In the meantime, open your DHCP management console and assign a fixed local IP address to the virtual machine by the Hyper-V virtual MAC address. The VM must have gotten a lease already under the name ‘MININT-F36S5EH’. This lease can be Added to reservation to make the lease persistent, e.g. 192.168.0.201
  11. What the C:\Windows\System32\drivers\etc\hosts file does to the local machine, so is the DNS server for the local network. In the DNS console, create a new Forward Lookup Zone cloud.onebox.dynamics.com, and add a New Host (A) usnconeboxax1aos with the IP address from step 10 into this zone. The FQDN of the virtual machine in the local network becomes usnconeboxax1aos.cloud.onebox.dynamics.com:
  12. To test the connection, you may temporarily turn the firewall in the VM off for the internal network, and try to ping the VM by the name usnconeboxax1aos.cloud.onebox.dynamics.com from a different host in the LAN, then navigate to https://usnconeboxax1aos.cloud.onebox.dynamics.com in the browser. The browser is going to show an SSL certificate error.
  13. To circumvent the warning, export the SSL certificate from the IIS in the VM by opening Bindings… of the AOSService site, then Edit… > View… > Details > Copy to File, then save the file in a local network share, since your VM is able to browse the local network.
  14. Install the certificate on your notebook into the Trusted Root Certification Authorities repository of your Current User by double-clicking the .PFX certificate file from step 13 (you may review or delete them if needed in the Manage user certificate console).
  15. Try https://usnconeboxax1aos.cloud.onebox.dynamics.com again, voila!
  16. Update 27.03.2018: In order to download Office files from the machine or to use the Data management module you need to re-configure the Azure Storage Emulator in the OneBox, otherwise an error appears on the attempt to connect to the address http://127.0.0.1:10000.
  17. Open the configuration file C:\Program Files (x86)\Microsoft SDKs\Azure\Storage Emulator\AzureStorageEmulator.exe.CONFIG and replace 127.0.0.1 with usnconeboxax1aos.cloud.onebox.dynamics.com at 3 places.
  18. Open the configuration file C:\AOSService\webroot\web.CONFIG and replace the encoded connection string with UseDevelopmentStorage=true;DevelopmentStorageProxyUri=http://usconeboxax1aos.cloud.onebox.dynamics.com
  19. In the Windows firewall, add a new Inbound rule and open the ports 10000, 10001, 10002 to the Private network. Update 02.09.2019: The Azure Storage Emulator fails to release the 1000x ports on every VM restart e.g. due to mandatory Windows updates. Change the ports to 40000, 40001, 40002 in C:\Program Files (x86)\Microsoft SDKs\Azure\Storage Emulator\AzureStorageEmulator.exe.CONFIG, start the emulator, than restart the VM once more, set the ports back to 10000, 10001, 10002 and restart the emulator again.
  20. Restart the IIS application and the Azure Storage Emulator.

Onebox in the WAN

Exposing the same machine to the WAN is difficult. Obviously, you do not own the domain dynamics.com, and for the global Domain Name System to redirect an HTTPS call to the external IP address of your router, you have to rename the URL of the Dynamics 365 application first. The old instructions here and here do not work anymore, since authentication attempts from a fake URL such as dax.erconsult.eu fail with the error AADSTS50011: The reply address 'https://dax.erconsult.eu/' does not match the reply addresses configured for the application: '00000015-0000-0000-c000-000000000000’ Update 02.09.2019: This conundrum was solved by M.J. from the Netherlands: https://cloudtotal.blog/2019/08/tutorial-expose-a-dynamics-365-for-finance-and-operations-onebox-on-a-custom-public-domain/ Below is a copy of his work:

Connect the Warehouse Management App

Update 15.11.2023: Provided an up and running Dynamics 365 for Finance / SCM instance,as outlined in the previous chapter, the challenge is now to connect a Warehouse Management app and execute the respective workloads against the local server.
  1. Follow the advice Install the Warehouse Management mobile app – Supply Chain Management | Dynamics 365 | Microsoft Learn up to the selection of the authentication method.
  2. Opt for the User-based authentication. Follow the guidance User-based authentication – Supply Chain Management | Dynamics 365 | Microsoft Learn. It is essential to have these 2 API permissions granted to your Application: CustomService.FullAccess https://erp.dynamics.com/CustomService.FullAccess Resource APP ID: 00000015-0000-0000-c000-000000000000User.Read https://graph.microsoft.com/User.Read Resource APP ID: 00000003-0000-0000-c000-000000000000
  3. With regards to the user setup, you may find this blog highly useful: (6) User-based authentication (Device code flow) for the D365 Warehouse management app | LinkedIn The connection settings will look like this: where the client ID is the Application ID, and the Entra ID resource is the URL of the Dynamics 365 for Finance and SCM application.

EU Tax directives

EU Tax directives

A well-formed intra-community or export invoice in the European Union should have a certain remark for the issuer (exporter) to have a tax-free delivery, and for the recipient (importer) to apply the proper tax regime.

In the past we used to build complex hard-coded logic into our invoices in Dynamics AX: “if the destination delivery address is not our country but another EU member, and the goods are tangible, then print XXXX, otherwise YYYY” etc. It turns out we were reinventing the wheel. Pascal, a colleague of mine, discovered a function called Tax directive which emerged apparently in one of the AX2012 releases and remained in Dynamics 365 for Finance and Operations EE.

On the VAT codes screen there is a button called Tax directives. This button appears in legal entities with a primary address in one of the EU countries. The remark can be entered in the language of the prospective customer:

Now, if the parameter VAT specification in Sales ledger (en-us: Accounts receivable) > Setup > Forms > Form setup is set to either Registration currency or Registration and company currency, the text of the directive appears nicely in the middle section of the sales order invoice or the free text invoice:

The remarks are as flexible as the tax configuration itself, and the tax directives are additive, which allows for complex cases e.g. where services (=reverse charge) and goods (=IC delivery) are billed with one invoice.

There are limitations. The tax directives are not yet available on PSA (professional service automation) project invoices, in particular on the so-called “Project invoice without billing rules”. The remedy is the VAT exempt codes with their Translations. They are a bit more difficult to configure because not assigned to tax codes directly but to VAT group — Tax code combinations, but they fulfil the same purpose, here for the reverse charge remark in the German language:

You may vote for my product improvement suggestion to extend the VAT directives into the Project accounting realm sooner.