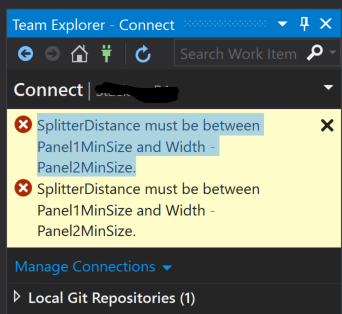
SplitterDistance must be between Panel1MinSize and Width – Panel2MinSize

SplitterDistance must be between Panel1MinSize and Width – Panel2MinSize

On the first attempt to connect to the Visual Studio Professional 2015’s Team Explorer on a brand new virtual development machine for Dynamics 365 for Finance many of us have been taken by surprize by the notorious “SplitterDistance must be between Panel1MinSize and Width – Panel2MinSize.” error message.

The Internet has a few tips https://stackoverflow.com/questions/33845414/… more or less useful, and the true reason is this: VS 2015 UI does not manage the high resolution well. Most of us will use a full-screen RDP connection to the virtual machine, Windows takes the native resolution of your notebook by default, passes this to Visual Studio and this leads to the said error message. The full HD resolution of 1920 x 1080 already means trouble.

The solution is simple:

  1. Sign off from the VM.
  2. Change the RDP connection settings from the fullscreen to 1024×768.
  3. Sign on to the VM.
  4. Start Visual Studio and connect to the Team Explorer for the first time.
  5. Close Visual Studio and let it save your preferences.

Next time, the error message will not occur even when connecting to another DevOps server.

Semi-finished goods in an advanced warehouse

Semi-finished goods in an advanced warehouse

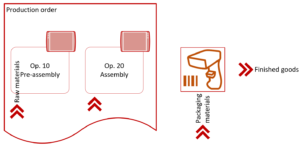
The management of semi-finished goods in the Production control module in Dynamics 365 SCM is notoriously messy in conjunction with the WHS (warehouse management), see my blog Missing flushing principle. The challenge is posed by the system if the material flows on the production shop floor do not require license plate handling, i.e. if people only need scanners to pick raw materials from the warehouse, but do not need them when passing semi-finished products from one working station to another. It becomes even harder if production orders overlap, i.e. if the downstream production order relies on a constant inflow of semi-finished orders and is started shortly after the upstream production order.

Preamble

We evaluated various scenarios:

  • a separate non-advanced warehouse in production is awkward, because every demand of raw materials results then in a transfer order which is a substantial overhead both in shipping and receiving. Moreover, transfer order put away directives do not ‘sense’ warehouse locations with material shortage, i.e. you cannot ‘aim’ multiple work station locations in one transfer order. Managing multiple transfer orders to different logical warehouses is even a greater overhead compared to a warehouse production picking wave, which flexibly consolidates all picking work for a production order or even for a set of production orders;
  • withdrawal Kanbans are awkward, because they require standalone rules for every material and every workstation. Managing BOMs is much easier than managing Kanban flows and withdrawal Kanban rules (where you don’t even have a data entity to import or update them in bulk!).
    Moreover, Kanbans do not ‘sense’ locations either, and rely on the MRP to trigger them. But the master planning usually does not consider the warehouse location level: if you do so, this renders the advanced warehouse management obsolete. We end up with logical warehouses per machine again. Finally, the MRP is not instant, the master planning may run for hours, but you need the material now!
  • phantom sub-assemblies do not invoke any movements at the warehouse and remain a viable and very safe alternative: the first inventory transaction will be at the very end of the last machine in the chain. This approach is not always possible (at least no at all stages in production) if the factory is required to count WIP items or builds up a safety stock of them.

The approach described below uses classic BOMs and production routes in combination with work policies or automatic work. Every route has a resource (machine, work station), and every resource is associated with one inbound and one outbound warehouse location. Materials in the BOM are marked for Resource consumption i.e. to be consumed from the inbound location of the respective machine. Provided that the locations are NOT license plate controlled, the warehouse management module may be configured to automatically pass the semi-finished materials from one location to another.

Converging or sequential material flows

Consider the following scenario: whatever the semi-finished products are, one machine supplies with them just one downstream machine. Or 2 or more machines feed together the next one, and the path never changes. In this case, the output location of the upstream machine can be defined the same as the input location of the downstream machine.

In the below example the outbound location of the machine 145 equals the inbound of 146: O145 = I146.
Converging material flowsThe inbound and outbound locations are set for a resource (Production control > Setup > Resources > Resource) in connection with a resource group. The group in turn specifies the [advanced] inbound and the outbound warehouses, which are normally the same (unless it’s subcontracting).
Resource locations

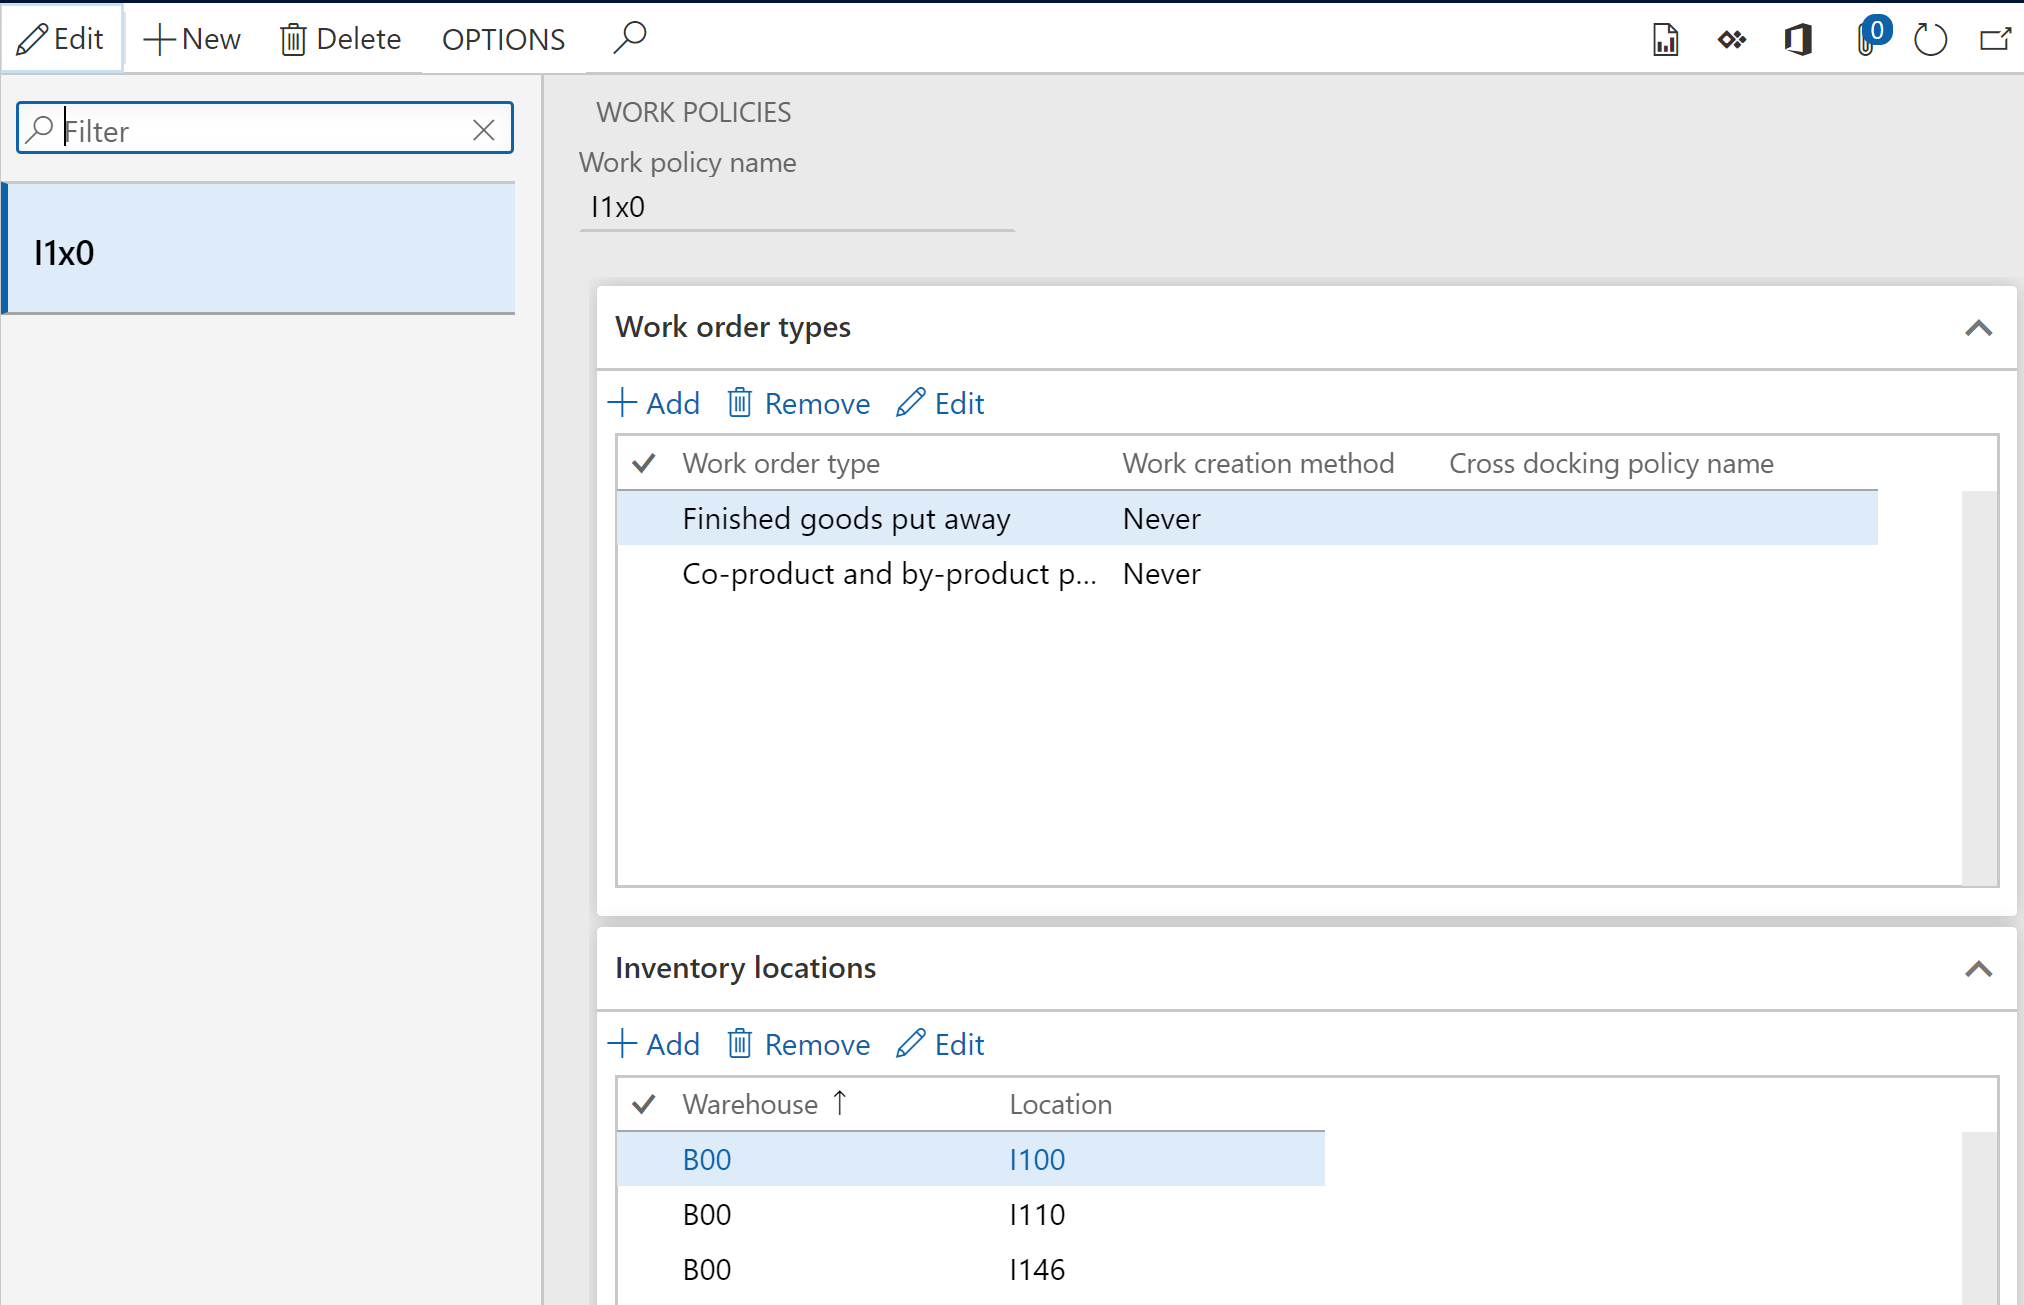
However, on an attempt to select a non-license plate controlled warehouse location (the one where in the Location profile the parameter Use license plate tracking = No) for the output, a warning message comes up: “A work policy does not exist for location %1. A work policy must exist for a non-license plate controlled output location”.
Indeed, a work policy must be created first to inhibit any put-away work on reporting products as finished into this location:
No put work policy
An unprocessed put away work is bad even if it points into the same location I146 -> I146, because it reserves the semi-finished product and makes it unavailable to the next machine. With the above policy no put-away work is going to be created out of the location I146, the material is reported as finished into this location and stays there, ready to be reserved and consumed by the downstream resource.

Diverging material flows

Forks in the material flow make it much harder to configure. For example, if one resource may feed different downstream resources depending on the context, then the above setup with a work policy is not going to work.
Diverging material flows
In short, one needs 3 ‘ingredients’:

  • a Work template with an automatic processing;
  • a specially prepared Location;
  • a set of “put” Location directives (“pick” directives are not necessary, because the picking location is always dictated by the resource).

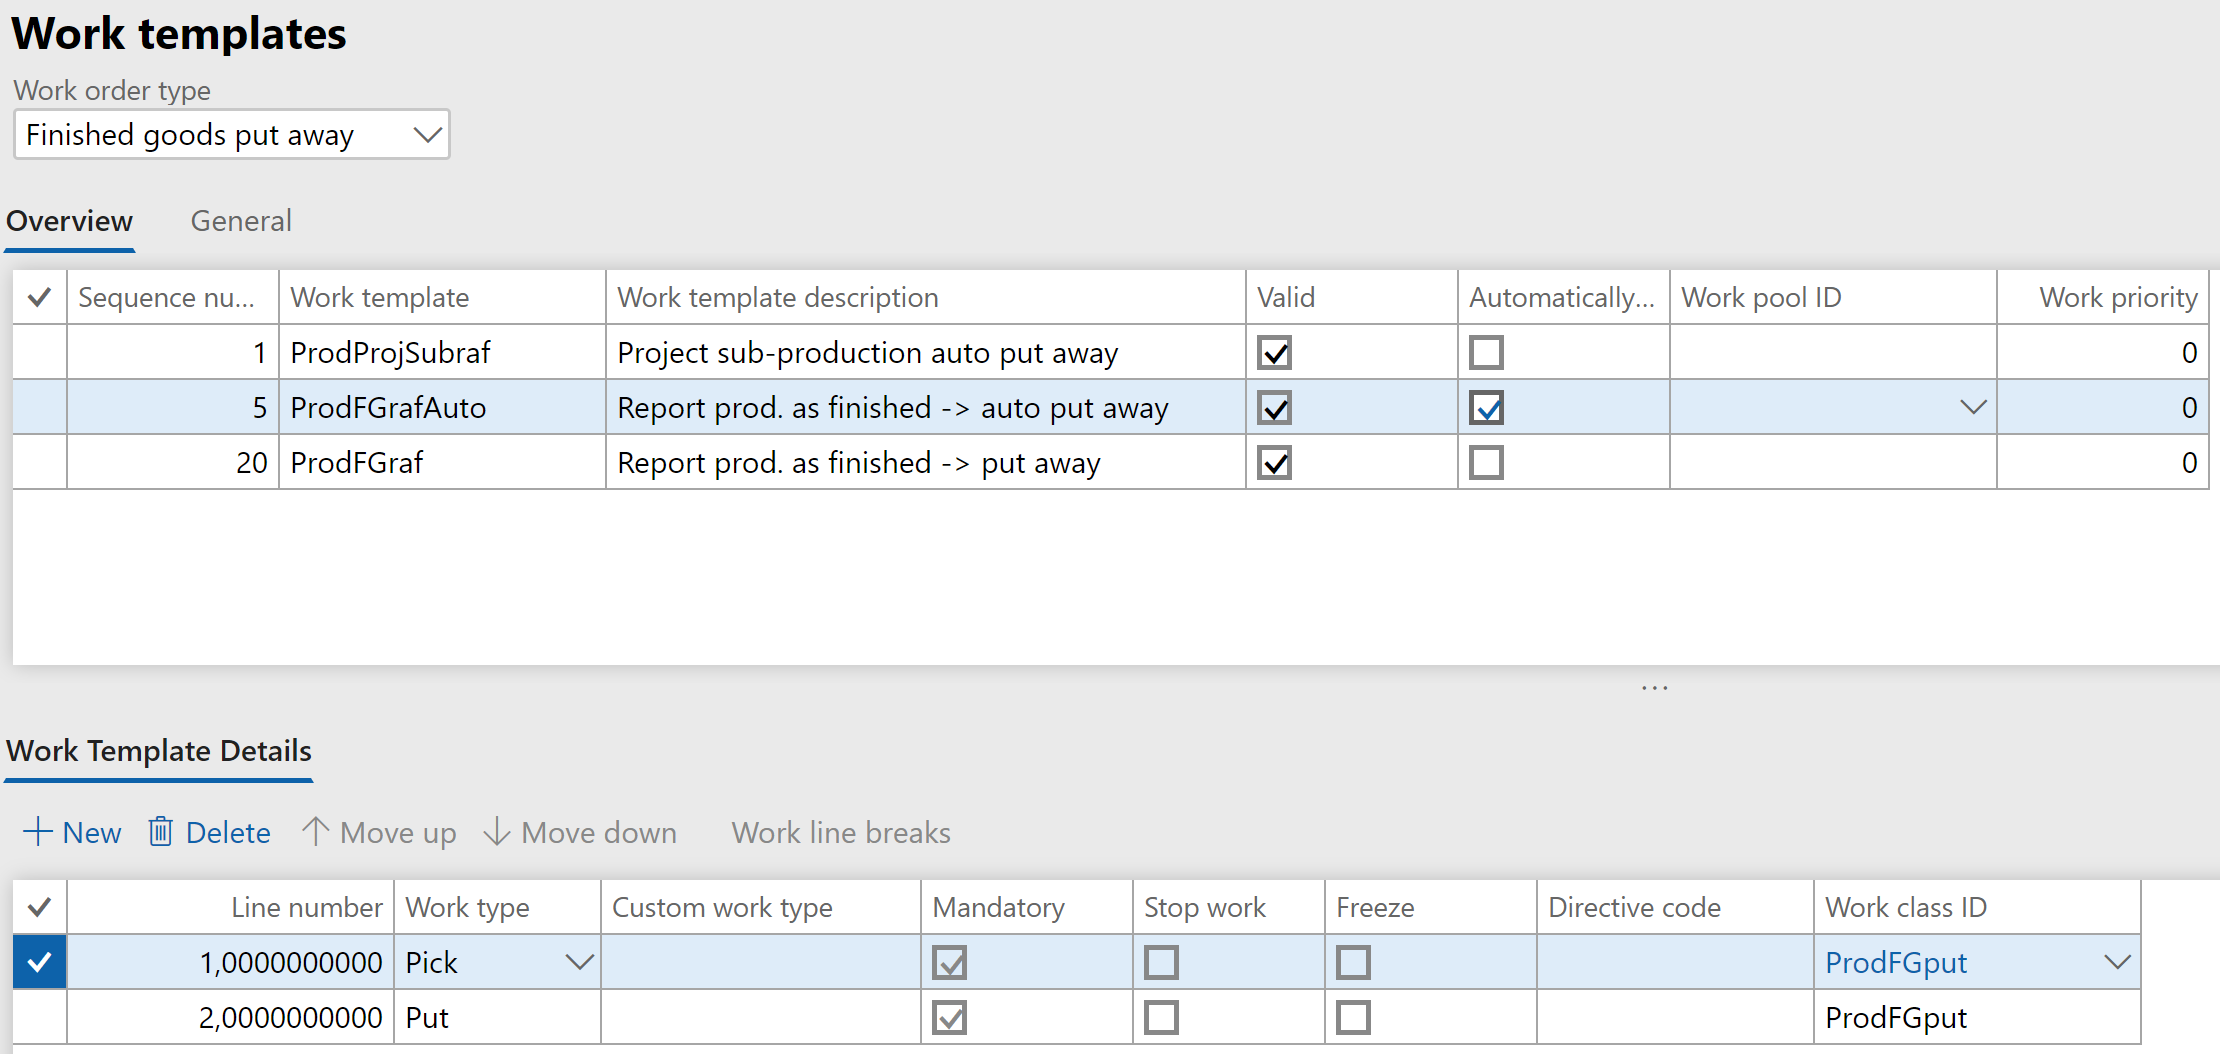
The Work template (Warehouse management > Setup > Work > Work templates) for the Finished goods put away work order type should have a typical Pick-Put pair, the Automatically process flag (!) set and a distinct Query to react to pre-defined semi-finished products.
Work template for Automatic processing
Bear in mind that (1) the automatic work processing requires a Default work user ID in the Warehouse management parameters; (2) the automatic work processing fails if the product is serial number controlled; (3) a number sequence for the license plates must exist: the system is going to take a temporary target LP.

The Location should not be license plate controlled, because if it was, the production worker would have to manually select a distinct LP on the Report as finished or the Manufacturing execution Feedback screen.
However, such a location cannot be selected in a resource, as we know. On the one hand, you don’t wish to have license plates, on another hand you need an automatic put away work to a certain location, and a prohibitive put work policy is not an option anymore.
This is not intended by Microsoft to work, but one can trick the system into it. First, assign a LP-tracked profile to the output location, and select it in the resource. Second, change the profile of the location to a Non-LP-tracked one!

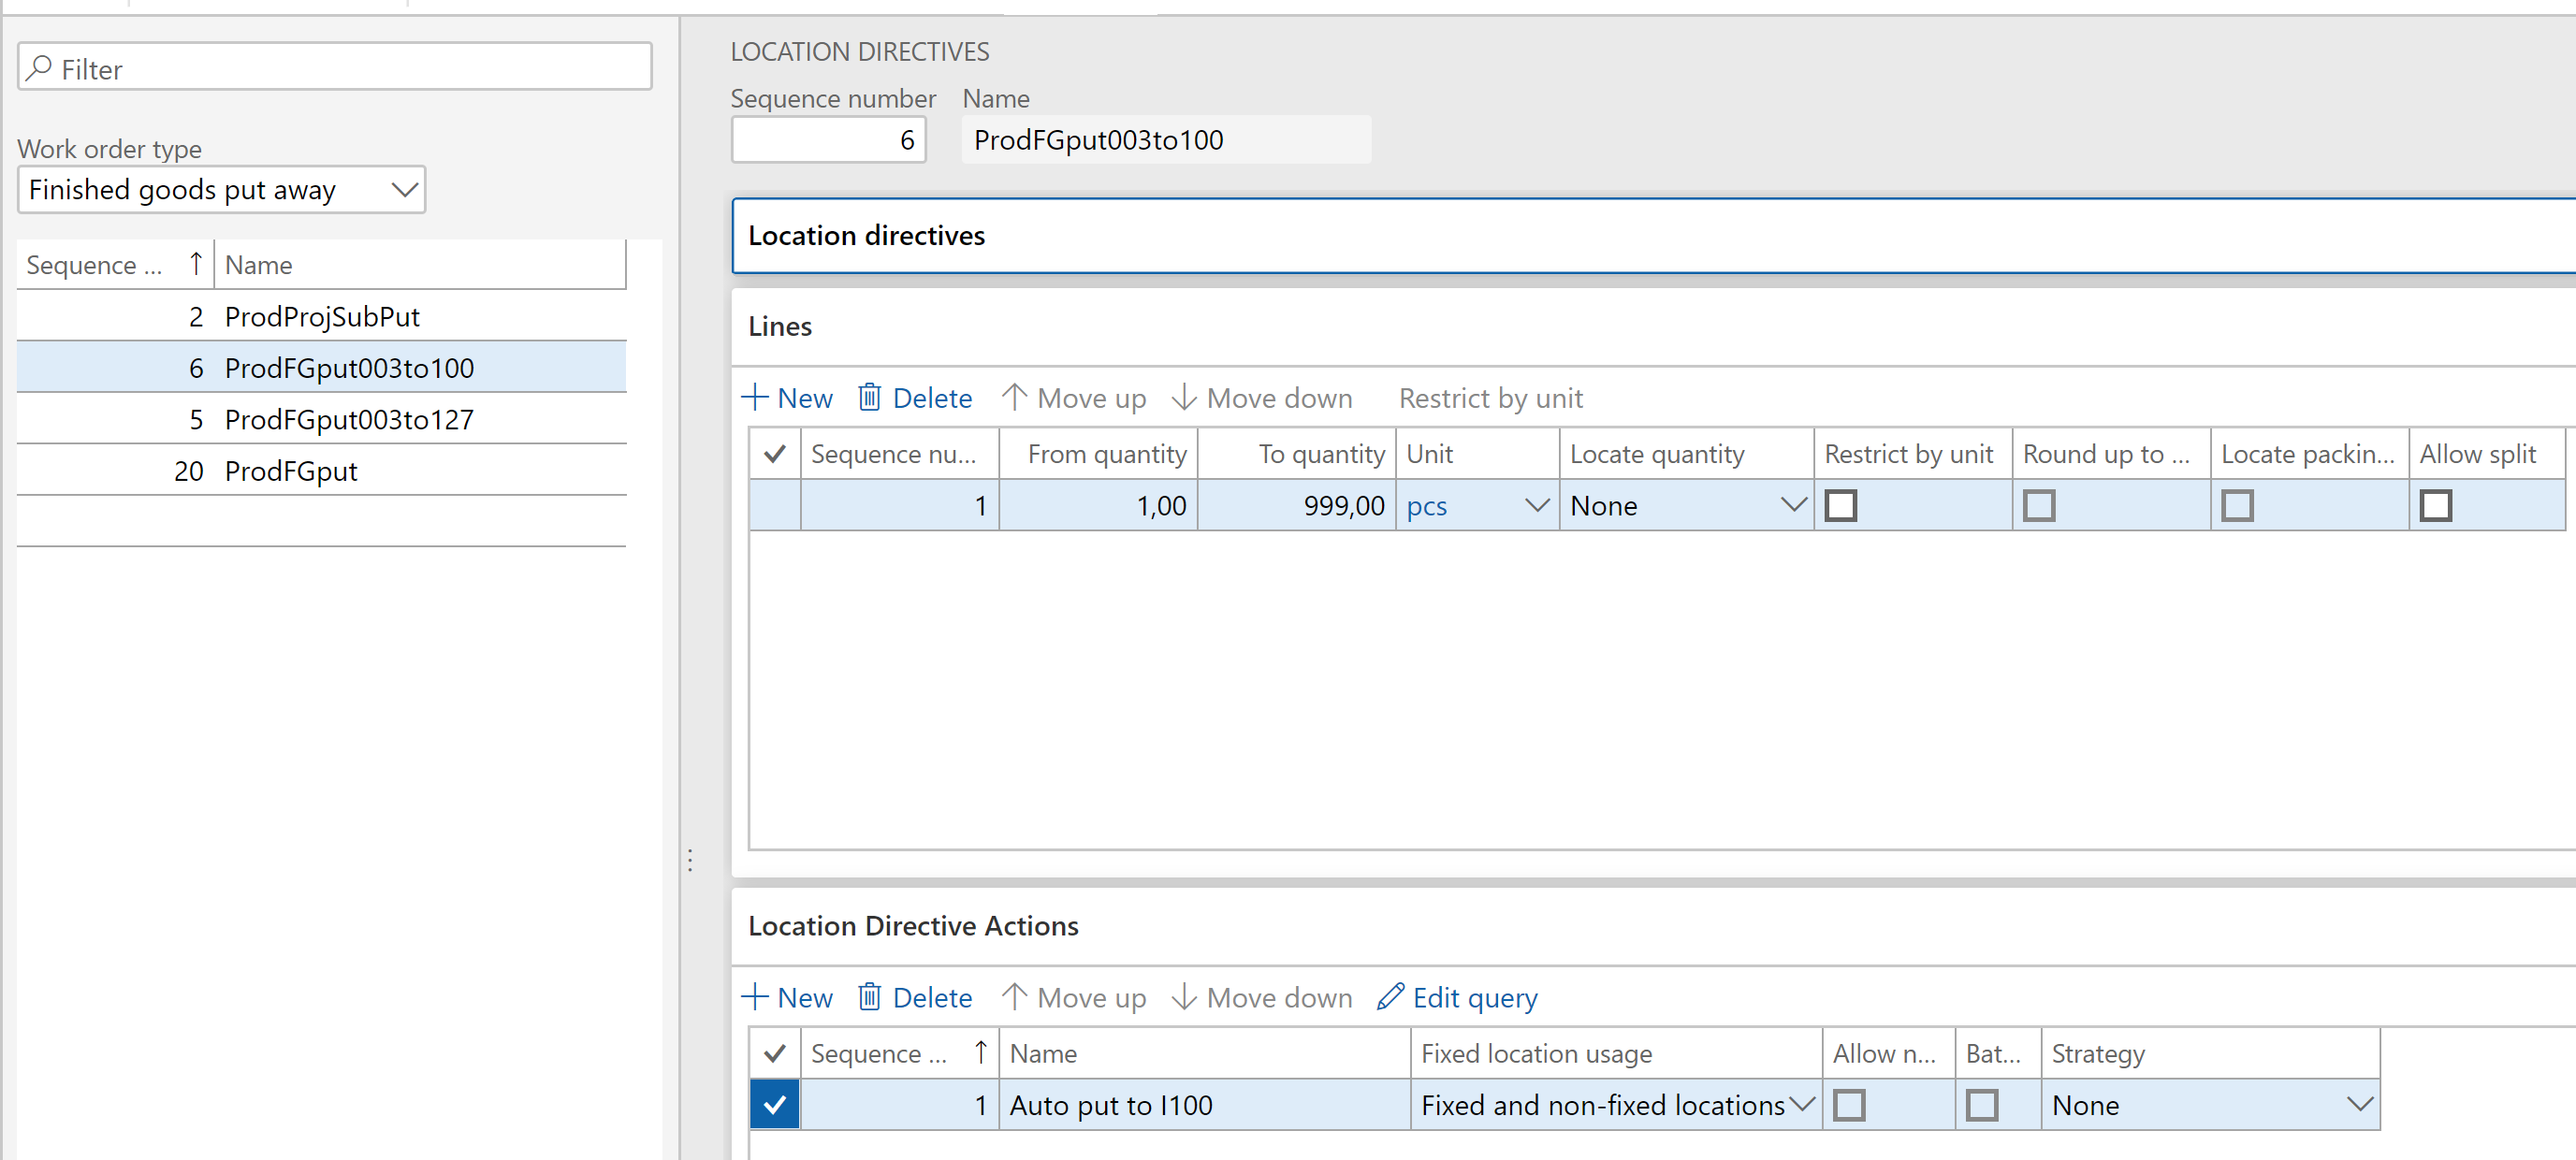
The Put Location directives (Warehouse management > Setup > Location directives) for the Finished goods put away work react to certain products or resources with the help of the directive header Query (one can join the production table with the production route in the query) and divert the automatic put operation from one location to another:
Putaway location directives
The target location is “hardcoded” in the Location directive action Query.

Let the worker report the production order as finished: the system creates and executes put away work despite the missing license plate. One product goes ‘left’ and another goes ‘right’ from the same station fully automatically:
Automatically executed work

Conclusion

It is possible to “hard-wire“ a certain material flow between machines into the Warehouse management. Overlapping production orders remains a nuisance, because BOM lines do not exhibit a location if the warehouse is an “advanced” one. The input location of the machine is derived dynamically and the WHS module works through the reservation: the raw material must be reserved in the inbound location prior to consumption. But how do you reserve a material if it did not exist as you started the downstream production order?! The orders may be chained by the “Pegged supply” or automatically “re-released to warehouse” every X minutes.


Electronic reporting for data migration

Electronic reporting for data migration

Intro

There are still dozens of important tables in Dynamics 365 for Finance and SCM not exposed by any entity. Sometimes simple solutions like my Copy-paste with a keyboard script from Excel don’t work due to the volume or complexity of the data, and sometimes there is no UI at all.

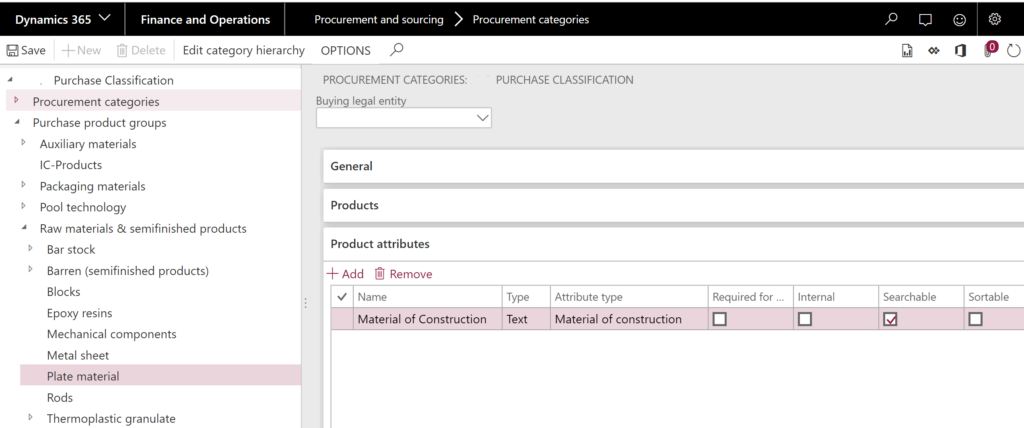
One of the notorious examples is the table EcoResCatalogControl which is associated with product attributes bound to procurement categories, see the Searchable flag in my blog Searchable product attributes. An import of these “Product category attributes” through the entity EcoResProductCategoryAttributeEntity leaves the attributes dysfunctional: the internal table EcoResCategoryAttributeLookup is left out of sync and the new attributes remain invisible in the product master.
Procurement category attributes
The only form where the EcoResCatalogControl is editable and visible is the Procurement category form, but an attempt to update the flag fails with a “Missing reference” error: the system expects a EcoResCatalogControl record to exist already. Dead end.

Electronic reporting: the last resort

Since the table browser is not an option anymore in a sandbox or production environment, the number of tools available to the consultant reduces to just one: Electronic reporting. Despite the name, the Electronic reporting module is able not only to read, but also freely insert, update or delete voluntary tables in D365FO.
In essence, the idea is to make a CSV text file and import it into the EcoResCatalogControl with the help of the Electronic reporting (ER).

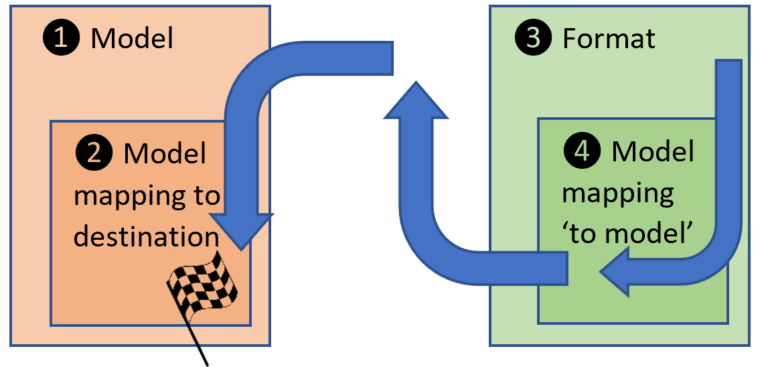
This requires a so-called Mapping to destination where the “destination” is one or many tables or entities in D365FO. The concept is nicely outlined in the blog of Mr. Ties Philippi. In total, 4 “components” are required in at least 2 ER configurations (the Mapping to destination may in theory be detached into a separate – third – configuration).

  1. Model
  2. Model mapping “To destination”
  3. [CSV file] Format
  4. Model mapping [from format] ”To model”

ER configuration and component diagram
The execution flows in the order (3) -> (4) -> (1) -> (2).
The 2 configurations I used can be downloaded here.

First, create a model, for the simplification its structure may follow exactly the table.

Next, create a mapping with the Direction = To destination. Add the target table to the right with the button Destination, then bind the model from the left to the table at the right side of the Model mapping designer. Change the status of the configuration to Complete.

Next, create a format configuration based on the model. It should describe the CSV file structure, namely a set of records (Lines) separated by CRLF, with 2 fields in every line, separated by the semicolon “;” (in a German version of the Excel; in an English version the comma “,” is more appropriate). The encoding of the CSV format should better be UTF-8 (Excel is able to produce UTF-8 encoded files).

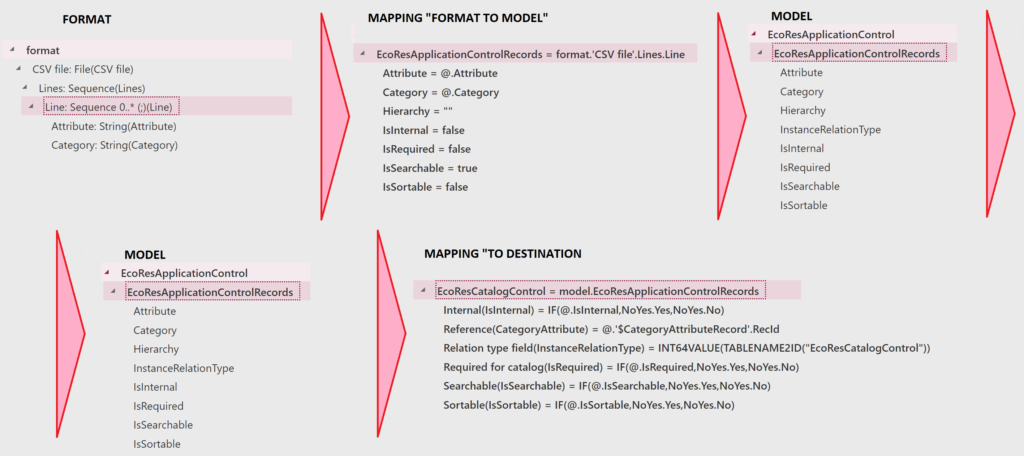
Do not bind the format to the model, but use the button Map format to model to create a mapping of the same name. Bind the format to the model as shown on the screenshot below. The button Run can be used to test the mapping ad hoc: it takes a CSV file, interprets it according to the format definition, translates to the model internal container and exports this container to an XML file.
ER components and mappings

Once tested, update the format status to Completed. Make note that the import is started from the artefact (2) Model mapping to destination (with the button Run). The system looks for a format based on the model the mapping belongs to, and inside of that format it looks for a “To model” mapping.
Run Mapping to destination
Having found an appropriate format, the system asks for a CSV file and unleashes the import, there is no way back.

Update route

Added on 31.01.2020
Electronic reporting destination mappings can also be used to launch X++ code. If you have ever worked with production routes, you may have noted the Update route button. The class behind is called RouteUpdate and it is executed by the system automatically from the UI on any change in the order of operations. On plain production routes, it updates the Next operation numbers, and multiplies the variable scrap percentages to cache and store accumulated scrap factors. The problem is, this class cannot be run over all routes in the batch mode; in the Route headers entity they forgot to use it. Opening every single route out of thousands imported is obviously not an option.

I took the same CSV file and created a new destination mapping which updates the RouteTable. One column in the CSV file (Attribute) contains the key RouteId, the other (Category) bears the route name. I am updating the name by the key, but in the middle I am injecting the following code
RouteSearch.newRouteId(@.Attribute).routeId
like this
LEFT(RouteSearch.newRouteId(@.Attribute).routeId,0)&@.Category
It instantiates and executes the RouteSearch class which as a by-product calls RouteUpdate in its constructor method, then gives a routeId() value back which I neglect. Thousands of routes are updated blazing fast, and the Next operation and the Accumulated scrap is set everywhere:

The ER configuration can be downloaded here: RouteUpdateMapping.zip.

Open project milestones

Added on 16.04.2020
Finally, I have designed a data model and mappings for the fixed fee project On-account transactions aka Billing milestones. The configuration may take a project TransId from the CSV file, or it may create its own from the standard number sequence in the Project module parameters. Both the related tables ProjOnAccTrans + ProjOnAccTransSale are generated.
Project on-account transactions
The ER configuration can be downloaded here: ProjOnAccTransModel.zip
Fun fact: a DMF entity for this existed in AX2012, but not D365.

Epilogue

The above crude trick works, but it is dangerous. Fixing a broken import might be a challenge, because to delete the data and start all over you need to change the destination Record action to Delete and then hope to find the right record by the primary key from the CSV file.

I would love to use standard entities, and make Microsoft add them to the application. Please vote for my 2 “favourites”: