Electronic Reporting (ER) Cookbook 4: References in a model

Electronic Reporting (ER) Cookbook 4: References in a model

The “Item reference” in Dynamics 365 Electronic Reporting models has been an elusive concept for me for quite a long time. A reference creates a kind of a cross-link between the ER model parts, but what for? Now I think I have figured out some important use cases:

  • Re-use structures and record list definitions within the model, especially for UNIONs
  • Map the same model in different ways and export similarly structured files from different sources

References to facilitate LISTJOINs

The LISTJOIN ER function is an analogue to the SQL UNION. It combines heterogenous record lists into one list of a common type. For example, a LISTJOIN(model.PurchaseLines, model.SalesLines) creates a typed single record list with their common fields: Product no, Quantity, Delivery date, Warehouse etc. However, for the LISTJOIN to recognize the common fields, the fields must be aligned, i.e. follow in exactly the same order, bear exactly the same names.

Here is where the references come into play. One can organize a “Dictionary” root entry in the model, define the most elementary composite entries there, then click the Switch item reference button elsewhere and include this small “brick” into a larger record. From the small bricks one may build larger bricks and so on. Such cross references are indicated by the asterisk (*):
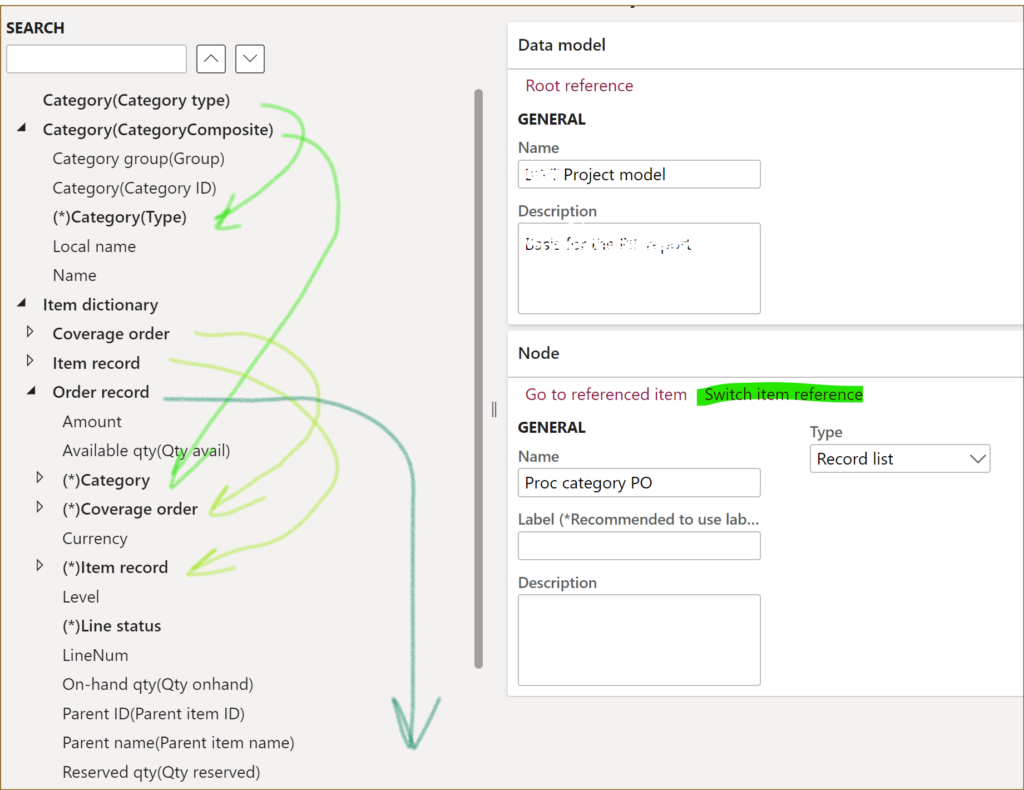
In the above example, an Order record includes the CategoryComposite, Coverage order, Item order nested 1:1 records, and uses fields of the Category type and Line status enumerations. The resulting common Order record type is further assigned to the Sales and Purchase record lists, and this makes their structure in the model identical. The LISTJOIN() then produces a list of records with the following fields:

@.Amount
@.’Qty avail’
@.Category.Group
@.Category.’Category ID’

and so on.
By the way, the root node Item dictionary here is a Container. A Container is used simply to put together diverse artefacts, a way to make the model definition more readable.

References to apply different mappings to the same model

Imagine you need to export sales order lines and purchase order lines into 2 different files, similar in structure. You need a model to abstractly describe a generic Order line list, then a Sales line format export definition, a Purch line format definition both preferrably derived from a common Order line format, and 2 mappings: Sales line to model and Purch line to model to populate the Order line list model from 2 different data sources in Dynamics 365.

Try to run the Sales line format file. It is going to start complaining about 2 models present: “More than one model mapping exists. Set one of the configurations as default.” You set the Sales line to model as Default for model mapping = Yes and the export starts working.
No try to run the Purch line format. It is going to export sales order lines in the purchase order line format, because a link between the format and the outbound mapping is through the model node they use:

Format → Model [node] → [default] Model mapping

To fix this, the 2 formats should be mapped to different nodes in the model!

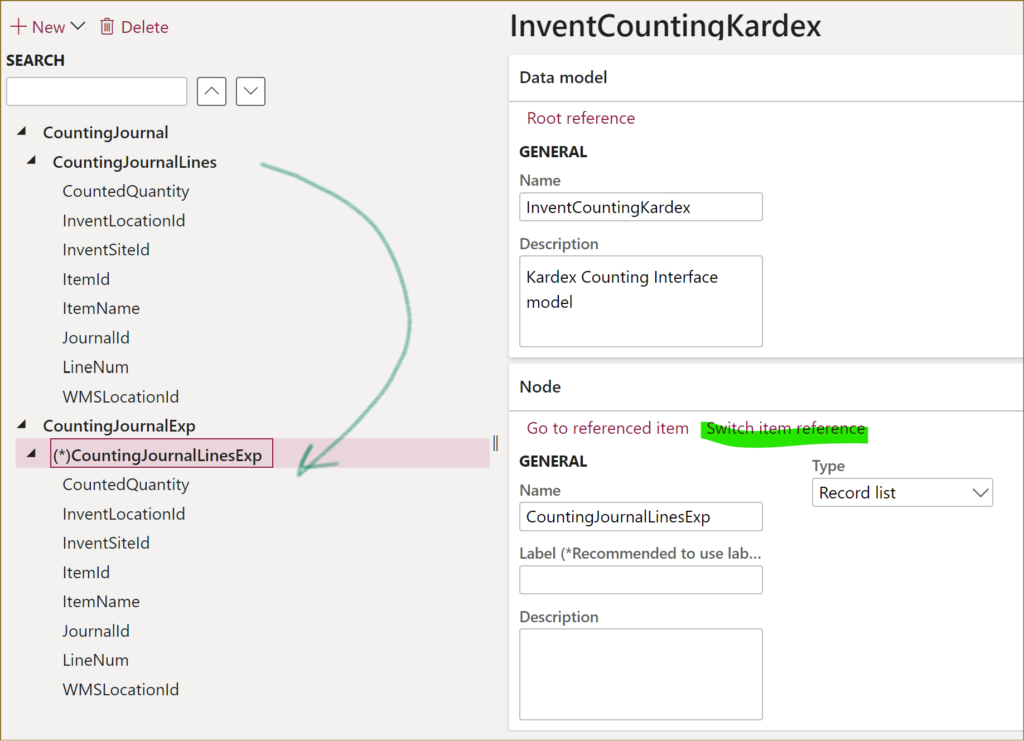
I’ve got a similar issue when I was trying to use the same model both for the export and for the import of data. There was a Counting journal model and 2 formats: Export to Kardex and Import from Kardex. There was a Counting model mapping for the export and a Counting model to destination mapping for the import.

Tried to run the export Export to Kardex and it asked to “Set one of the configurations as default“, which I did.
Then I tried to run the Counting model to destination mapping but it was not prompting any files for the upload, because a link between the inbound mapping to the import format was established through the model and it was pointing to the export format:

Model mapping to destination → Model [node] → Format

The trick is to use different nodes! The import format should write the data from the inbound file into one Record list in the model, while the export format should read data from another Record list in the model. The mappings then bind the same table to the one node and another, respectively. To reuse the data types and the structure, one node references the other (Switch item reference).

D365: Import Mastercard CDF3 statements OOTB

Introduction

It has been 5 years since I first described how to import credit card statements into Dynamics AX2012 Expense management module with zero customizations and zero middleware.

The technology has changed a lot, the transport is now not through the AIF but the [unattended] bulk upload of packages aka Recurring integration or just through ODATA and the entity TrvCreditCardTransactionEntity.

The principle remained the same: a text file in a proprietary format is converted into an intermediary XML, it passes an XSL transformation pipeline to get mapped to the canonical Dynamics schema, becomes interpreted and uploaded into the TrvPBSMaindata staging table via the TrvCteditCardTransactionEntity. The transactions are pre-processed by the D365 entity and automatically assigned to the respective employees by the credit card number. They are picked up by the employee herself/himself and included into an expense report in a self-service manner.

XSL transformation: key facts and considerations

In that old blog of mine the tedious VISA format was tackled; this time we will explore the Mastercard Common Data Format 3, the simplest of them all: the input file is in an XML one, and to feed it to Dynamics 365 for Finance just one XSLT transformation suffices in the pipeline: XML -> XML, no need for a CDATA envelope.
CDF3 to D365 conversion
The D365 schema has been simplified a lot: within the 1
envelope there are 1..N records. I described the mandatory fields in the entity and the interaction between the 3 different amounts in [potentially] 3 different currencies in another blog of mine: https://erconsult.eu/blog/credit-card-currency-1/.

The other important aspects to consider are:

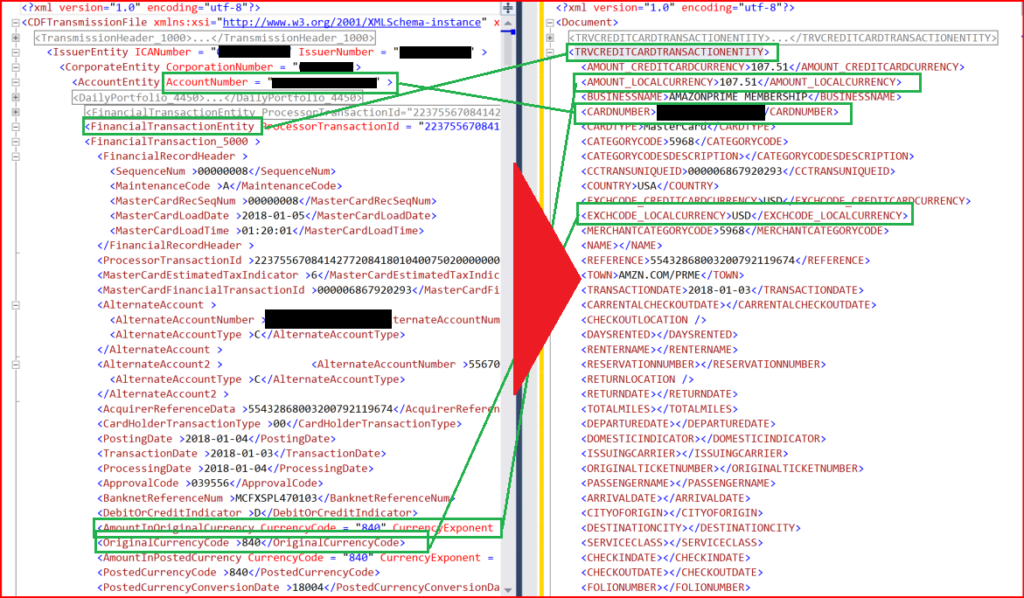
  • We are looking for CDFTransmissionFile/IssuerEntity/CorporateEntity/AccountEntity/FinancialTransactionEntity nodes and converting them into TRVCREDITCARDTRANSACTIONENTITY records.
  • The essential credit card number which is needed to establish a connection to the employee is taken from the CDFTransmissionFile/IssuerEntity/CorporateEntity/AccountEntity node, its @AccountNumber attribute.
  • D365 only stores credit card hash numbers and the last 4 digits of the credit card number; in addition, the credit card number is “salted” with the Credit card type. In the XSLT this is hardcoded, it is case sensitive and MUST match the Credit card type configured in Dynamics 365 and specified in the employee records:
    Mastercard
  • The numerical format in CDF3 it weird: monetary values are represented with integer numbers with an exp10(x) exponent; there is an embedded function monetaryNodeToFloat in the XSLT file to reformat them into the XML decimal data type;
    moreover, there may be foreign currency conversion charges in a separate node CDFTransmissionFile/IssuerEntity/CorporateEntity/AccountEntity/FinancialAdjustmentRecord_5900. To locate one, a 0..1 cross reference over FinancialTransaction_5000/AcquirerReferenceData is required.
  • To match a proper D365 expense category, the /CardAcceptor_5001/CardAcceptorBusinessCode data is used. Mastercard leverages the full https://en.wikipedia.org/wiki/Standard_Industrial_Classification list with up to 9999 branches down to single airlines and hotel chains; this is quite an overkill for D365. I prepared an abridged list with ~1000 most useful numbers, mapped to the standard Contoso USMF expense categories: “Travel”, “Flights”, “Car Rental”, “Hotel”, “Meal”.
    Here is a Data management package for a quick import: Credit_card_category_codes_Mastercard.zip
  • Mastercard may impose some generic charges such as late payment charges, annual fees, etc. They are present in a different set of nodes but affect the CC statement balance all the same: CDFTransmissionFile/IssuerEntity/CorporateEntity/AccountEntity /FinancialAdjustmentRecord_5900.

Step by step instructions

  1. Get your hands on a sample CDF3 file! How about this one: GNU3571A_3.xml ?
  2. Navigate to Expense management > Setup > Calculations and codes > Credit card types and add a Card type = Mastercard.
  3. Check the Expense management > Setup > General > Expense management parameters: Enter employee credit card number must be set to Hash card numbers (store last 4 digits).
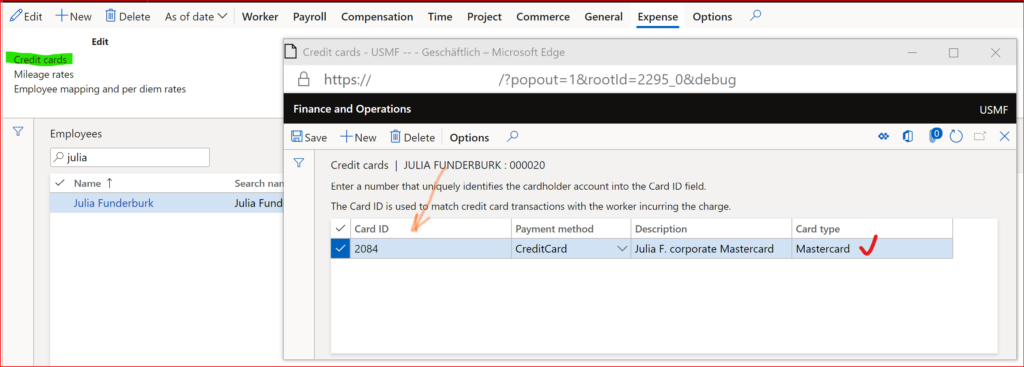
  4. Extract a credit card number from the file, go to Human resources > Workers > Employees, select e.g. the enigmatic Julia Funderburk and click Expense / Credit cards.
  5. These are the so-called employee payment methods: one employee may possess several cards; the Payment method controls who is charged – the company or the employee – and how the employee is reimbursed. Choose Card type = Mastercard, Card ID = 16-digit credit card number. On saving the record the system keeps the last 4 digits and stores a hash value for comparison.
  6. Go to the Data management workspace, create a new import Data project, upload Credit_card_category_codes_Mastercard.zip package with the Credit card category codes.
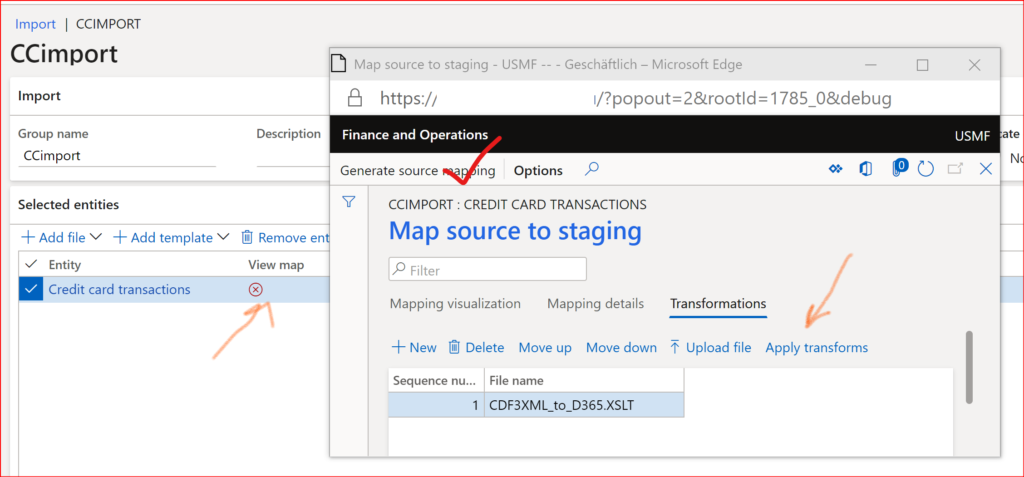
  7. The Import transactions button on the Expense management > Periodic tasks > Credit card transactions form is dysfunctional in the modern D365 versions. We have to make a tailored Data project: on the Data management workspace, create a new import Data project, Add file = your sample file, Entity name = Credit card transactions, Source data format = XML-Element, Skip staging = No. The mapping is not going to work at the first try (“Node with ‘TrvCreditCardTransactionEntity’ could not be found in the source…”), as it cannot interpret the native CDF3 schema.
  8. Click on the View map error symbol, go to Transformations, New, upload the XSLT file: CDF3XML_to_D365.xslt
  9. Click Apply transforms, then Generate source mapping; it will try to interpret the previous sample file again, this time after the XSLT pre-processing.
  10. Once the mapping between the transformed file and the D365 staging table has been established, close the mapping, drill down into the Credit card transactions entity name, open Entity structure and turn off Run business validations: this will let the system upload credit card transactions with a failing employee matching.
  11. In the mapping, set an Auto default value for the PAYMENTMETHOD = the Payment method “CreditCard” you created before, as the import procedure is not going to take it from Employee-CC mapping (see #4 above) for whatever reason the developers had.
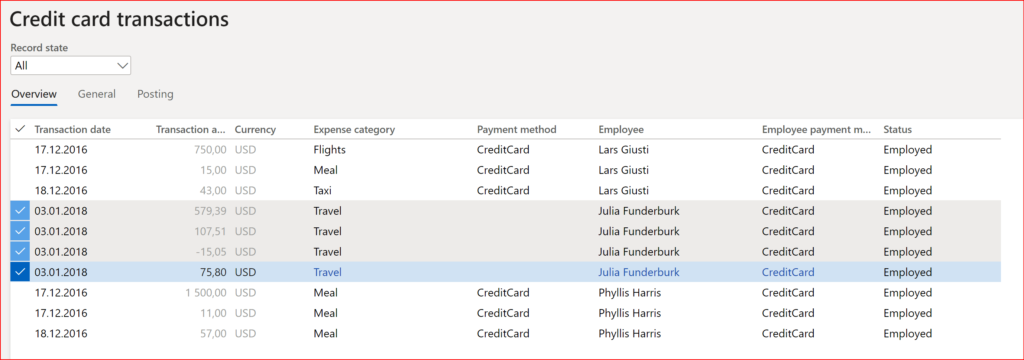
  12. Start the import. After a few attempts – try and error, try and error – you should get the records imported. Check Expense management > Periodic tasks > Credit card transactions. The Payment method is going to be empty, this seems to be a bug; if necessary, select Record state = Error and manually amend the employee, expense category, payment method for those transactions where the matching by the credit card number and/or the merchant code has failed.
  13. Impersonated as Julia, go to Expense management > My expenses > Expense reports, create a new expense report, and click Add unattached expenses.
  14. Mark the CC statement lines to add, and confirm. The lines are added to the current expense report for further processing (check the blog for more details what is editable by the employee and what it not). On the Credit card transactions screen, the lines migrate to the Records state = All list.

To automate the above steps, convert the import project into a recurring data job. Use Tomek’s Recurring Integrations Scheduler or any other middleware of your liking to periodically grab local data files and push them through the Recurring integration API.

Subcontracting with Warehouse management – Part 2

Subcontracting with Warehouse management – Part 2

Following up the 1st part of this blog series, let’s elaborate on the standard model of subcontracting promoted by Microsoft
https://docs.microsoft.com/en-us/dynamics365/unified-operations/supply-chain/production-control/manage-subcontract-work-production

Option 2: Subcontracting via Production order

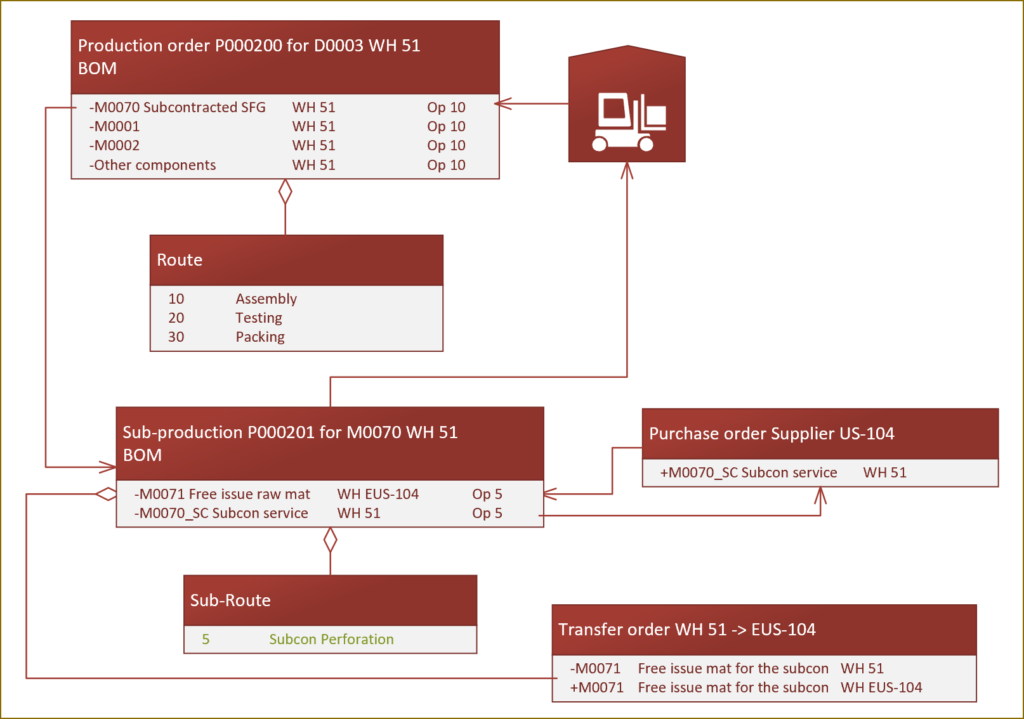
The semi-finished product (here: M0070) has a BOM of its own. It includes all materials but also a service item (M0070_SC) for the value added by the subcontractor.

The service item drives the purchasing process with the subcontractor, is carries the purchase price of the service. We open a purchase order for a service, and provide components to the subcontractor which are either sent to the supplier from the main warehouse or procured directly to the supplier’s site. On the PO delivery note posting, the semi-finished product is received as an output of a sub-production order, it is then brought (“put away”) to the main warehouse, where it is picked for the master production order as a regular component.

The product structure transforms to a 2-level BOM:

Note that this time the service and the free issue material items belong to the same operation 5 which resides on an own route.

The standard process includes the following steps:

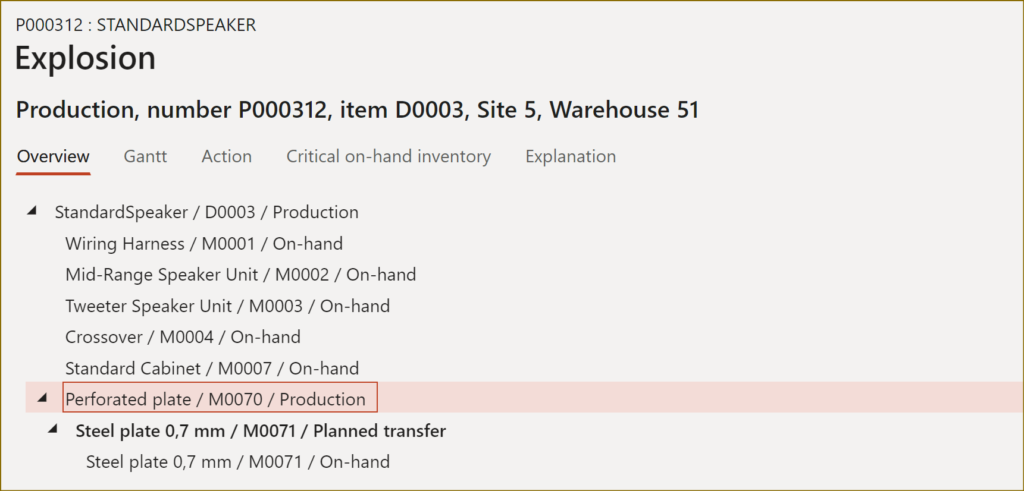
  1. The main order and the subcontracting order are either converted (firmed) from planned production orders, or the main order for D0003 is entered manually, then the estimation spawns the sub-production order automatically due to the type Vendor of the M0070 BOM line. The MRP explosion shows the following picture:
  2. With the firming/estimation of the sub-production order a purchase order for the service item M0070_SC is automatically generated by the system
  3. The purchase order is confirmed by the procurement department.
  4. The sub-production order is started from the screen Production / Subcontracted work. No materials or time may be consumed before this point.
  5. The transfer order for the free issue materials is released to the warehouse (it may be the same person who created and started the production order).
  6. The warehouse workers execute the picking work, confirm the TO shipment.
  7. The transfer order is getting shipped and received.

After a while the semi-finished product arrives at our doorstep. It is time to ‘receive’ the service. In standard Dynamics 365, this is not performed at a mobile scanner. Instead, a delivery note is posted against the purchase order. Thanks to the configuration described in first blog, this leads to an automatic consumption of the BOM and the route of the sub-production order. The system automatically:

– consumes both the materials delivered for free (M0071) and the service item M0070_SC itself,

– reports the route good quantity = purchase order quantity my means of a Route card journal, the same journal…

– …derives and posts a Report as finished journal which writes the semi-finished product in the stock ledger.

Normally, the last step – posting a RaF journal – is going to fail, because the license plate (SSCC pallet ID) is missing. To circumvent this, the special output location of the resource RECV-SUB can be given a “non-LP-controlled” location profile and assigned a “No putaway” work policy. This technique is described in detail in another blog of mine.

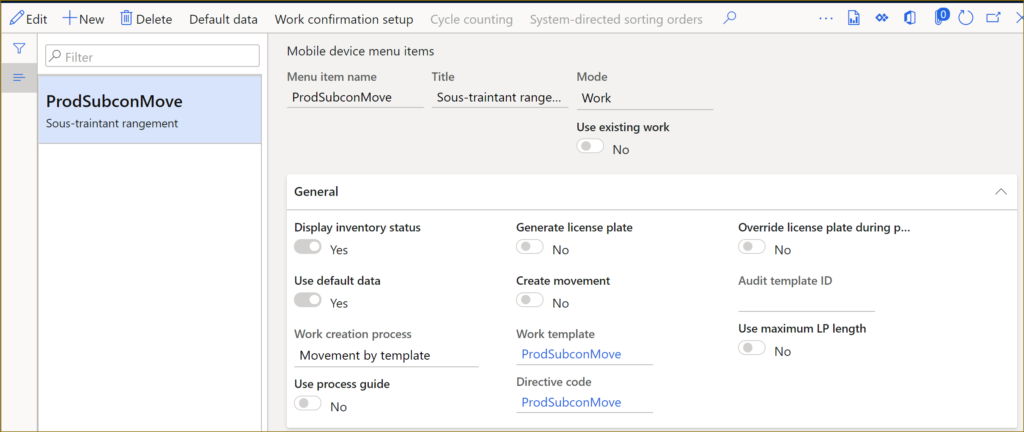
As a result, the received quantity of M0070 appears at the location 51/RECV-SUB with no license plate known and no production put-away work generated. A ‘fake’ put-away work may be triggered by the user with a special Movement by template menu item on the mobile device. The ‘from’ location in this menu item is pre-selected to RECV-SUB via the Default data setting of the menu item:

This menu item should be given a specific Directive code; a set of Location directives of the Inventory movement kind would react to this directive code and simulate the ‘put’ logic of a purchase order. The license plate number is scanned by the user during the movement. As a result of this movement, the pallet will land where it was supposed to be if we received the M0070 item from a purchase order (Option 1).

Now, the problem is that the step “Post purchase order delivery note” is not automated. Somebody needs to recognize the subcontracted PO as such, put aside the mobile device, open the rich Dynamics 365 interface and capture the quantity. In essence, this is an annoying deviation from the standard PO receipt process, a source of human error.

The suggested disruptive solution is a…

Warehouse-enabled service item

Astonishingly, it works: a service may be received on a license plate (pallet) in D365.

The stocked service item (Item model group -> Stocked product = Yes) should be given a WHS-enabled Storage dimension group with Use warehouse management process = Yes. Such an item participates in the master planning as long as it is assigned a Vendor-type BOM line, it does not have any on-hand stock at any given point in time, but it does record inventory transactions with all 5 mandatory WHS dimensions: Site, Warehouse, Location, Inventory status, License plate.

Provide the service item with the same unit, unit conversion factors, Unit sequence group, Reservation hierarchy as the subcontracted product it represents (here: M0070). Do not try to set the external supplier ID to the item number of M0070: the user would need to scan the real item ID (M0070_SC) at the baydoor.
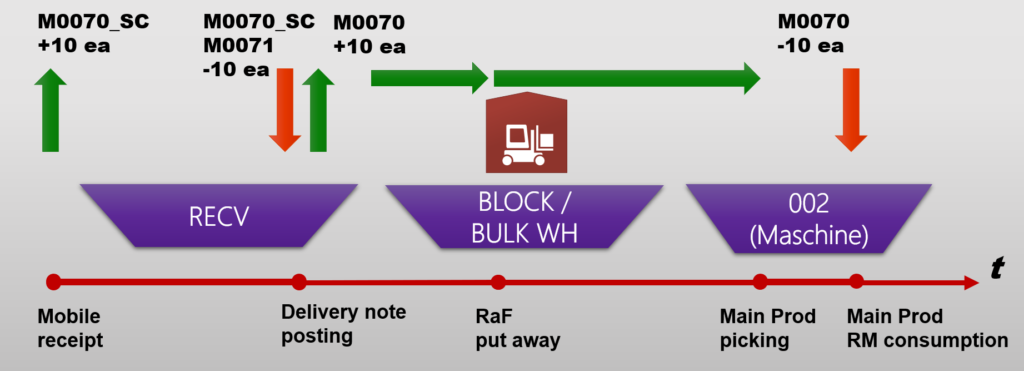
Set the Output location of the subcontractor resource SUB_US-104 to the regular, LP-controlled location RECV. Here is what is going to happen on a timeline:

In practice, the consumption of M0070_SC in the below example will happen at the location 005 (the default WH production input location):
51/RECV +10 ea M0070_SC
51/005 -10 ea M0070_SC
This works even without the negative stock option set, because there is no such a thing as a service stock level: it is neither maintained nor controlled by the system. The location stock imbalance is not a problem for the inventory settlement and closing, because the location dimension is never a ‘financial’ one: the overall stock level at the warehouse level is zero, the (+) and (-) transactions will be settled and will mutually annihilate.

Subsequently, at the start of the sub-production order to the warehouse the system is going to say “The total quantity for production BOM XXXXXX could not be fulfilled. No work was created for wave USMF-YYYYYYYYY. See the work creation history log for details.”, because the item M0070_SC cannot be really picked, and this warning message can be safely ignored.

The scenario then continues as follows:

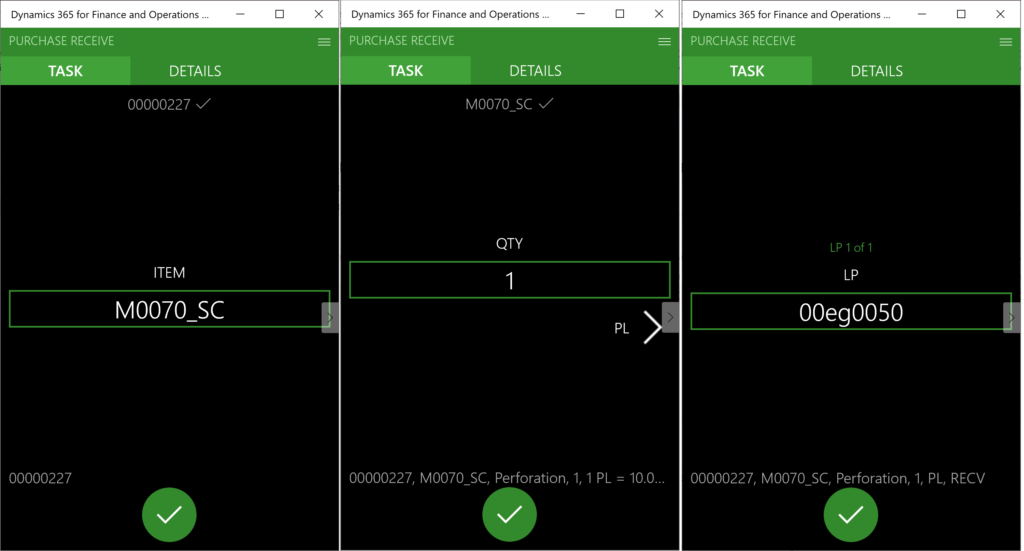
  1. The service from the purchase order is “received”, the license plate number is scanned or generated. Interestingly, the system does not build any put-away work for the item, probably because a service item cannot be reserved in any location.
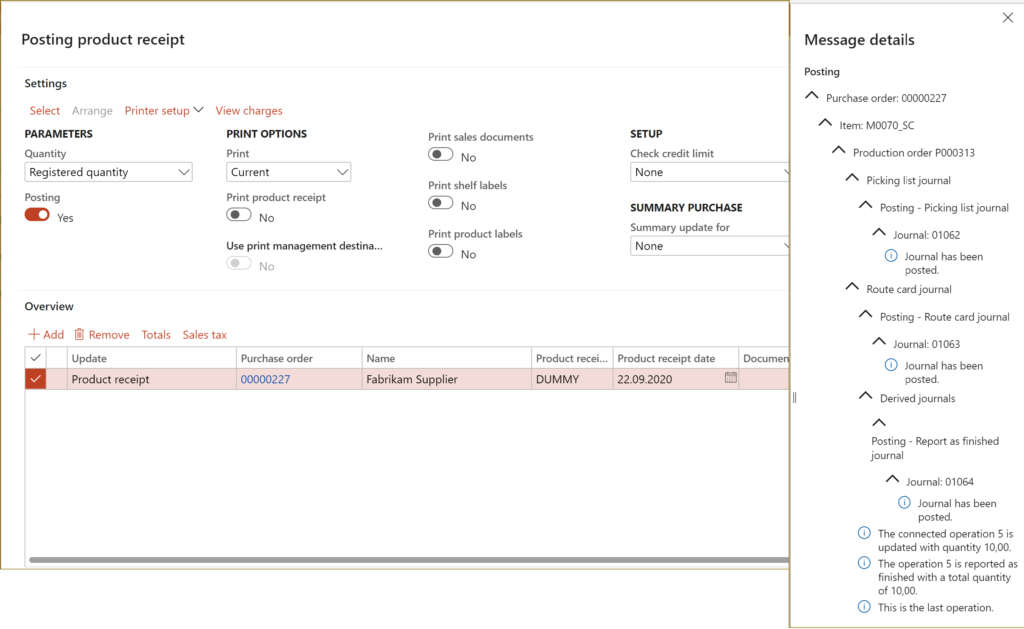
  2. The delivery note (en-us: packing slip) posting should better be automated. In standard D365, this doesn’t work, because the batch mode posting requires a unique delivery note number. With a little customization this obstacle may be overcome by feeding the system with a fake delivery note number “DUMMY”. With the posting running in the batch mode and automatically updating every 2 minutes any purchase order with some quantity in the status Registered, this step may be fully automated:
  3. In standard D365 FO, the automatic posting of the picking list journal is going to fail because of the missing location (the Location dimension in the BOM of any WHS-enabled item is always empty, because it awaits a production order release to reserve at the location level according to the location directives, but a service cannot be reserved by definition), and the automatic posting of the Report as finished journals is going to ask for a license plate ID due to the LP-controlled location RECV. 2 little customizations outlined in the next chapter help: the service Licence plate ID propagates the production order and generates the RaF put-away work.
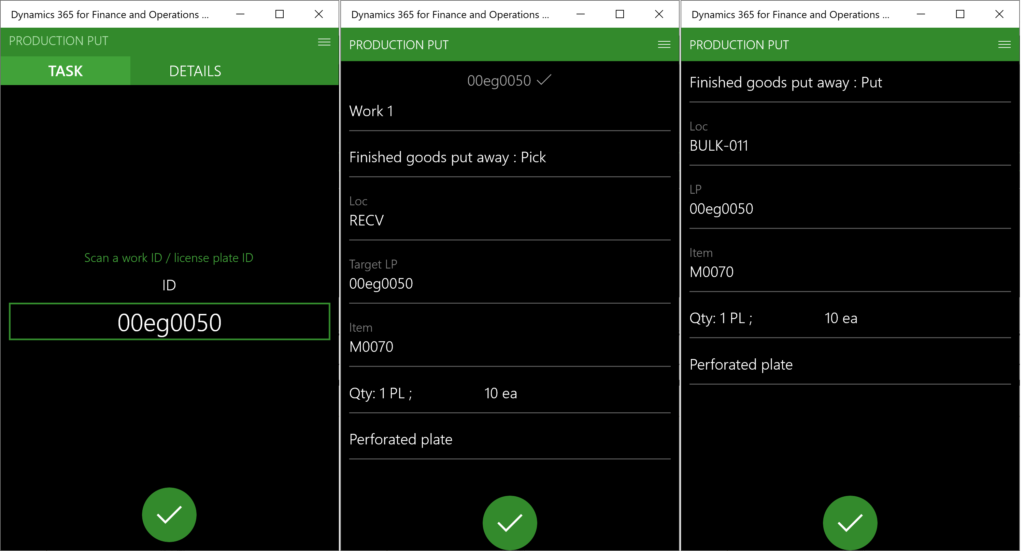
  4. The RaF put away location directives should be configured in exactly the same manner as the purchase order put-away locations. They can react to the M0070 item number or sense any other attribute of the sub-production order, such as a specific pool or a presence of a Vendor operation on the joined production route.The put-away work should be processed at the mobile device. A Print work line may be added to the Work template to print or re-print the pallet label which now has the proper Item ID: M0070 instead of the M0070_SC (beware that the Zebra ZPL printing language cannot carve a substring out of the printing stream or perform any other string manipulations).
  5. The semi-finished product is now placed in the main warehouse and the main production order may be reserved and released to the warehouse. A picking work for the subcontracted SFG is created.
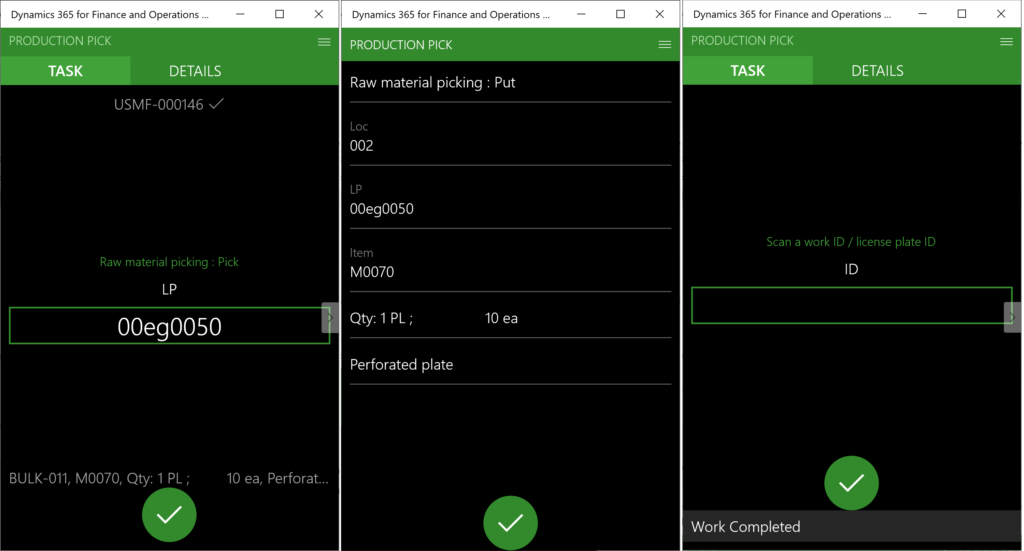
  6. The picking work is performed at the mobile scanner:
  7. The main production order may be stated and the materials may be consumed with a Picking list in any eligible way.

ProdBOM table customization

The above scenario needs a little extension of the ProdBOM table:
– the location of the service may not remain empty. The method setInventDimId() has been extended to populate any WHS-enables service BOM line with the Default production input location of the warehouse. The location does not need to match the inbound location for the reasons described above.

– the license plate number of the service received with the purchase order should propagate the marked subcontracted production order. The method postVendorProdRoute() has been extended to write the service LP number right into the production order inventory dimensions. Obviously, this allows for the receipt of 1 pallet at a time, and updates the production order with the most recent license plate.

This does not contradict the current system logic though, as partial receipts can anyways only be enabled by an undocumented feature ProdJournalPostVendorProdBOMInOrderFeature:
This feature enables partial receipt of subcontracted items. Before, when reporting a partial quantity on a purchase order for a sub contracted service item, the full quantity was updated on the related picking list journal on the production order. Now, the correct partial received quantity is updated. This feature also fixes an issue with an incorrect updated scrap quantity when using BOM lines of type Vendor.

The source code can be downloaded here: ProdBOMLine_SubcontractingLicensePlate.axpp
Feel free to use, but I do not give any guarantees 😉

Conclusion, pros and contras

2 options have been presented:

Subcontracting via Purchase order

  • + A lightweight implementation can be easily adopted by the logistics department.
  • + It does not require any customizations.
  • – The raw material transfer to the subcontractor may be scheduled too late if we maintain the subcontracting lead time at the route operation level.
  • – The cost price of the semi-finished product only includes the cost of the subcontracting service, but not the materials. The standard price model will always show deviations.
  • – The free issue raw materials are only consumed at the next operation. On long-running orders this distorts the WIP value.

Subcontracting via Production order

  • – The solution contains too many moving parts: the sub-production order must be in the Started status, all raw material levels at the external warehouse must be exact.
  • – The segregation of duties between the procurement, logistics, warehouse and production departments is broken.
  • – Such a ‘deviant’ process is not easily adopted by the warehouse people: they must know when to use the normal purchase put-away menu items and when to leverage the production put-away menu.
  • – Comfortable work is not possible without the above production BOM and purchase delivery note auto-posting customizations
  • + The cost price of the semi-finished product is correct at all times.

Choose for yourself, but the CFO may let you reconsider 😉

There is a video recording in German explaining fine aspects of the 2 scenarios.